
Are you tired of spending hours trying to achieve those perfect curls, only to be left with a frizzy mess? You’re not alone.
Many people struggle to master the art of curling their hair, often ending up frustrated with less-than-stellar results. But what if there was a simple tool that could transform your curling routine and leave you with flawless, salon-quality curls every time?
Enter the clamp curling iron, a game-changer in the world of hairstyling. Imagine waking up, knowing that you have the secret weapon to effortlessly create those luscious, bouncy curls you’ve always dreamed of. The clamp curling iron is not just another styling tool; it’s your ticket to achieving stunning curls without the hassle. This guide will walk you through everything you need to know about using a clamp curling iron, from the basics to pro tips that will elevate your curling game. Get ready to unlock the secrets of this amazing tool and say goodbye to bad hair days forever. Whether you’re a beginner or a seasoned pro, this guide is tailored to help you master the art of curling, ensuring you step out with confidence and style. So, are you ready to transform your hair routine and embrace a world of endless styling possibilities? Keep reading to discover how to use a clamp curling iron like a pro!
Choosing The Right Curling Iron
Choosing the perfect curling iron involves understanding its features. A clamp curling iron offers control for creating defined curls. Simply position the hair between the clamp and barrel, then gently rotate.
Choosing the right curling iron can change your hair styling game. The ideal tool can create beautiful curls with ease. But how do you find the right one? Consider a few important factors. Below are some key points to guide you.
Barrel Size Options
Barrel size greatly affects your curl style. A smaller barrel creates tight curls. Larger barrels give loose, beachy waves. Common sizes range from 0.5 to 2 inches. Select the size based on your desired look.
Material Considerations
The material of the curling iron is crucial. Ceramic is popular for even heat distribution. It reduces damage to your hair. Titanium heats up fast and holds heat longer. Tourmaline is great for reducing frizz. Choose a material that suits your hair type.
Temperature Settings
Temperature settings are vital for healthy styling. Fine hair needs lower heat. Thick or coarse hair may need higher temperatures. A curling iron with adjustable settings is best. This ensures you can choose the right heat for your hair.

Credit: greensafaris.com
Preparing Your Hair
Start by ensuring your hair is clean and dry for better results. Section your hair and gently comb through to remove tangles. Adjust the curling iron temperature to suit your hair type. Clamp a small section of hair and twist the iron away from your face.
Hold for a few seconds, then release for perfect curls.
Preparing your hair is the essential first step to achieving those perfect curls with a clamp curling iron. You might wonder why this step is so crucial. The truth is, how you prep your hair can make or break your styling results. Just like painting, you need a smooth, clean canvas for the best outcome. So, let’s dive into how you can prepare your hair for curling like a pro.
Washing And Drying
Start with clean hair. Dirt and oils can weigh your hair down, making it harder to curl. Use your favorite shampoo and conditioner to wash your hair thoroughly. Dry your hair completely. Damp hair doesn’t curl well, and using a curling iron on wet hair can damage it. Use a towel to absorb excess moisture and finish off with a hair dryer for best results.
Applying Heat Protectant
Heat can be harsh on your hair, leading to damage over time. A heat protectant is your best friend here. It acts as a barrier, reducing heat damage and keeping your hair healthy. Choose a spray or serum that suits your hair type. Apply it evenly throughout your hair. Don’t skip this step; it’s a small effort for a big payoff.
Detangling And Sectioning
Knots and tangles can disrupt your curling process. Use a wide-toothed comb to gently detangle your hair. Start from the tips and work your way up to avoid breakage. Once detangled, section your hair. This makes curling more manageable and ensures even curls. Depending on your hair thickness, you can divide it into 4-6 sections. Use clips to keep sections secure and ready for styling. — Taking these preparatory steps can elevate your curling game. Have you ever tried curling without prep and ended up with a tangled mess? It’s frustrating, right? Preparing your hair properly not only saves time but also ensures that your curls last longer and look fabulous. So, how do you plan to prep your hair for your next curling session?
Mastering The Technique
Mastering the technique of using a clamp curling iron can enhance your hairstyling skills. With practice, you can achieve salon-like curls at home. Understanding the basics is key for stunning results. Let’s explore the essential steps to become proficient with your curling iron.
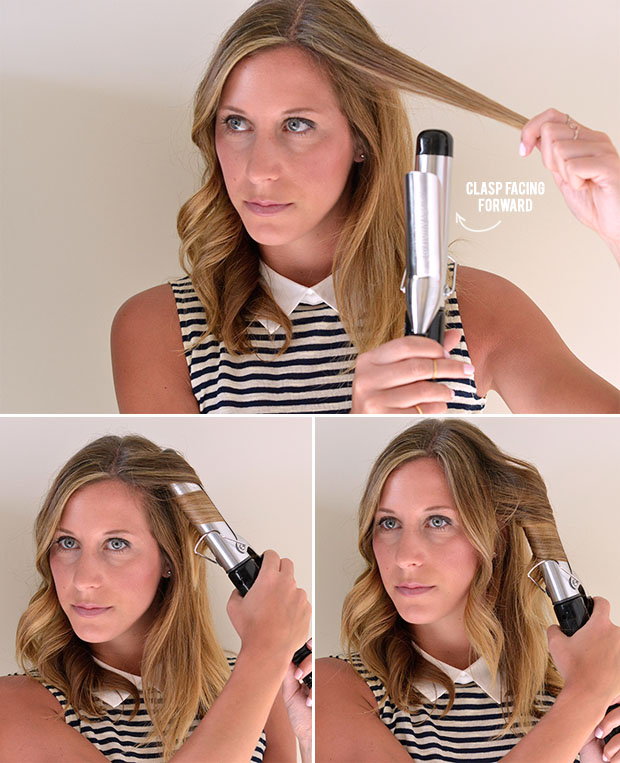
Holding The Curling Iron
Grip the curling iron with your dominant hand firmly. Ensure the clamp faces outwards. This position offers control and precision. Maintaining a steady grip is crucial for safety. Adjust the tension on the clamp carefully. Avoid gripping too tightly to prevent damage.
Curling Away From The Face
Wrap hair sections away from the face. This technique creates a natural look. Start from the roots and move towards the ends. Keep the curling iron vertical for best results. This angle prevents accidental burns and ensures uniform curls.
Creating Uniform Curls
Divide your hair into equal sections. Consistent sizing leads to uniform curls. Use clips to separate each section. Work methodically from the bottom layers upwards. Hold each curl for a few seconds for lasting effect. Release the clamp gently to avoid tangles.
Adding Volume And Texture
When it comes to achieving fabulous hair, adding volume and texture is key. A clamp curling iron can be your best friend in this quest. It’s not just about creating curls—it’s about transforming your hair into a voluminous masterpiece with texture that turns heads. With a few techniques, you can elevate your hair game and get the most out of your curling iron. Let’s dive into how you can use different directions, adjust curl tightness, and incorporate hair products to make your hair pop.
Using Different Directions
Switching up the direction of your curls can make a big difference. Curling some sections towards your face and others away creates a natural, voluminous look. It’s like your hair is dancing in different directions, adding a playful texture.
Try curling the front sections away from your face to open up your features. Use alternate directions for the back for a carefree vibe. This mix not only adds volume but also makes your hairstyle look more dynamic. Have you ever noticed how hair seems fuller when it’s not all curled the same way?
Adjusting Curl Tightness
The tightness of your curls can drastically change the volume and texture. Looser curls give a soft, romantic look, while tighter ones add bounce and definition. Experiment with your clamp curling iron’s settings.
For a relaxed style, hold the iron vertically and wrap your hair loosely. Want tighter curls? Wrap your hair snugly around the barrel and hold for a few extra seconds. Adjusting curl tightness is a simple trick to diversify your hair’s texture. Which look reflects your mood today?
Incorporating Hair Products
Hair products are the secret sauce to maintaining volume and texture. Before curling, use a heat protectant spray to shield your hair. Post-curling, a light mousse or volumizing spray can boost your style.
Apply a texturizing spray to give your curls a tousled, beachy vibe. Finish with a flexible hold hairspray to keep your curls intact without stiffness. Hair products are your allies in achieving that perfect balance of volume and texture. What product will be your go-to for your next hair adventure?
Finishing Touches
Effortlessly create beautiful curls with a clamp curling iron. Start by sectioning your hair for even styling. Gently wrap each section around the barrel, ensuring it doesn’t overlap. Hold for a few seconds, then release for smooth, bouncy curls. Adjust the temperature for different hair types to achieve perfect curls every time.
Creating the perfect curl with a clamp curling iron is an art. But the magic truly happens when you add those finishing touches. These little details can elevate your look from good to great. Let’s dive into how you can set your style, use hairspray effectively, and maintain your curls throughout the day.
Setting The Style
After curling your hair, let the curls cool completely. This helps them hold their shape. If you’re in a hurry, use a blow dryer on the cool setting to speed things up. Once cooled, gently run your fingers through your curls for a soft look. Want more definition? Use a wide-tooth comb instead. Experiment with different partings or add a hair accessory to personalize your style. What unique touch can you add to make the look yours?
Using Hairspray
Choose a hairspray that suits your hair type and desired hold. Light holds are great for a natural feel, while strong holds ensure lasting curls. Hold the can about 12 inches away from your hair. This ensures even coverage without weighing down the curls. Remember to spray in layers. Start from the bottom and work your way up. Have you ever noticed how layering hairspray makes your curls last longer?
Maintaining Curls Throughout The Day
Avoid touching your curls too often. This can lead to frizz and loss of shape. Carry a small travel-sized hairspray in your bag for touch-ups. A quick spritz can revive curls in seconds. Consider using a silk scarf or pillowcase at night. This reduces friction and keeps curls intact. How do you keep your curls fresh from morning till night? With these finishing touches, your curls can stay vibrant and stunning all day long.
Common Mistakes To Avoid
Using a clamp curling iron can be tricky for beginners. Many make common mistakes that affect hair health and styling results. Avoid these errors to achieve beautiful, bouncy curls without damage.
Overheating Hair
Excessive heat can damage your hair. It leads to dryness and split ends. Many people use the highest setting, thinking it works faster. But this can cause harm. Always choose a lower heat setting suitable for your hair type. Fine hair needs less heat compared to thick hair.
Skipping Heat Protectant
Heat protectants shield your hair from damage. Skipping this step can lead to brittle and lifeless locks. Apply a heat protectant spray or serum before styling. It creates a protective barrier, preserving hair health. Never underestimate its importance.
Using Incorrect Barrel Size
The right barrel size gives the desired curl type. A common mistake is using the wrong size. Smaller barrels create tighter curls, while larger ones offer loose waves. Choose a barrel size based on the look you want. This ensures you get the perfect curl every time.
Caring For Your Curling Iron
Caring for your curling iron ensures it lasts longer. It also helps maintain its performance. Regular maintenance is essential for best results. Follow these steps to keep your curling iron in top shape.
Regular Cleaning
Residue from hair products can build up. This affects your curling iron’s effectiveness. Clean your iron after each use. Use a damp cloth and mild cleanser. Avoid soaking the iron. Too much water can damage it. Wipe down the barrel and handle. This will keep it free from dirt.
Proper Storage
Store your curling iron in a cool, dry place. Avoid wrapping the cord tightly. This can cause damage over time. Use a heat-resistant pouch. It protects the iron from scratches. Let the iron cool before storing. This prevents burns and extends its life.
Checking For Damage
Inspect your curling iron regularly. Look for cracks or loose parts. Check the cord for fraying. Damaged cords can be dangerous. Replace them if needed. A well-maintained curling iron is safe to use. It also performs better, giving you perfect curls every time.
Credit: www.tiktok.com
Credit: advicefromatwentysomething.com
Frequently Asked Questions
How To Use A Curling Iron With Clamp For Beginners?
Begin with clean, dry hair. Clamp the curling iron near the roots, wrapping hair around the barrel. Hold for 10 seconds, then release. Use a heat protectant to prevent damage. Adjust heat settings based on hair type. Practice for even curls.
Is A Curling Iron With A Clamp Better?
A curling iron with a clamp offers more control for beginners. It helps in creating defined curls easily. Some users prefer it for its versatility and ease of use. Others may find a wand better for natural waves. Choose based on your styling needs and comfort level.
How To Use Curling Iron For Beginners?
Start with clean, dry hair. Section your hair for easier handling. Wrap a section around the curling iron, holding for 10 seconds. Release and let it cool. Repeat until all sections are curled. Finish with a hairspray for lasting hold.
How To Not Get Clamp Marks From Curling Iron?
Use a curling iron with a clamp-free design. Apply even pressure and avoid holding too long. Start curling at the roots for a natural look. Use a heat protectant spray to prevent damage. Practice makes perfect for flawless curls without marks.
Conclusion
Using a clamp curling iron can transform your hair routine. Practice makes perfect, so keep trying. Start with small sections for better control. Remember to adjust the heat settings based on your hair type. Protect your hair with a heat protectant spray before curling.
This helps maintain healthy locks. Take your time and be patient for the best results. A little effort leads to beautiful, bouncy curls. Experiment with different techniques to find your style. Enjoy the flexibility and convenience this tool offers. Happy styling!


