
Are you looking to simplify your electrical tasks? A clamp-on multimeter might just be the tool you need.
Whether you’re a seasoned electrician or a DIY enthusiast, understanding how to use this device can save you time, effort, and ensure your safety. Imagine effortlessly measuring current without the hassle of breaking circuits. Sounds convenient, right? You’ll discover the essential steps to harness the full potential of a clamp-on multimeter.
With our easy-to-follow guide, you’ll quickly learn how to make accurate readings like a pro. Keep reading to unlock the secrets of this versatile tool and elevate your electrical projects to a new level of efficiency and precision.
Choosing The Right Clamp Meter
Selecting the right clamp meter makes measuring electrical currents simple. Grasp the device around a conductor to read current flow. Ensure the meter is properly set to measure AC or DC currents for accurate results.
Choosing the right clamp meter ensures accurate and reliable electrical measurements. With many options available, selecting the right one can be daunting. Understanding the types and features helps make an informed choice. Consider your needs and the tasks you’ll perform. This guide simplifies your decision-making process.Types Of Clamp Meters
Clamp meters come in various types, each suited for specific tasks. AC clamp meters measure alternating current. These are ideal for most household electrical jobs. DC clamp meters measure direct current. They’re used in automotive and solar applications. True RMS clamp meters measure complex waveforms. They provide accurate readings in industrial settings. Choose based on the type of current you need to measure.Key Features To Consider
Key features impact a clamp meter’s effectiveness and usability. Look for a clamp meter with a wide jaw opening. This allows it to accommodate larger conductors. Ensure it has a high current range for diverse applications. Safety is crucial. Choose a meter with a high safety rating. A backlit display is helpful in dim conditions. Auto-ranging simplifies use and avoids manual adjustments. Consider a clamp meter with data hold functionality. This feature allows you to record readings easily. Durability ensures the clamp meter withstands tough conditions. Check for a sturdy build and good materials.Safety Precautions
Using a clamp on multimeter can be dangerous without proper safety measures. It’s crucial to be aware of potential hazards. This ensures your safety while handling electrical circuits. Below are key safety precautions you need to follow.
Essential Safety Gear
Always wear safety goggles to protect your eyes from sparks. Use insulated gloves to prevent electrical shocks. Ensure your clothing does not conduct electricity. Wear shoes with non-conductive soles. Use ear protection in noisy environments.
Handling Electrical Circuits Safely
Turn off power before testing circuits. Double-check connections before taking measurements. Keep hands dry to avoid electric shocks. Avoid touching live wires directly. Use the multimeter correctly to prevent accidents.
Basic Functions And Controls
Using a clamp on multimeter can be a breeze if you understand its basic functions and controls. Whether you’re troubleshooting electrical problems or conducting routine checks, mastering these essential elements will make your task efficient and accurate. Once, I found myself in a tricky situation with a faulty appliance. Understanding how to navigate the multimeter’s controls not only saved me time but also gave me confidence in handling other electrical issues. So, let’s dive into the basic functions and controls that will empower you to make the most of your clamp on multimeter.
Understanding The Display
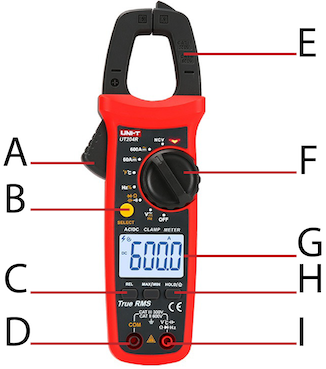
The display is your window into the multimeter’s readings. It typically shows numbers that indicate the voltage, current, or resistance. Familiarize yourself with the icons, as they can denote different modes or functions. Notice how certain symbols may appear when you switch modes. This visual feedback is crucial for ensuring you’re measuring what you intend to.
Have you ever stared at a screen, unsure of what it was telling you? Avoid that confusion by paying attention to details on the display. Some advanced models offer backlit displays for better visibility in low light conditions. This can be a game-changer during late-night electrical fixes.
Button Functions And Modes
Buttons on your multimeter are like the steering wheel of a car. They guide you through its features. Each button serves a specific purpose, such as switching between measurement types or activating additional features. Power, Hold, and Mode are commonly found buttons that you should get comfortable with.
Explore the variety of modes available. Most clamp on multimeters allow you to measure AC/DC voltage, current, and resistance. Think about how each mode can serve your current needs. For instance, if you’re checking a battery, the DC mode will be your go-to choice.
Have you ever accidentally pressed the wrong button on a device? Understanding the button layout can prevent mishaps and streamline your tasks. Practice pressing buttons deliberately and see how the multimeter responds. This hands-on approach can reveal nuances you might have missed in the manual.
Understanding these basic functions and controls will set a strong foundation for using your clamp on multimeter effectively. What other challenges have you faced when trying to decode electrical tools? Your insights could be the key to mastering this handy device.
Measuring Current
Measuring current is a critical skill when using a clamp-on multimeter. Whether you’re a seasoned electrician or a DIY enthusiast, understanding how to measure current accurately can save you time and prevent potential hazards. Picture this: you’re troubleshooting an electrical system and need to check the current flow without interrupting the circuit. That’s where a clamp-on multimeter becomes your best friend. It’s designed to help you measure current without breaking the circuit. Let’s dive into how you can effectively measure both AC and DC currents using this handy tool.
Ac Current Measurement
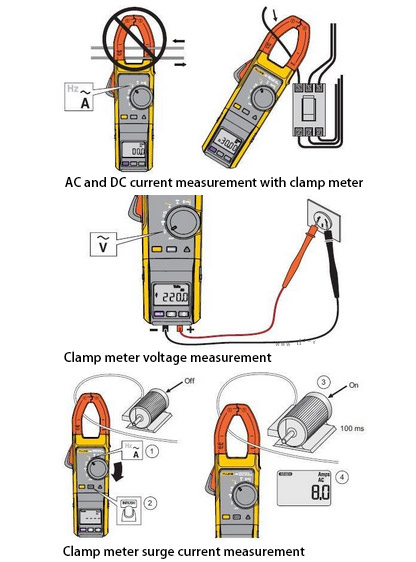
Measuring AC current is straightforward with a clamp-on multimeter. Start by setting your multimeter to the AC current setting. Ensure the jaws of the clamp are open wide enough to fit around the wire you want to measure.
Place the wire in between the jaws and close them. Make sure the wire is centered for accurate readings. Your multimeter should display the current flowing through the wire.
It’s crucial to ensure the wire is not surrounded by other wires, as this can affect the reading. Have you ever thought about how this tool can simplify your work?
Dc Current Measurement
DC current measurement with a clamp-on multimeter requires a few extra steps. Unlike AC, DC current measurement may require a special DC clamp meter as not all clamp meters can measure DC current.
If your multimeter supports DC, switch it to the DC current setting. Follow the same steps as measuring AC current: open the jaws, place the wire, and close the jaws.
DC current readings are particularly useful for automotive applications or solar panels. Imagine being able to diagnose battery issues in your car effortlessly.
Why not give it a try and see how accurately you can measure current today?
Measuring Voltage
Measuring voltage is a fundamental skill when using a clamp on multimeter. Understanding how to accurately measure both AC and DC voltage can provide valuable insights into the electrical health of your devices and systems. Whether you’re troubleshooting a pesky electrical issue at home or ensuring your car battery is functioning optimally, mastering voltage measurement with a clamp on multimeter is essential. Let’s dive into how you can confidently measure both AC and DC voltage.
Ac Voltage Measurement
Start by setting your multimeter to the AC voltage setting. This is usually indicated by a V with a tilde (~) symbol. Check your user’s manual if you’re unsure. Clamp the jaws around a single wire or conductor. Make sure no other wires are inside the clamp, as this could interfere with your reading.
Once clamped, your multimeter will display the voltage present in the wire. It’s fascinating how a simple clamp can reveal what’s happening inside a wire. Is the reading higher than expected? This could mean an overload or faulty wiring. As you measure, think about what the numbers tell you about your system’s condition.
Use the hold function to freeze the reading if needed. This is especially useful when working in tight spaces or if you need to jot down the measurement. Do you remember the first time you managed to solve an electrical issue with just a clamp and a multimeter? It can be quite empowering.
Dc Voltage Measurement
Switch your multimeter to the DC voltage setting, typically marked by a V with a straight line (-). Clamp the jaws around the conductor carrying DC current. This is usually a single wire coming from a power source like a battery.
Observe the reading on your multimeter. If it reads negative, swap the direction of the clamp. This simply means you’re measuring the voltage in the opposite direction. DC voltage is crucial for battery-powered devices, and understanding its behavior can save you from unexpected shutdowns.
Consider the implications of your DC voltage readings. Are they within the expected range? This can indicate whether your device is receiving the right power or if adjustments are needed. Have you ever noticed how a small change in voltage can drastically affect a device’s performance? It’s a reminder of the importance of precision.
By grasping the nuances of voltage measurement with a clamp on multimeter, you can troubleshoot more effectively and ensure your systems are running smoothly. Are you ready to take control of your electrical insights?
Credit: www.youtube.com
Measuring Resistance
A clamp-on multimeter measures resistance by clamping around a wire, avoiding direct contact. This tool reads resistance values without interrupting the circuit, offering a safer and faster method. Ideal for electrical troubleshooting, it simplifies the process for both professionals and beginners.
Measuring resistance with a clamp on multimeter is simple and effective. This tool helps you check the health of electrical components. You can find out if a wire is damaged or if a device is faulty. It’s a must-have skill for anyone working with electronics. You’ll gain confidence by understanding how to measure resistance.Using The Resistance Mode
First, turn on your clamp on multimeter. Locate the resistance mode on the dial. It’s usually marked by the omega symbol (Ω). Select this mode to begin measuring resistance. Ensure the device is off and disconnected from power. Safety first! Connect the test leads to the multimeter. The black lead goes into the COM port. The red lead goes into the port marked with Ω. Next, place the clamp around the wire or component. Ensure the jaws fully close around it. This ensures accurate readings. Wait for the multimeter to stabilize. The screen will show the resistance value in ohms.Interpreting Resistance Readings
Look at the reading on the multimeter’s display. A low resistance value often means a good connection. High resistance might indicate a problem, like a broken wire. Zero or near-zero resistance suggests a short circuit. Infinite resistance means an open circuit. Compare the readings with the expected values. This helps identify faults or issues. Keep a record of your readings for future reference. It’s useful for tracking changes over time. Understanding these readings helps maintain electrical systems.Advanced Measurements
Clamp on multimeters are versatile tools. They measure more than just current. With advanced features, they offer detailed insights. This helps in diagnosing electrical systems accurately. Understanding these features can enhance your measurement capabilities. Let’s explore how to use a clamp on multimeter for advanced measurements.
Measuring Frequency
Frequency measurement is crucial in AC systems. It helps ensure stable electrical supply. To measure frequency, first select the frequency setting on the multimeter. Clamp the jaws around one conductor. The reading will display the frequency in hertz. Ensure a firm grip for accurate results. This helps identify any frequency variations.
Measuring Continuity
Continuity testing checks if a circuit is complete. It detects open or broken circuits. Select the continuity mode on your multimeter. Place the probes on the circuit points. A beep indicates continuity. No sound means a break in the circuit. This feature is valuable for troubleshooting. Ensure connections are secure for accurate readings.
Credit: www.ato.com
Maintaining Your Clamp Meter
Proper maintenance ensures your clamp meter works efficiently for years. It helps in getting accurate readings and extends the device’s life. Follow these simple tips to keep your clamp meter in top shape.
Regular Cleaning Tips
Dust and dirt can affect your clamp meter’s performance. Use a soft, dry cloth to wipe it regularly. Avoid using any harsh chemicals or abrasive materials. Clean the jaws carefully to ensure precise measurements.
Inspect the device for any signs of wear or damage. Replace any worn-out parts immediately. Keeping your clamp meter clean will help maintain its accuracy.
Calibration And Storage
Regular calibration is essential for maintaining accuracy. Follow the manufacturer’s guidelines for calibration. If unsure, seek professional assistance to avoid errors.
Store your clamp meter in a cool, dry place. Use a protective case to prevent dust and damage. Avoid exposing it to extreme temperatures or humidity. Proper storage prolongs the life of your clamp meter.
Troubleshooting Common Issues
Using a clamp on multimeter can make your troubleshooting tasks a breeze, but sometimes you might face common issues that can hinder your work. Understanding these issues and knowing how to resolve them is crucial for accurate measurements and efficient diagnostics. Let’s dive into some common challenges you might encounter and how to tackle them effectively.
Inaccurate Readings
Inaccurate readings can be frustrating, especially when you’re relying on precise data for your work. One common cause is improper placement of the clamp. Ensure the clamp is positioned correctly around the conductor and avoid squeezing too tightly. This can distort the reading.
Another reason might be electrical interference. If you notice fluctuations, try moving away from other devices or sources of interference. Also, verify that your multimeter is calibrated correctly. Double-check settings and adjust as needed.
Consider the condition of your multimeter. Dirty or damaged clamps can affect accuracy. Regularly clean your device, and inspect it for wear and tear. How often do you check your equipment’s condition?
Device Malfunctions
Device malfunctions can occur unexpectedly. A common issue is a dead battery. Always carry spare batteries to prevent downtime. If the display is blank or flickering, this might be the culprit.
Sometimes, the device might not power on. Check the battery connections and replace if needed. Ensure all wires and components are intact. Loose connections can lead to malfunction.
If the multimeter behaves erratically, reset it by turning it off and on again. If the problem persists, consult the user manual or seek professional help. Have you ever had to troubleshoot your multimeter on the job?
By understanding these common issues, you can enhance your troubleshooting skills and ensure your multimeter works reliably. Remember, regular maintenance and careful handling go a long way in preventing problems. What’s your strategy for keeping your tools in top shape?
Credit: tameson.com
Frequently Asked Questions
How To Use The Clamp On A Multimeter?
To use the clamp on a multimeter, set it to the AC or DC current mode. Open the clamp and place it around a single conductor. Ensure the jaws fully close. Read the current measurement on the display. Avoid clamping multiple wires to ensure accurate readings.
Why Do Some Multimeters Have A Clamp?
Some multimeters have a clamp to measure current without breaking the circuit. Clamps enable safe, non-invasive measurements and are ideal for high currents. They provide quick readings and enhance user safety by reducing contact with live wires.
How To Use A Clamp Meter To Measure Continuity?
Turn off the circuit power. Set the clamp meter to continuity mode. Connect the probes across the circuit. Listen for the beep indicating continuity.
How To Use A Multimeter For Beginners?
Turn the multimeter dial to the desired measurement type (voltage, current, resistance). Connect the probes: red to positive, black to negative. Read the display to get the measurement. Always start with the highest range to prevent damage. Ensure the multimeter is set to AC or DC based on the circuit.
Conclusion
Using a clamp on multimeter is simple with practice. Start with reading the user manual. Understand the functions and settings. Always ensure safety first. Keep the device in good condition. Regularly check its battery and leads. Practice using it on different circuits.
This builds confidence and skill. Remember, accuracy improves with experience. Stay cautious and attentive during measurements. Mistakes can be costly. Use the multimeter for safe and effective readings. With consistent practice, you’ll become proficient. Always prioritize understanding the basics. This makes complex tasks easier.
Happy measuring!


