
Ever started a project only to find your drill bit is too dull to finish the job? It’s a common frustration that can bring your DIY ambitions to a screeching halt.
But what if you could sharpen that drill bit by hand, saving time, money, and the hassle of running to the store? Imagine the satisfaction of restoring your tools to their peak performance with just a few simple steps. This guide is here to help you do just that.
You’ll not only learn how to sharpen a drill bit by hand, but you’ll also gain a valuable skill that makes your toolkit even more powerful. Ready to transform your dull drill bits into sharp, efficient tools? Let’s dive in and get your projects back on track!
Essential Tools
Sharpening a drill bit by hand requires a bench grinder and patience. Hold the bit at a 60-degree angle against the wheel. Rotate evenly to maintain its shape and sharpness.
Sharpening a drill bit by hand might seem daunting at first, but having the right tools can make all the difference. Whether you’re a seasoned DIY enthusiast or a beginner, ensuring you have essential tools will set you up for success. The right equipment not only aids in precision but also enhances safety and efficiency. Let’s dive into the must-have tools for this task.Choosing The Right Files
When sharpening a drill bit by hand, selecting the appropriate files is crucial. Files come in various shapes and sizes, each suited for specific tasks. A round file can be particularly handy for shaping the flutes of the drill bit. Think about the material of your drill bit. For harder materials, a diamond file might be necessary, while softer metals may only require a standard metal file. Choosing the right file is like choosing the right brush for painting; it shapes the outcome.Safety Gear
Safety should be your priority when working with sharp tools. Always wear safety goggles to protect your eyes from metal shards. Gloves can safeguard your hands from potential cuts and enhance your grip on the drill bit. But don’t stop there. Consider wearing a dust mask. Metal filings can linger in the air, and you don’t want to inhale them. Have you ever experienced a minor injury because you skipped safety gear? It’s a lesson learned the hard way that can easily be avoided with proper precautions. Equipping yourself with the right tools and gear transforms sharpening a drill bit from a chore into a straightforward task. How do you ensure you’re always prepared for projects like these?Understanding Drill Bit Anatomy
Sharpening a drill bit by hand involves using a bench grinder or a sharpening stone. Hold the bit firmly and gently rotate it against the grinding surface. Aim for a consistent angle to restore the cutting edge, ensuring it remains effective for drilling tasks.
Understanding the anatomy of a drill bit is essential if you want to sharpen it effectively by hand. Knowing its parts allows you to see where the wear happens and how you can restore its efficiency. It’s not just about the sharpening; it’s about understanding the tools you’re working with. Are you ready to dive into the details of drill bit anatomy? Let’s explore the parts that make up this vital tool.Identifying The Parts
Each drill bit consists of several key components. The shank is the part that fits into your drill. It’s often smooth, allowing for easy attachment. The flute is the spiral part that allows the chips to escape as you drill. Understanding the length and depth of the flute can help you assess how well your bit is performing. The cutting edge is the most crucial area for sharpening. It’s the tip that does the drilling. If this becomes dull, your bit loses efficiency. The chisel edge intersects the cutting edge and is another area to monitor closely. When these edges are sharp, your drilling becomes faster and more precise.Types Of Drill Bits
There are various types of drill bits, each designed for specific tasks. Twist drill bits are the most common, used for general-purpose drilling in wood, metal, and plastic. Their simplicity makes them a favorite for beginners. Spade bits are broader and typically used for drilling larger holes in wood. Their flat shape means they require a different sharpening approach. For metalworking, you might encounter cobalt or carbide bits. These are tougher and designed for more abrasive materials. They demand precision when sharpening due to their durable nature. Understanding these types is crucial. It ensures you use the right bit for your project, minimizing wear and tear. Have you been using the correct drill bit for your tasks? Identifying your bit type is the first step toward effective sharpening.Preparing The Drill Bit
Sharpening a drill bit by hand requires patience and precision. Start by securing the bit firmly. Use a bench grinder, holding the bit at a 60-degree angle. Gently grind the tip, ensuring equal angles on both sides. This restores the sharpness, making it ready for use.
Sharpening a drill bit by hand is a skill that, once mastered, can save you time and money. The first step in this process is preparing the drill bit. Proper preparation ensures a smooth sharpening experience and helps achieve optimal results. Imagine trying to sharpen a knife without cleaning it first; the same principle applies here. So, let’s dive into the crucial steps of cleaning and securing your drill bit.Cleaning The Drill Bit
Before you sharpen your drill bit, cleaning it is essential. Dirt and debris can affect the sharpening process, leading to uneven edges. Grab a wire brush or an old toothbrush. Gently scrub the bit to remove any built-up residue. Pay special attention to the cutting edges and flutes, as these areas can accumulate the most grime. If your bit is particularly dirty, consider using some mild soap and water. Ensure you dry it thoroughly afterward to prevent rust. Remember, a clean drill bit is a sharp drill bit.Securing The Bit For Sharpening
Once cleaned, securing the drill bit is the next step in preparation. A stable bit ensures precision while sharpening and reduces the risk of accidents. Find a sturdy surface, like a workbench. Use a clamp or vise to hold the bit firmly in place. This prevents any unwanted movement while you work on sharpening it. Double-check that the bit is secure. A loose bit can lead to uneven sharpening and potential injury. Your focus should be on stability, ensuring your sharpening efforts are effective and safe. Have you ever tried sharpening without securing the bit properly? Share your experiences and tips in the comments.
Credit: www.youtube.com
Sharpening Techniques
Sharpening a drill bit by hand involves precise techniques. Secure the bit in a vise for stability. Use a metal file to carefully sharpen each flute, maintaining the original angle for effective drilling.
Sharpening a drill bit by hand is a skill that can save you time and money, while also ensuring your tools are always in top shape. Whether you’re working in your garage or tackling a DIY project, knowing how to sharpen your drill bits can be incredibly empowering. There are several techniques you can use, each with its own set of tools and steps. Let’s dive into some of these techniques so you can choose the best one for your needs.Using A File
Sharpening a drill bit using a file is straightforward and doesn’t require complex tools. First, secure your drill bit in a vice to keep it stable. Ensure that the bit is held tightly to prevent any movement. With a flat file, gently stroke along the cutting edge of the bit. The idea is to maintain the original angle, which is usually around 60 degrees. Apply even pressure as you work, and check your progress frequently. Once you’re satisfied with one side, turn the bit around to sharpen the other. A few precise strokes on each side can make a significant difference. Have you tried this method before?Sharpening With A Grinder
If you have access to a grinder, it can make sharpening drill bits quicker. But it does require some practice to master. Start by adjusting the tool rest on your grinder to match the bit’s original angle. Gently press the drill bit against the grinding wheel. Keep your hands steady to avoid altering the bit’s shape. Rotate the bit slightly to ensure even sharpening on all sides. After a few passes, inspect the bit for a clean, sharp edge. It’s easy to overdo it, so take frequent breaks to check your work. Have you ever used a grinder for sharpening before, or is this new territory for you? Each method has its perks and challenges. But with a little patience and practice, you can keep your drill bits in perfect working order. Give it a try and see how it transforms your work.Testing Sharpness
Sharpening a drill bit by hand involves using a file or grinder to reshape the cutting edge. Precision is key; maintaining the correct angle ensures the bit cuts effectively. Regular sharpening extends the life of your drill bit, enhancing performance during projects.
Testing the sharpness of a drill bit after sharpening it by hand is crucial to ensure it performs efficiently. A sharp drill bit not only makes drilling easier but also extends the lifespan of your tools. Testing the sharpness can be a fun and satisfying process, where you get to see the fruits of your labor. But how do you know if your drill bit is sharp enough? Let’s find out through a couple of simple tests.Visual Inspection
Start by examining the drill bit under good lighting. Look closely at the edges of the cutting surface. They should appear clean and straight without any nicks or dents. A dull bit often has rounded or chipped edges. Rotate the bit slowly and observe the reflection of light on its surface. A sharp bit reflects light consistently along its edge. If you notice any unevenness in the shine, it may indicate dull areas that need further attention. Think about when you last used a dull drill bit. Remember how it struggled to penetrate materials? Avoid that frustration by ensuring your bit looks pristine and sharp.Performance Testing
Try drilling into a scrap piece of wood or metal. Notice how the drill bit engages with the material. A sharp bit will cut smoothly and quickly, with minimal pressure applied from your end. It should produce clean, spiral-shaped shavings, indicating precise cutting. If the bit struggles or requires excessive force, it might still be dull. Also, pay attention to the heat generated during drilling. A sharp bit remains relatively cool, while a dull one heats up quickly. Ask yourself—are you applying too much pressure? If so, the drill bit might not be as sharp as it should be. Aim for effortless drilling to confirm the sharpness. Testing the sharpness of your drill bit ensures you’re ready for your next project without any hiccups. Each step brings you closer to perfecting your DIY skills. Are you ready to give your drill bit the test it deserves?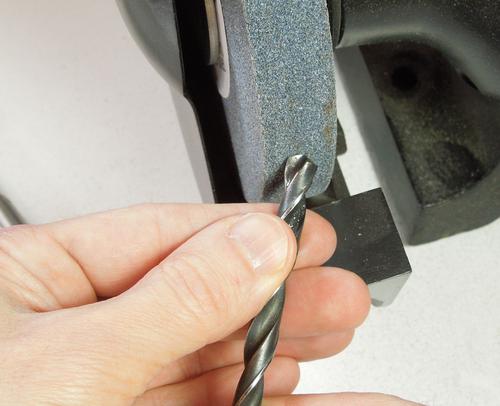
Credit: woodgears.ca
Maintenance Tips
Proper maintenance extends the life of your drill bits. Keeping them sharp ensures efficient performance. This saves time and effort during drilling tasks. Sharpening by hand requires care and precision. Follow these maintenance tips for best results.
Regular Sharpening Schedule
Set a regular schedule for sharpening drill bits. This prevents them from becoming too dull. Sharp drill bits cut through materials smoothly. Dull bits require more force and can damage workpieces. Frequent sharpening keeps your tools ready for use. A monthly check is a good practice. Adjust based on frequency of use.
Proper Storage
Store drill bits in a dry place to prevent rust. Moisture can dull the edges over time. Use a case or holder to keep them organized. This protects them from damage. Proper storage extends the life of your drill bits. Avoid leaving them loose in toolboxes. This reduces the risk of chipping or breaking.

Credit: www.wikihow.com
Frequently Asked Questions
Can Drill Bits Be Sharpened By Hand?
Yes, you can sharpen drill bits by hand using a bench grinder. Ensure to maintain the correct angle. Use a sharpening jig for better precision. Regular maintenance extends the drill bit’s lifespan and improves performance. Always wear safety goggles to protect your eyes while sharpening.
What Is The Easiest Way To Sharpen A Drill Bit?
Use a bench grinder for the easiest drill bit sharpening. Hold the bit at a 60-degree angle. Gently rotate while grinding. Keep the tip cool by dipping it in water. This method is quick, efficient, and restores cutting edges effectively.
Ensure safety with goggles and gloves.
How To Sharpen A Drill Bit Without A Grinder?
Use a bench vise to hold the drill bit securely. Employ a metal file to sharpen the edges carefully. Maintain the original angle while filing. Check sharpness regularly to avoid over-sharpening. Test on scrap material to ensure effectiveness.
Can You Sharpen Drill Bits With Sandpaper?
Yes, you can sharpen drill bits with sandpaper. Wrap sandpaper around a cylindrical object. Rub the drill bit against it gently. Use a fine grit for best results. Sandpaper helps remove burrs and sharpens edges. This method is effective for quick touch-ups.
Conclusion
Sharpening drill bits by hand is a useful skill. It saves time and money. With practice, your accuracy will improve. Use the right tools and safety gear. Steady hands and patience are essential. Check the bit’s angle frequently. It ensures a sharp edge.
Clean the drill bit after sharpening. It helps maintain its effectiveness. Keep practicing to perfect your technique. Soon, you’ll sharpen drill bits like a pro. Remember, safety first! Always wear protective eyewear. Enjoy the satisfaction of a job well done.
With these tips, sharpen your drill bits confidently.


