
Drilling a hole in porcelain tile might sound like a daunting task. You might worry about cracking the tile or making a mess of your project.
But what if you could approach this task with confidence and ease? Imagine the satisfaction of completing your home improvement project without a hitch. In this guide, you’ll discover simple, step-by-step instructions that make drilling into porcelain tile a breeze.
You’ll learn about the right tools and techniques to ensure precision and safety. By the end, you’ll feel empowered and ready to tackle this task like a pro. Stick around and uncover the secrets that will transform how you handle porcelain tiles forever.

Credit: www.instructables.com
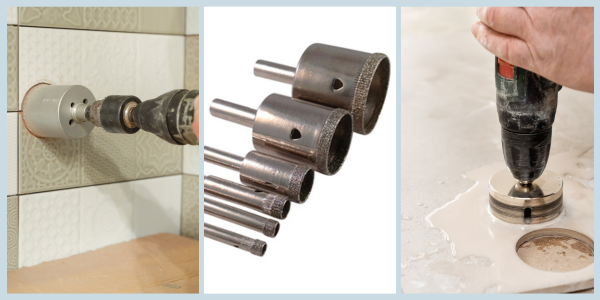
Choosing The Right Tools
Drilling through porcelain tile can be tricky. The right tools make it easier. Choosing the correct drill and bit is crucial. It ensures clean and precise holes. Incorrect tools might damage the tile. So, investing time in selection pays off.
Drill Types For Porcelain
Not all drills suit porcelain. A regular drill may not work well. Consider a variable-speed drill. It provides better control. A hammer drill isn’t recommended. It can crack the tile. Cordless drills offer flexibility. They’re easier to handle in tight spaces.
Selecting The Right Drill Bit
Drill bits matter a lot. Diamond-tipped bits are the best choice. They cut through porcelain smoothly. Carbide bits can work too. But they may wear out faster. Ensure the bit matches the drill size. A loose fit can cause accidents. Always start with a small bit. Then move to the desired size.
Preparing The Tile Surface
Clean the porcelain tile surface thoroughly. Remove dust and debris to ensure a smooth drilling process. Use a damp cloth for best results.
Drilling a hole in porcelain tile can seem daunting, but with the right preparation, it becomes a manageable task. Preparing the tile surface is crucial. A well-prepared tile ensures a clean, precise hole and prevents damage. Whether you’re hanging bathroom fixtures or installing a new shower rod, preparing the tile surface is your first step to success.Marking The Drilling Spot
Begin by identifying where you want to drill. Accuracy is key here. Use a pencil or a non-permanent marker to mark your spot clearly. Consider the surrounding area—avoid places that may weaken the tile or those close to grout lines. Measure twice, drill once. Double-check your mark to ensure it aligns with your installation needs. This is where many people stumble, so take your time. A little patience now saves a lot of hassle later.Securing The Tile
Once your spot is marked, secure the tile. You want to prevent slipping during drilling. Use masking tape to create an ‘X’ over your marked spot. This adds grip and provides extra support for the drill bit. Consider using a clamp or a wooden frame if you’re drilling a tile not yet installed. This keeps the tile steady and reduces the risk of breakage. Are you drilling a wall-mounted tile? Then, ensure that the surrounding area is clear, and use a towel or a cushion beneath to catch any debris. Preparing your tile is all about laying the groundwork for success. With a marked spot and secured tile, you’re now ready to drill with confidence. Can you feel the excitement of approaching your DIY project with the right tools and knowledge?Drilling Techniques
Drilling into porcelain tile requires precision and care. These tiles are hard and delicate. Proper techniques ensure a smooth process without damage. Let’s explore how to drill holes in porcelain tile effectively.
Starting The Hole
Begin by marking the spot with a pencil. Use a piece of masking tape over the mark. This helps prevent the drill bit from slipping. Choose a carbide-tipped drill bit for porcelain. Position the drill bit at a 90-degree angle to the tile. Start the drill at low speed. Apply gentle pressure to create a small indentation.
Maintaining Steady Pressure
Once the hole starts forming, maintain a steady pressure. Avoid pushing too hard. This can crack the tile. Gradually increase the drill speed as needed. Keep the drill bit perpendicular to the tile. This ensures a clean and precise hole.
Cooling The Drill Bit
Drilling generates heat. Keep the drill bit cool to avoid damage. Use water to cool the bit. Spray water onto the tile surface. Alternatively, dip the drill bit in water. Repeat this every few seconds. This prevents overheating and prolongs the drill bit’s life.
Safety Precautions
Drilling into porcelain tile requires careful safety measures. Wear safety goggles to protect your eyes from flying debris. Use masking tape on the tile to prevent drill slipping and potential cracks.
Drilling a hole in porcelain tile can be a daunting task, especially if you’re worried about safety. It’s essential to take precautions to protect yourself and ensure a smooth operation. Safety should always be your top priority. Without it, even a simple project can turn dangerous. Let’s dive into how you can keep yourself safe with some practical safety measures.Protective Gear
Wearing the right protective gear is crucial. You don’t want to end up with shards of porcelain in your eyes. Always wear safety goggles to protect your eyes from flying debris. Consider using ear protection too, especially if you’re sensitive to loud noises. Drilling can be unexpectedly loud, and protecting your hearing is just as important. A dust mask might not seem necessary, but it can prevent you from inhaling harmful particles, especially if you’re in a confined space.Handling Sharp Tools
Handling sharp tools requires attention and care. Always inspect your drill bits before use. Are they in good condition? A dull bit can slip and damage the tile or worse, injure you. Maintain a firm grip on your drill. A shaky hand can lead to slips and accidents. Have you practiced a steady hand? If not, try drilling on a scrap piece first. Be mindful of your surroundings. Are there others around you who might accidentally bump into you while you’re working? Ensure you have enough space and alert others to stay clear. Safety is in your hands. Are you ready to approach your tile project with confidence? By taking these safety precautions, you can drill that hole with peace of mind.Common Mistakes To Avoid
Drilling a hole in porcelain tile can be tricky. Many people make common mistakes that lead to cracked tiles or ruined projects. Understanding these mistakes is crucial for a successful drilling experience. This section highlights key errors to watch out for.
Applying Excessive Force
Porcelain tiles are delicate. Pressing too hard can crack them easily. Many assume more force equals faster drilling. This is false with porcelain. Light pressure is best. Let the drill do the work. Use slow, steady pressure. This prevents damage and ensures a clean hole.
Using Incorrect Drill Speed
Drill speed matters in porcelain tile. High speed generates heat. Heat cracks tiles. Lower speed is safer and more effective. Start slow and increase gradually. This controls heat and prevents cracking. Choose a variable speed drill for best results. Adjust speed based on the tile’s resistance.
Credit: eternaltools.com
Post-drilling Care
Ensure smooth edges and a clean finish after drilling porcelain tiles. Use a damp cloth to wipe away dust and debris. Inspect for any cracks or chips, and apply a sealant if needed to protect the tile surface.
After successfully drilling a hole in porcelain tile, your job is not over. Post-drilling care is crucial to maintain the integrity and aesthetics of your tile. Simple steps like cleaning and inspecting can save you from future headaches and ensure your tiles last longer.Cleaning The Tile Surface
Once you’ve drilled, the surrounding area may have dust and debris. Use a soft cloth or sponge to gently wipe the tile surface. Avoid harsh chemicals that might damage the tile glaze. You can use a mild soap solution to remove stubborn particles. Ensure the drilled area is dry before proceeding to the next step. This will help prevent any slipping or further dust accumulation.Inspecting For Cracks
Carefully inspect the tile and the area around the drilled hole. Look for any visible cracks or chips that might have occurred during drilling. Even minor cracks can expand over time. Run your finger gently around the hole to feel for any rough edges or irregularities. If you notice any issues, consider applying a sealant to prevent further damage. Remember, catching these problems early can save you time and money. How often do you find yourself rushing through the cleanup process? Taking a few extra minutes now can prevent costly repairs later. Always prioritize the longevity of your tiles by giving them the care they deserve.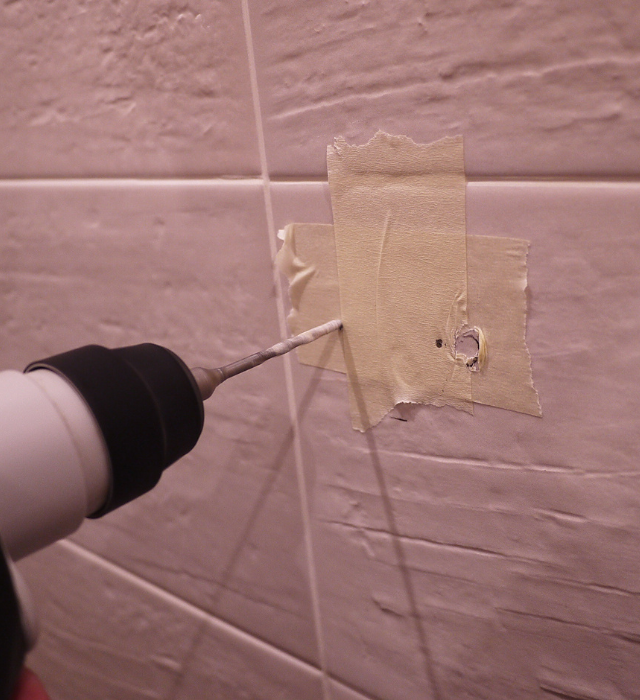
Credit: ceramiccity.ie
Frequently Asked Questions
How To Drill A Hole In Porcelain Tile Without Chipping It?
Use a diamond-tipped drill bit and apply painter’s tape to the tile. Start drilling slowly, maintaining constant pressure. Keep the drill bit cool by spraying water while drilling. Ensure a steady hand to avoid chipping.
What Is The Best Drill Bit To Drill Through Porcelain Tile?
Use a diamond-tipped drill bit for porcelain tiles. It offers precision and durability. Ensure steady pressure and cooling water. Start at low speed to prevent cracking. Diamond bits handle hard surfaces effectively, making them ideal for porcelain tiles. Always prioritize safety and follow manufacturer’s guidelines for best results.
Should You Drill Porcelain Tile Fast Or Slow?
Drill porcelain tiles slowly to prevent cracking. Use a diamond-tipped drill bit for best results. Keep the drill steady and apply gentle pressure. Ensure the drill bit stays cool by using water for lubrication. This approach ensures clean, precise holes without damaging the tile.
Do I Need A Special Drill Bit For Porcelain?
Yes, you need a special drill bit for porcelain. Use a diamond-tipped or carbide-tipped drill bit. These are designed to handle the hardness of porcelain, preventing cracks and ensuring a smooth finish. Always use water as a lubricant to keep the bit cool and extend its lifespan.
Conclusion
Drilling a hole in porcelain tile requires patience and care. Always use the right drill bit for the job. Keep the drill speed slow to prevent cracking. Remember to cool the drill bit with water. This helps avoid overheating. Ensure the tile surface is clean before drilling.
A clean surface provides better results. Practice on a spare tile first. This builds confidence and skill. With these steps, you can drill safely and effectively. Your porcelain tiles will remain intact and beautiful. Happy drilling!


