
Drilling into tile can be a nerve-wracking task, especially if you’re worried about cracking or damaging the surface. You might feel anxious just thinking about it.
But what if I told you there’s a way to do it safely and effectively without the hassle? Whether you’re hanging a towel rack or installing a shower door, mastering this skill can save you time and money. Imagine the satisfaction of completing your home project without a hitch.
In this guide, you’ll discover step-by-step instructions that make the process straightforward and stress-free. Ready to gain the confidence to tackle your tile drilling project? Let’s dive in and turn your apprehension into accomplishment.
Choosing The Right Drill Bit
Selecting the correct drill bit is crucial for drilling tiles. Opt for a carbide-tipped bit for precision and durability. Ensure steady pressure and low speed to prevent cracking and achieve a clean hole.
Drilling a hole in tile might seem daunting at first, but it becomes much simpler when you have the right tools. The drill bit you choose can make or break the project—literally. Picking the right one ensures you avoid cracks and achieve a clean hole. Let’s explore how to select the ideal drill bit for your tile work.Types Of Drill Bits For Tile
When you’re dealing with tile, ordinary drill bits simply won’t cut it. Instead, you need to choose from specialized options designed specifically for this task. – Carbide-Tipped Drill Bits: These are great for ceramic tiles. They provide durability and precision, allowing you to drill without damaging the tile. – Diamond-Tipped Drill Bits: Ideal for tougher materials like porcelain or glass tiles. These bits offer superior strength and can cut through hard surfaces with ease. Have you ever tried using a regular drill bit on a tile, only to watch it skitter across the surface? It can be frustrating and potentially damaging. Specialized drill bits save you from these woes and keep the project on track.Selecting The Correct Size
Choosing the right size drill bit isn’t just about fitting the screw. It’s about ensuring a snug, secure fit that holds firmly over time. Measure twice, drill once. Before you start, measure the size of the hole you need. This will often depend on the anchor or screw you’re planning to use. – Smaller Holes: Use a drill bit that’s slightly smaller than the anchor. This ensures a tight fit. – Larger Projects: For bigger holes, opt for a drill bit that matches the anchor size closely. Have you ever ended up with a wobbly fixture because the hole was too big? Avoid this by carefully matching your drill bit size to the requirements of your project. This small step can save you a lot of hassle and ensure your fixtures stay put. Choosing the right drill bit is crucial for successful tile drilling. With the right tools and a little preparation, you can tackle your project with confidence and precision. What are your experiences with tile drilling? Are there any tips you swear by? Share your thoughts!
Credit: danslelakehouse.com
Preparing The Tile Surface
Preparing the tile surface is crucial before drilling. Clean the tile to remove dust and dirt. Mark the spot accurately with a pencil or tape to ensure precision.
Preparing the tile surface is crucial for achieving a clean and precise hole. It’s not just about drilling; it’s about drilling smartly. You might have seen tiles crack or chip when handled carelessly. To avoid such mishaps, laying the groundwork is key. First, consider the type of tile you’re working with. Ceramic, porcelain, or stone each have their own quirks. Knowing your tile type can impact your approach and tools. Have you ever tried drilling without proper prep? It’s a recipe for disaster. Let’s dive into how you can prep your tile surface effectively.Marking The Drill Spot
Start by deciding where you want the hole. Accuracy here is your friend. Use a pencil to mark the spot lightly. It’s visible but won’t damage the tile. Measure twice, drill once. Double-check your mark against your plan. Is it aligned correctly? Misalignment can lead to errors and extra work. Some people use a grease pencil for marking. It wipes off easily after drilling. Choose what works best for you and your surface.Using Tape For Stability
Tape is your secret weapon. It reduces slipping and provides grip. Apply a piece of masking tape over the marked spot. You might wonder why tape is necessary. It prevents your drill bit from wandering. This is especially useful on smooth tiles, where slipping is common. Consider using painter’s tape for easy removal. It’s gentle on surfaces and won’t leave residue. Have you ever struggled with sticky marks after tape removal? That’s a hassle you can avoid. — By preparing the tile surface thoroughly, you set the stage for a successful drill. It’s more than just technical steps; it’s about foresight and planning. Are you ready to drill with confidence?Safety Precautions
Drilling into tile requires careful preparation to avoid damage. Ensure using a drill bit designed for tiles. Protect surrounding areas with masking tape to prevent cracking.
Drilling a hole in tile can be quite a task, especially if you’re concerned about safety. Ensuring you take the right precautions can prevent accidents and damage. It’s not just about getting the job done; it’s about doing it safely. Imagine the peace of mind knowing you’re protected while you work on your home improvement projects.Protective Gear
Wearing the right protective gear is essential. You might not think of tile drilling as hazardous, but debris can fly. Safety glasses will protect your eyes from tiny shards. Use gloves to safeguard your hands from sharp edges and cuts. A dust mask can be helpful too, especially if you’re sensitive to particles in the air. Have you ever drilled without these? It’s a risk not worth taking.Handling Tools Safely
Handling tools properly is equally crucial. Ensure your drill is in good condition. Check that it’s functioning correctly before you start. Always use the appropriate drill bit designed for tile. This isn’t the time to improvise with the wrong equipment. Maintain a steady grip and apply pressure evenly. Have you ever felt the drill wobbling? That’s a sign you need to adjust your hold. Avoid rushing; it’s about precision and control. Remember, the goal is a clean hole without cracking the tile. Safety isn’t just a checklist; it’s an attitude. Taking these steps seriously could mean the difference between a successful project and a costly mistake. Are you ready to drill with confidence?Drilling Technique
Drilling through tile requires precision to prevent cracks. Begin with a carbide-tipped drill bit for durability. Apply gentle pressure and maintain a slow speed to ensure a clean hole without damage.
Drilling a hole in tile can feel like a daunting task, especially if you’ve never tackled it before. Tiles are delicate and can crack if not handled properly. However, with the right drilling technique, you can achieve a clean hole without damaging your tiles. Here’s how you can do it effectively, starting with the basics.Starting With A Pilot Hole
Creating a pilot hole is your first step to success. A pilot hole helps guide your drill and prevents the bit from slipping off the shiny tile surface. Begin by marking the spot where you want the hole. Use a marker or a piece of tape for precision. Next, use a masonry bit and gently start drilling at a low speed. This creates a small indentation, giving your larger drill bit a stable starting point.Maintaining Consistent Pressure
Once your pilot hole is ready, switch to a larger bit suitable for tiles. The key here is to apply consistent pressure. Think of it as a steady push, not too hard, but firm enough to keep the drill in place. Pressing too hard can crack the tile, while too little force may not penetrate effectively. Take it slow and steady. This is not a race. Patience will yield the best results. If you ever feel the drill bit heating up, pause and let it cool down. Do you ever feel like you’re not making progress? It might be tempting to push harder, but resist the urge. Instead, check your drill speed and adjust accordingly. A balanced approach ensures your tile remains intact. Have you tried drilling tiles before? What challenges did you face, and how did you overcome them? Share your experiences in the comments, and let’s learn from each other.Cooling The Drill Bit
Keeping the drill bit cool prevents tile cracks. Use water or a damp sponge for cooling during drilling. This method ensures a smooth, clean hole.
Drilling a hole in tile can be a daunting task, especially when you’re worried about damaging the delicate surface. One key to success is keeping your drill bit cool. This is crucial to prevent overheating, which could lead to cracks or broken tiles. Cooling the drill bit isn’t just a technical necessity; it can make the whole process smoother and more efficient. Let’s dive into some practical ways to ensure your drill bit stays cool and your tiles remain intact.Using Water Or Lubricant
Using water or a lubricant can be a game-changer in your drilling process. A simple trick is to keep a spray bottle of water nearby and spritz the drill bit regularly. This helps dissipate heat effectively. If you prefer a lubricant, there are specialized products available that can keep your drill bit running smoothly. Just apply a small amount to the tip of the bit. Imagine you’re drilling into your kitchen backsplash, and you hear a crack. That’s your cue to pause and consider if your drill bit needs cooling. A little water or lubricant can prevent that from happening.Preventing Overheating
Preventing overheating is essential for maintaining tile integrity. Overheated drill bits can cause tiles to crack, ruining your hard work. You might find yourself wondering, “How often should I cool the drill bit?” The answer lies in your observation. If you notice smoke or excessive heat, it’s time for a cool-down. Consider using a drill with adjustable speed settings. Lower speeds generate less heat and reduce the risk of damage. It’s like giving your drill bit a breather amidst the hard work. Remember, a cool drill bit means happy tiles and a successful DIY project. So, how will you keep your drill bit cool on your next drilling adventure?Dealing With Common Issues
Drilling a hole in tile requires patience and precision. Start with a carbide-tipped drill bit for best results. Ensure the drill’s speed is slow to prevent tile cracking.
Drilling a hole in tile can be a daunting task, especially if you’re new to DIY projects. Whether you’re installing a new fixture or creating a decorative design, dealing with common issues is crucial to ensure a smooth process. Understanding these challenges can save you time, money, and frustration.Preventing Tile Cracks
Tile cracks are a common fear. The key is to go slow and steady. High speed can cause your tile to crack. Use a drill bit specifically designed for tile. These are often made of carbide or diamond-tipped materials. Apply gentle pressure. Let the drill do the work. Pushing too hard can result in unwanted cracks. Consider starting with a small pilot hole. This helps guide the larger bit and reduces the risk of cracks. Do you have a steady hand and patience? Those are your best tools here.Correcting Off-center Holes
An off-center hole can be a real eyesore. But don’t worry, it’s not the end of the world. First, double-check your measurements. Are you sure they’re accurate? A small mistake here can lead to big problems. If your hole is slightly off, a tile repair kit can help. These kits often include filler and color matching components. For larger issues, consider repositioning the fixture or using a decorative cover. Sometimes, creativity can save the day. Have you ever turned a mistake into an opportunity? In DIY, flexibility is your friend. Dealing with common tile drilling issues doesn’t have to be a nightmare. With the right approach and mindset, you can tackle these problems with confidence.Post-drilling Tips
Drilling holes in tile requires precision to avoid cracks. Use masking tape for stability and a carbide-tipped drill bit. Apply gentle pressure and keep the drill speed low for smooth results.
After successfully drilling a hole in your tile, the journey doesn’t end there. Post-drilling care is crucial to ensure your tile stays in good condition and the hole serves its purpose effectively. Let’s dive into some essential post-drilling tips to wrap up your project neatly and efficiently.Cleaning Up The Work Area
Once you’re done drilling, it’s important to clean up immediately. Tile dust can be slippery and may cause accidents if left unattended. Grab a vacuum or a soft brush to carefully sweep away any debris. Don’t forget about the dust that may have settled on the tile surface. Use a damp cloth to wipe it clean. This not only makes the area look tidy but also helps prevent the dust from scratching the tile surface. Consider organizing your tools and putting them back in place. It’s always satisfying to end a project with a clean workspace, ready for your next DIY adventure.Inspecting The Drilled Hole
After cleaning, take a moment to inspect the hole you’ve drilled. Check for any cracks or chips around the edges. Even if you were careful, sometimes small imperfections can occur. If you notice any rough edges, sand them gently with fine-grit sandpaper. This will smoothen the area and help when you’re fitting screws or anchors. Ask yourself: Is the hole the correct size for your needs? It’s better to address any sizing issues now rather than struggle with fitting later. Precision can save you from future headaches. Remember, a little attention to detail goes a long way in ensuring your tile projects are both functional and aesthetically pleasing.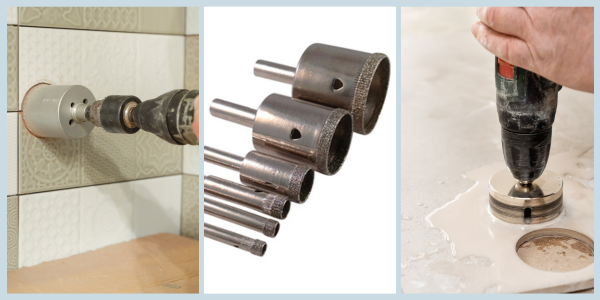
Credit: eternaltools.com

Credit: www.youtube.com
Frequently Asked Questions
How To Drill A Hole In Tile Without Breaking It?
Use masking tape to prevent slipping. Mark the spot. Use a carbide-tipped drill bit. Drill slowly with minimal pressure. Keep the drill bit cool with water.
Can You Use A Regular Drill To Drill Through Tile?
Yes, you can use a regular drill to drill through tile. Use a carbide-tipped or diamond drill bit. Apply gentle pressure and keep the drill speed low to avoid cracking the tile. Always start with a small pilot hole and use water for lubrication to prevent overheating.
What Is The Best Tool To Drill Holes In Tile?
A diamond-tipped drill bit is the best tool for drilling holes in tile. It provides precision and reduces cracking. Use a variable-speed drill to maintain control and prevent overheating. Always start with a small pilot hole before increasing the size.
This method ensures clean, accurate holes in tiles.
How To Drill A Hole In Ceramic Without Breaking It?
Use a diamond drill bit for ceramics. Place masking tape on the spot. Drill slowly with light pressure. Keep the drill bit cool with water. Avoid pressing too hard to prevent cracks.
Conclusion
Drilling a hole in tile is simple with the right steps. Start by gathering all necessary tools. Measure and mark your spot carefully. Use masking tape to prevent slipping. Choose the right drill bit for your tile. Keep a steady hand and take your time.
Apply gentle pressure to avoid cracks. Always wear safety gear to protect yourself. Remember, practice makes perfect. With patience, you can achieve professional results. Now, you’re ready to tackle your tile project with confidence. Happy drilling!


