
Are you ready to tackle a DIY project that can transform the look and functionality of your doors? Learning how to chisel hinges in a door is a skill that can save you money and give you the satisfaction of saying, “I did that myself!”
Whether you’re a seasoned DIYer or just getting started, knowing how to properly chisel hinges ensures your doors hang perfectly, swing smoothly, and last longer. Plus, it’s easier than you think! Imagine the sense of accomplishment you’ll feel when your door sits flush and operates flawlessly.
Dive into this guide, and you’ll discover step-by-step instructions that turn a daunting task into a rewarding experience. Don’t let the fear of the unknown stop you—grab your chisel, and let’s get started! Your perfectly hung door is just a few steps away.
Tools Needed
Essential tools include a chisel, hammer, and measuring tape for precise hinge installation. Sandpaper smoothens edges, ensuring a snug fit. A screwdriver tightens hinge screws securely into place.
Chiseling hinges in a door is a task that seems daunting at first, but with the right tools, it becomes a straightforward process. Having the correct tools not only makes the job easier but also ensures a cleaner, more professional finish. Let’s dive into the essential tools you need to achieve a perfect hinge recess.1. Hammer
A sturdy hammer is crucial for chiseling. It provides the force needed to drive the chisel into the wood. Opt for a claw hammer, as it offers a good balance and grip. A good hammer not only aids in precision but also prevents unnecessary strain on your arm.2. Chisel
A sharp chisel is your best friend in this task. Look for a chisel that’s specifically designed for woodworking. A 1/2 inch chisel is ideal for most door hinge sizes. Keep it sharp; a dull chisel can damage the wood and make the task harder.3. Utility Knife
A utility knife helps you mark the hinge outline on the door. Ensure the blade is sharp for clean and precise cuts. This step is crucial as it guides your chisel and prevents the wood from splintering.4. Square
A square ensures that your hinge recess is perfectly aligned. Use it to mark straight lines on the door. This tool helps you maintain accuracy, which is essential for a professional finish.5. Measuring Tape
Accurate measurements prevent mistakes. Use a measuring tape to determine the precise position and depth of the hinge recess. Double-check your measurements before you start chiseling.6. Pencil
A simple pencil is needed to mark the hinge position on the door. It’s an indispensable tool for ensuring your marks are clear and easy to follow. Always use a pencil rather than a pen to avoid permanent marks on the wood.7. Safety Goggles
Protect your eyes from wood chips and dust. Safety goggles are a must-have when working with tools. Your safety should always be a priority. Equipped with these tools, you’re ready to start chiseling like a pro. Have you ever tried a DIY project and found the right tools made all the difference? Investing in quality tools not only saves time but also enhances your craftsmanship.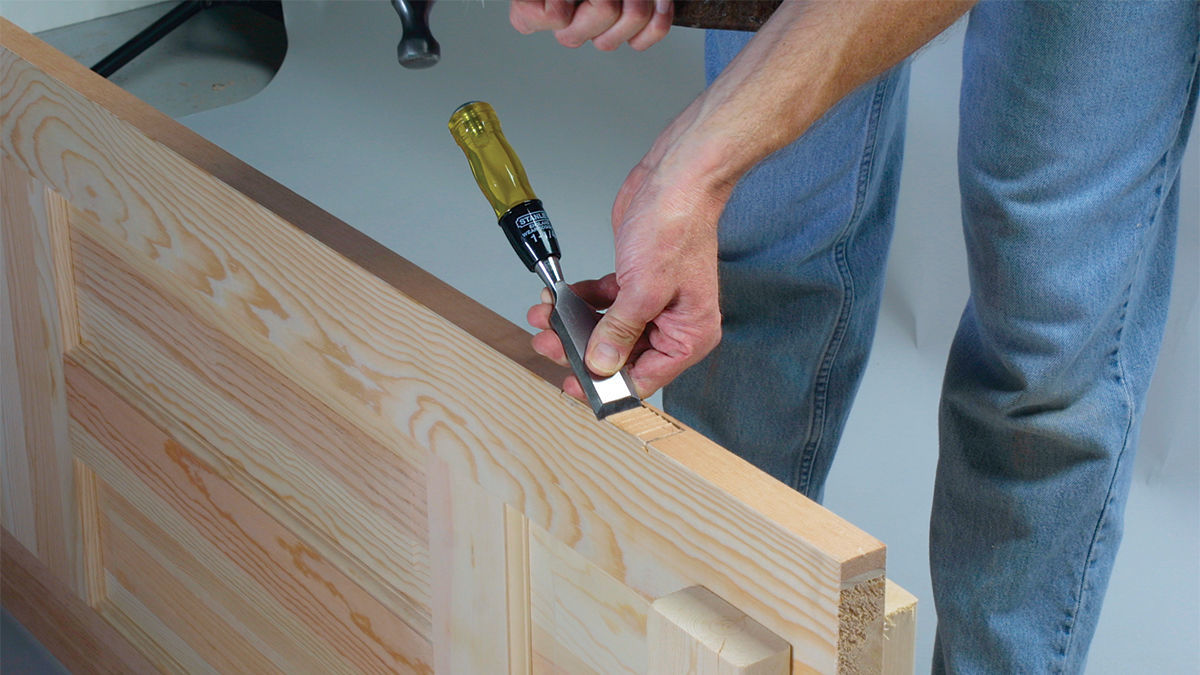
Credit: www.finehomebuilding.com
Preparing The Door
Chiseling hinges in a door involves precise marking and careful cutting. Begin by tracing hinge outlines on the door edge. Use a sharp chisel to carve out the wood, ensuring a snug fit for the hinges.
Preparing the door for hinge chiseling is a crucial step that sets the stage for a smooth installation process. You’ll want to ensure the door is ready for the precise work ahead. This preparation involves removing the door and accurately marking hinge positions, tasks that might seem straightforward but require attention to detail. Let’s dive into these steps to make sure your door is ready for its new hinges.Removing The Door
To begin, you’ll need to take the door off its hinges. This may sound daunting, but with the right approach, it can be a breeze. Start by using a screwdriver to remove the screws from the hinges on the door frame. If you’re struggling, a power drill can make this task quicker and less strenuous. Once the screws are removed, gently lift the door off the hinges. You may need a friend to help with this part, especially if the door is heavy. Imagine the satisfaction of having a clear workspace, ready for the next steps.Marking Hinge Positions
With the door safely set aside, it’s time to mark where the new hinges will go. Use a pencil to lightly sketch the hinge positions on the door edge. Accuracy here is key — a small mistake can lead to frustration later. Consider using the old hinge marks as a guide. If you’re working with a new door, measure carefully to match the hinge positions on the frame. Are you confident in your measuring skills? Double-check your work to ensure everything lines up perfectly. This preparation might seem meticulous, but it pays off in the end. Once the door is ready, you’ll be set for the satisfying task of chiseling and installing the hinges.Chiseling Techniques
Crafting precise hinge spaces in doors requires careful chiseling techniques. Mark hinge outlines on the door edge. Use a chisel to carve out the marked area, ensuring an even depth.
Chiseling hinges into a door might seem daunting, but with the right techniques, it becomes a straightforward task. The key is to approach the project with patience and precision. Your goal is to ensure the hinges sit flush with the door, allowing it to open and close smoothly. You’ll want to start with a good understanding of the tools and methods that make this possible.Choosing The Right Chisel
Selecting the correct chisel is crucial. A 1/4 inch or 1/2 inch chisel is typically ideal for door hinges. Make sure your chisel is sharp; a dull tool can cause more harm than good. A sharp chisel cuts cleanly, reducing the risk of splintering the wood. You might ask, “How do I know if my chisel is sharp enough?” Try the paper test: if it slices through paper effortlessly, you’re ready to go. Remember, investing in a quality chisel can make all the difference. It might cost a little more upfront, but it will save you time and frustration in the long run.Safety Tips
Safety should always be your priority. Always wear protective eyewear to guard against flying wood chips. It’s surprising how often people overlook this simple step. Ensure your work area is clear and well-lit. This helps you see what you’re doing and reduces the risk of accidents. A stable workbench will prevent unexpected slips. Keep your hands behind the cutting edge of the chisel. If the tool slips, you’ll avoid potential injury. Have you ever nicked your finger with a chisel? It’s a painful reminder to always respect your tools. By following these tips, you’ll ensure a safer and more efficient chiseling process. Taking these precautions might seem tedious, but they make a world of difference. Remember, practice makes perfect. With each door you chisel, your confidence and skill will grow. What technique will you master next?
Credit: www.finehomebuilding.com
Creating Hinge Mortises
Creating hinge mortises in a door might seem daunting, but with the right approach, it becomes a straightforward task. A hinge mortise is the recessed area where the hinge sits, ensuring it fits flush with the door and frame. Precise mortising is key to a door’s seamless operation. Let’s dive into the steps to outline and carve these mortises effectively.
Outlining The Mortise
Start by holding the hinge against the door edge where you want it to be installed. Use a pencil to trace around the hinge, ensuring your line is precise and clear. This outline acts as your guide, so take your time.
Consider using a utility knife to score the penciled line. This step helps prevent wood splintering when you start carving. Have you ever faced a splintered door edge? It’s frustrating, and scoring can save you from this annoyance.
Make sure you have the right measurements. Double-check the hinge placement to avoid misalignment. A misplaced hinge can lead to a door that doesn’t close properly. Imagine having to redo the entire process because of a small oversight!
Carving The Mortise
Begin with a chisel that matches the width of your hinge outline. Angle the chisel slightly as you cut into the wood. This technique allows for more control and precision.
Remove small chunks of wood with gentle taps from a mallet. Be patient; rushing might lead to mistakes. Have you ever tried to force a carving only to regret it later? Slow and steady wins the race here.
As you carve, frequently check the depth by placing the hinge into the mortise. Adjust as needed to ensure the hinge sits flush. This step ensures your door swings smoothly without obstructions.
Doesn’t it feel satisfying to see the hinge fit perfectly into the carved space? This meticulous attention to detail pays off in the end.
Remember, the goal is precision and functionality. Each step matters, so take your time and enjoy the process. What’s your biggest challenge when crafting hinge mortises? Share your thoughts below!
Installing Hinges
Installing hinges on a door might seem like a straightforward task, but doing it right can make all the difference in the function and longevity of your door. I remember my first attempt—an afternoon of trial and error that taught me valuable lessons. If you’re about to tackle this project, here are some practical tips to ensure your door swings smoothly and securely.
Aligning Hinges
Begin by carefully marking the spot where your hinges will sit. The rule of thumb is to place one hinge at the top, one at the bottom, and one in the middle for added stability. Use a measuring tape to get accurate placement, ensuring each hinge is in line with its counterpart on the door frame.
Aligning hinges properly prevents the door from sagging or sticking. While marking, ask yourself: is the door level? A small error in alignment can lead to major issues down the line. Double-check your measurements and make adjustments as needed.
Securing Hinges
Once aligned, it’s time to secure the hinges. Start by pre-drilling holes for screws to avoid splitting the wood. This step is crucial for achieving a snug fit and preventing damage to the door or frame.
Use screws that match the hinge size and are appropriate for the door material. Tighten them evenly to ensure the hinge remains flush against the surface. A few extra minutes spent securing hinges can save hours of troubleshooting later.
Remember the frustration of a door that won’t close properly? Securing hinges correctly is your first defense against such annoyance. Are you confident each screw is tightly fixed? A firm attachment will keep your door in place and functioning smoothly.
Installing hinges is more than just a mechanical task; it’s an opportunity to refine your DIY skills. With careful alignment and secure fastening, you’ll gain satisfaction every time you open your door. These steps might seem small, but they play a significant role in the overall function of your home.
Reattaching The Door
Reattaching the door is a crucial step in the hinge installation process. After chiseling the hinges, you need to fix the door back in place. This requires precision and patience to ensure it hangs perfectly. A well-reattached door enhances the room’s functionality and aesthetics.
First, align the hinges with the chiseled recesses on the door frame. Use screws to secure them firmly. This ensures the door is stable and properly aligned with the frame. Proper alignment prevents issues like uneven door movement or gaps.
Testing Door Movement
Once the door is reattached, test its movement. Open and close the door slowly. Check for smooth operation without resistance. If the door sticks or drags, adjustments may be needed. Smooth movement indicates correct hinge placement and alignment.
Adjusting For Perfect Fit
Sometimes, doors need minor adjustments for a perfect fit. Check the gap between the door and frame. The gap should be even along all edges. Uneven gaps might cause drafts or noise. Adjust the hinges slightly if necessary. This ensures the door closes snugly without gaps.
Tighten or loosen screws as needed for final adjustments. This fine-tuning ensures the door sits flush with the frame. A well-fitted door enhances security and energy efficiency in your home.
Troubleshooting Common Issues
Chiseling door hinges can be tricky, but ensure your chisel is sharp for clean cuts. Measure hinge placement accurately to avoid misalignment. Use a mallet gently to prevent damaging the door surface.
Chiseling hinges in a door can sometimes lead to unexpected challenges. It’s not uncommon to face issues that require a bit of troubleshooting. Understanding how to address these common problems can save you time and frustration. Let’s dive into some practical solutions that you can apply.Fixing Misalignment
Misalignment is a frequent issue when installing door hinges. If your door isn’t closing properly, it might be due to this. Begin by checking if the hinge leaf is flush with the door and frame. If there’s a gap, you might need to chisel a bit more for a perfect fit. Remove the hinge and carefully chisel away small amounts of wood. Test the fit frequently to avoid over-chiseling. Have you ever considered using a pencil to outline the hinge’s position before chiseling? This can be a simple yet effective way to ensure precision.Dealing With Loose Hinges
Loose hinges can lead to a wobbly door, which no one wants. This issue often arises when the screws aren’t holding firmly in the wood. Check if the screws are tight, and if not, tighten them with a screwdriver. If tightening doesn’t work, the screw holes may be too large. Try using wooden toothpicks or matchsticks to fill the gap, then reinsert the screw. Have you ever thought about using longer screws? They can provide a more secure hold, especially if you’re dealing with heavy doors. When tackling these issues, patience is your best friend. Don’t rush the process; instead, approach it with a problem-solving mindset. What other tricks have you found useful when working with door hinges? Share your thoughts in the comments!
Credit: www.youtube.com
Frequently Asked Questions
What Chisel To Use For Door Hinges?
Use a 1/4-inch or 1/2-inch bevel edge chisel for door hinges. Ensure it’s sharp for clean cuts. A mallet can aid precision. This chisel size fits most standard hinges, providing accurate and efficient installation.
How To Carve Out A Door Hinge Without A Router?
Use a chisel and hammer to carve out a door hinge. Mark the hinge outline on the door. Carefully chisel along the lines, ensuring depth consistency. Smooth out the recess with sandpaper for a perfect fit. Always work slowly and check the fit regularly.
What Tool To Use To Cut Out Door Hinges?
Use a router with a hinge mortising bit for precise door hinge cuts. Chisels can also be used for manual adjustments. Both tools ensure accurate and clean results.
How To Mortise A Door Hinge With A Router?
Use a router template to outline the hinge shape. Secure the door and set the router depth. Carefully rout the hinge area, ensuring smooth edges. Test the hinge fit and make adjustments if necessary. Clean up debris and attach the hinge securely.
Conclusion
Chiseling hinges may seem tricky, but practice makes it easier. Start with the right tools. Measure carefully and mark your spots. Take your time when chiseling. Small, steady strokes work best. Check your alignment regularly. This ensures a perfect fit.
Mistakes happen, and that’s okay. Just adjust and try again. Your door will hang beautifully. With patience, you’ll become more confident. Remember, practice leads to improvement. Soon, chiseling hinges will be second nature. Enjoy your handiwork and the satisfaction it brings.


