Have you ever struggled with a door that just won’t close properly? Or maybe you’ve noticed that annoying scraping noise every time you try to shut it.
You’re not alone! Many homeowners face this common issue, and the solution might be simpler than you think. Hand planing a door can seem like a daunting task, but with the right guidance, you can easily restore the smooth functionality of your doors.
Imagine the satisfaction of fixing it yourself and the peace of mind knowing your door operates perfectly. This article will guide you step-by-step on how to hand plane a door, ensuring you have all the tips and tricks needed to tackle this DIY project with confidence. Dive in and discover how you can transform your home with just a few easy steps!
Tools And Materials Needed
Essential tools for hand planing a door include a sharp hand plane, measuring tape, and sandpaper. Materials needed are sturdy clamps, a pencil for marking, and a workbench. These items ensure precision and ease during the planing process.
When you’re getting ready to hand plane a door, the right tools and materials are crucial. Having the proper equipment ensures a smooth process and a better finish. Let’s dive into what you need to make your task easier and more efficient.Selecting The Right Plane
Choosing the right plane is the first step. A bench plane is often the best choice for doors, offering good control and versatility. If the door is particularly large or has thick edges, a jack plane might be more effective. Remember, the right tool can make all the difference in achieving a clean, professional look.Essential Tools And Supplies
Here’s a simple list of what you’ll need: – Hand Plane: As discussed, pick a bench or jack plane depending on the door’s size. – Sandpaper: Fine-grit sandpaper helps smooth out any rough edges after planing. – Pencil and Straightedge: Mark the areas you plan to shave off to maintain precision. – Clamps: Secure the door to a stable surface to prevent movement while you work. – Safety Gear: Consider using goggles and a dust mask to protect yourself from wood particles. Once, while working on my own door, I forgot clamps. The door slipped, and I ended up with an uneven edge. It’s a small tool but makes a big impact. Have you ever overlooked a simple tool and wished you hadn’t? Additionally, keep a damp cloth handy to wipe away sawdust and check your progress. This helps you see where further planing might be needed. To wrap up, having these tools within arm’s reach can save you time and frustration. Proper preparation leads to smoother, more satisfying results. Are you ready to tackle your door with confidence?
Credit: www.amazon.com
Preparing The Door
Preparing a door for hand planing is crucial. Proper preparation ensures smooth and effective work. Planing helps the door fit perfectly. Let’s start with removing and inspecting the door.
Removing The Door
First, you need to take the door off its hinges. Use a screwdriver to remove hinge pins. Support the door to prevent it from falling. Once the pins are out, gently lift the door. Place it on a flat surface. Make sure it’s stable before working.
Inspecting The Door For Imperfections
Look closely at the door’s surface. Find areas that need planing. Check for rough spots or uneven edges. Examine the bottom and sides too. Use your hand to feel for bumps. Mark areas needing attention. This helps you plan your work.
Marking And Measuring
Accurate marking and measuring simplify the task of hand planing a door. Begin by measuring the door’s dimensions to ensure even shaving. Mark the areas needing adjustment with a pencil for precision while planing.
Marking and measuring are crucial steps when it comes to hand planing a door. They ensure precision and prevent unnecessary mistakes. Without accurate markings and measurements, you might find yourself planing too much or too little, which can lead to a door that still won’t fit properly. Let’s dive into how you can tackle this important task effectively.Identifying Problem Areas
Before you start measuring, inspect your door carefully. Look for areas where it sticks or rubs against the frame. These problem areas are your focus points. A quick way to spot them is by opening and closing the door. Listen for squeaks or feel where the door resists movement. Once identified, mark these areas lightly with a pencil. This makes them easy to locate later without damaging the door.Using Measuring Tools Accurately
Now that you know where the issues lie, it’s time to measure. Use a tape measure or a ruler to gauge the extent of the problem. Measure the gap between the door and frame at various points. This helps determine how much you need to plane off. Remember, precision is key. Double-check your measurements to avoid errors. Consider using a caliper for more detailed measurements if the gaps are small. Getting these measurements right means less time spent planing and a better fit for your door. — These steps require a bit of patience, but the result is worth it. The satisfaction of a door that swings freely and quietly is unbeatable. Have you ever struggled with a stubborn door? What was your solution?
Credit: www.wikihow.com
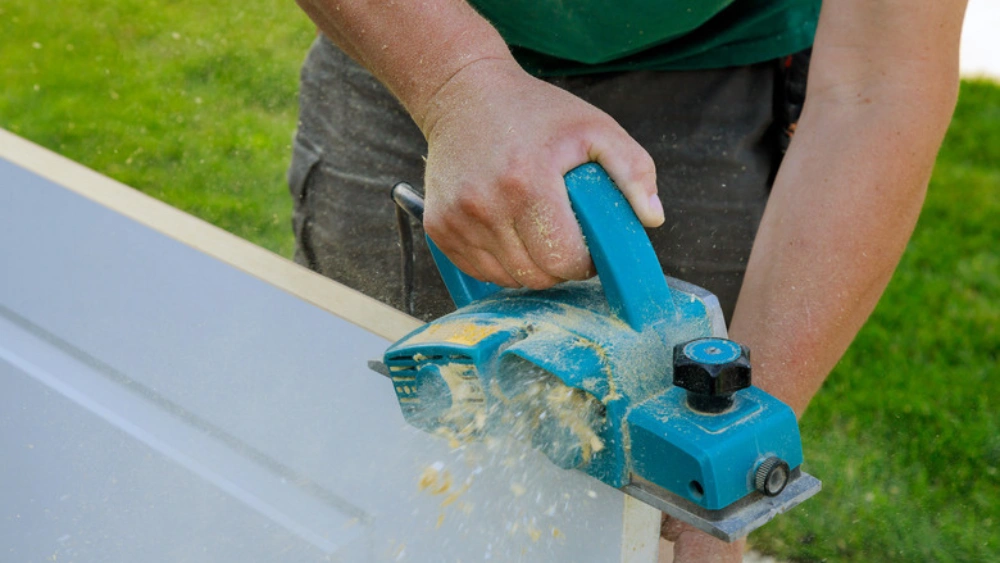
Planing Technique
Planing a door is an essential skill in woodworking. It requires precision and care to achieve a perfect fit. The planing technique helps create a smooth, even surface. This process ensures the door fits snugly in its frame. With the right approach, planing becomes an easy task.
Proper Hand Plane Grip
Holding the hand plane correctly is crucial. Grip the handle firmly but not too tight. Your fingers should wrap around the handle comfortably. The thumb should rest on top for control. This grip gives stability during planing. Avoid pressing too hard. It can cause uneven surfaces. A gentle, steady motion works best.
Achieving A Smooth Surface
Start by checking the door’s surface. Look for rough patches or uneven areas. Use the hand plane to shave off high spots. Move the plane in long, even strokes. Keep the blade sharp for clean cuts. Adjust the blade depth for different wood types. Test the surface regularly. Feel with your hand for smoothness. Repeat until the door is level and smooth.
Checking The Fit
After you’ve carefully planed your door, the next crucial step is checking the fit. This part of the process ensures that all your hard work pays off with a perfectly functioning door. But how do you know if your planing efforts have hit the mark? Let’s dive into how you can confidently check the fit of your door and make necessary adjustments.
Reattaching The Door
Begin by reattaching the door to its hinges. It’s essential to have someone assist you, ensuring the door is aligned correctly. This prevents any misalignment that might cause trouble later.
As you secure the hinges, watch out for any gaps or uneven spacing between the door and the frame. This can indicate additional planing is necessary. Don’t rush this step; precision now saves time later.
Testing Movement And Alignment
Once reattached, test the door’s movement. Open and close the door several times to see how it swings. Does it glide smoothly without catching?
Check the alignment. Make sure the door closes flush against the frame, and there’s no light peeking through the edges. This is a sign of a well-fitted door.
If you notice resistance or misalignment, ask yourself: Could a minor adjustment make a big difference? Often, slight additional planing or hinge adjustments can perfect the fit.
Consider this: every door has its personality. During one of my projects, a door seemed stubborn, refusing to fit as planned. A couple of extra passes with the plane corrected the fit perfectly. This small adjustment transformed the door’s functionality.
Remember, the goal is a seamless fit that enhances your space. Take the time to ensure your door operates smoothly and looks great. What tricks have you discovered when adjusting a door? Share your experiences, and let’s learn together!
Troubleshooting Common Issues
Hand planing a door can fix sticking problems and improve fit. Ensure the door is free of hardware before you start. Check for uneven edges and plane smoothly, removing small amounts of wood at a time.
Hand planing a door can be a satisfying DIY project, yet it often comes with its own set of challenges. Troubleshooting these common issues is crucial to ensuring your door operates smoothly and looks great. Whether you’re dealing with warped doors or uneven planing, understanding how to address these problems will save you both time and frustration.Dealing With Warped Doors
A warped door can be quite a headache. It might not close properly or could even get stuck. To check if your door is warped, lay it flat on a level surface. If there’s a visible gap, you’ve got a warp to fix. To tackle this, use your hand plane to shave down the high spots. Start with gentle strokes and check your progress often. You might be tempted to plane aggressively, but patience is key here. Too much planing can ruin the door. Sometimes, adding a bit of moisture to the opposite side of the warp and applying weight can help straighten the door. Have you ever tried this simple trick? It can work wonders for minor warps without needing extensive planing.Addressing Uneven Planing
Uneven planing is a common issue, especially for beginners. It results in a door that looks unprofessional and may not fit well. To avoid this, ensure your plane blade is sharp and properly adjusted. A dull blade leads to more problems than solutions. Always plane in the direction of the wood grain. Going against it can cause tear-out and uneven surfaces. Consider marking the areas you need to plane with a pencil. This helps you maintain focus and avoid over-planing certain spots. Have you ever wondered why the door still doesn’t close smoothly? Check the door frame. Sometimes the issue isn’t with the door itself but with the frame. Adjusting the frame slightly can sometimes solve what seems like a planing problem. Troubleshooting these common issues not only enhances your woodworking skills but also brings a sense of accomplishment. Each challenge you overcome builds confidence for future projects.Maintenance And Care
Maintaining your hand plane and the door itself after planing is crucial for achieving the best results and prolonging the life of your tools and surfaces. Proper care ensures that your plane performs efficiently and that the door remains in top-notch condition. Let’s delve into the simple yet vital steps to keep both in excellent shape.
Keeping Your Plane Sharp
Sharpness is key to a smooth planing experience. A dull blade not only makes the task harder but also risks damaging the door’s surface. Regularly check your plane’s blade; if you notice it’s not cutting cleanly, it’s time for a sharpening session.
Use a whetstone or honing guide to sharpen the blade. Consistency in angle is crucial to maintaining a sharp edge. Remember, a sharp blade is your best friend when it comes to efficiency and precision.
After sharpening, keep the blade dry and store it properly. Moisture can cause rust, which dulls the blade and can ruin your plane over time. Make it a habit to wipe the blade clean and apply a light coat of oil after use.
Protecting The Door Finish
Planing can leave the door’s edges vulnerable to moisture and damage. After planing, inspect the finish and touch up any bare wood with a matching stain or sealant. This step is crucial to prevent swelling or warping.
Consider using a clear coat to protect the door further. Not only does it enhance the wood’s natural beauty, but it also adds a layer of protection against everyday wear and tear. Remember, prevention is better than repair when it comes to maintaining your door.
Think about where your door is located. Is it exposed to weather elements? Ensure that the edges are sealed properly, especially if they are in direct contact with rain or sun. A well-maintained door lasts longer and functions better.
Have you ever noticed your door sticking again after a few months? Regular maintenance prevents this annoyance and keeps your handiwork in top form. Keep your tools sharp and your door protected, and you’ll enjoy smooth operation for years to come.

Credit: www.amazon.com
Frequently Asked Questions
Can You Hand Plane A Door?
Yes, you can hand plane a door to adjust its fit. Use a sharp hand plane for smooth edges. Ensure the door is securely held while planing. Regularly check the fit to avoid over-planing. Hand planing offers precision and control for perfect alignment.
What Is The Best Tool For Planing A Door?
The best tool for planing a door is a hand planer or an electric planer. These tools efficiently shave off wood, ensuring a smooth and accurate fit. Electric planers are faster, while hand planers offer more control for precision work.
Choose based on your skill level and project requirements.
What’s The Best Way To Plane A Door?
Use a sharp hand plane to trim the door edges. Secure the door, then shave small amounts. Check fit frequently. Ensure hinges and latch align properly for smooth operation. Sand edges for a smooth finish.
How To Plane A Door Without A Planer?
Use a hand plane, sandpaper, or a rasp to shave the door edges. Secure the door, mark areas, and sand or plane gradually until it fits. Always check fit frequently to avoid over-removal.
Conclusion
Hand planing a door enhances its fit and function. Remember, patience is key. Take your time and focus on each step. Double-check measurements before shaving wood. Smooth, even strokes prevent uneven surfaces. Test the door frequently during the process. This ensures it swings freely and closes properly.
Proper tools make the job easier. Invest in quality equipment for better results. Practice improves skill over time. Soon, you’ll tackle doors with confidence. Experience brings mastery, and effort leads to satisfaction. Enjoy the rewarding process of hand planing. Your doors will thank you with perfect fits.


