
Are you tackling a home improvement project or involved in precision-based construction work? A laser level might just be the tool that makes your life a whole lot easier.
Imagine hanging that picture frame perfectly straight or ensuring that your new deck is flawlessly aligned. Sounds like a dream, right? That’s where understanding how to work a laser level comes in. This tool can save you time, frustration, and potentially costly mistakes.
By the end of this article, you’ll have the skills to handle a laser level like a pro, making your projects not just easier, but more enjoyable. Ready to discover the secrets to perfect alignment? Keep reading, and let’s get started on making your next project a breeze!

Credit: home.howstuffworks.com
Choosing The Right Laser Level
Choosing the right laser level is crucial for your project’s success. Whether you’re hanging a picture or building a fence, the right tool can make all the difference. Have you ever found yourself struggling with uneven surfaces or inaccurate measurements? A laser level could be your solution. Let’s explore what you need to know to make the right choice.
Types Of Laser Levels
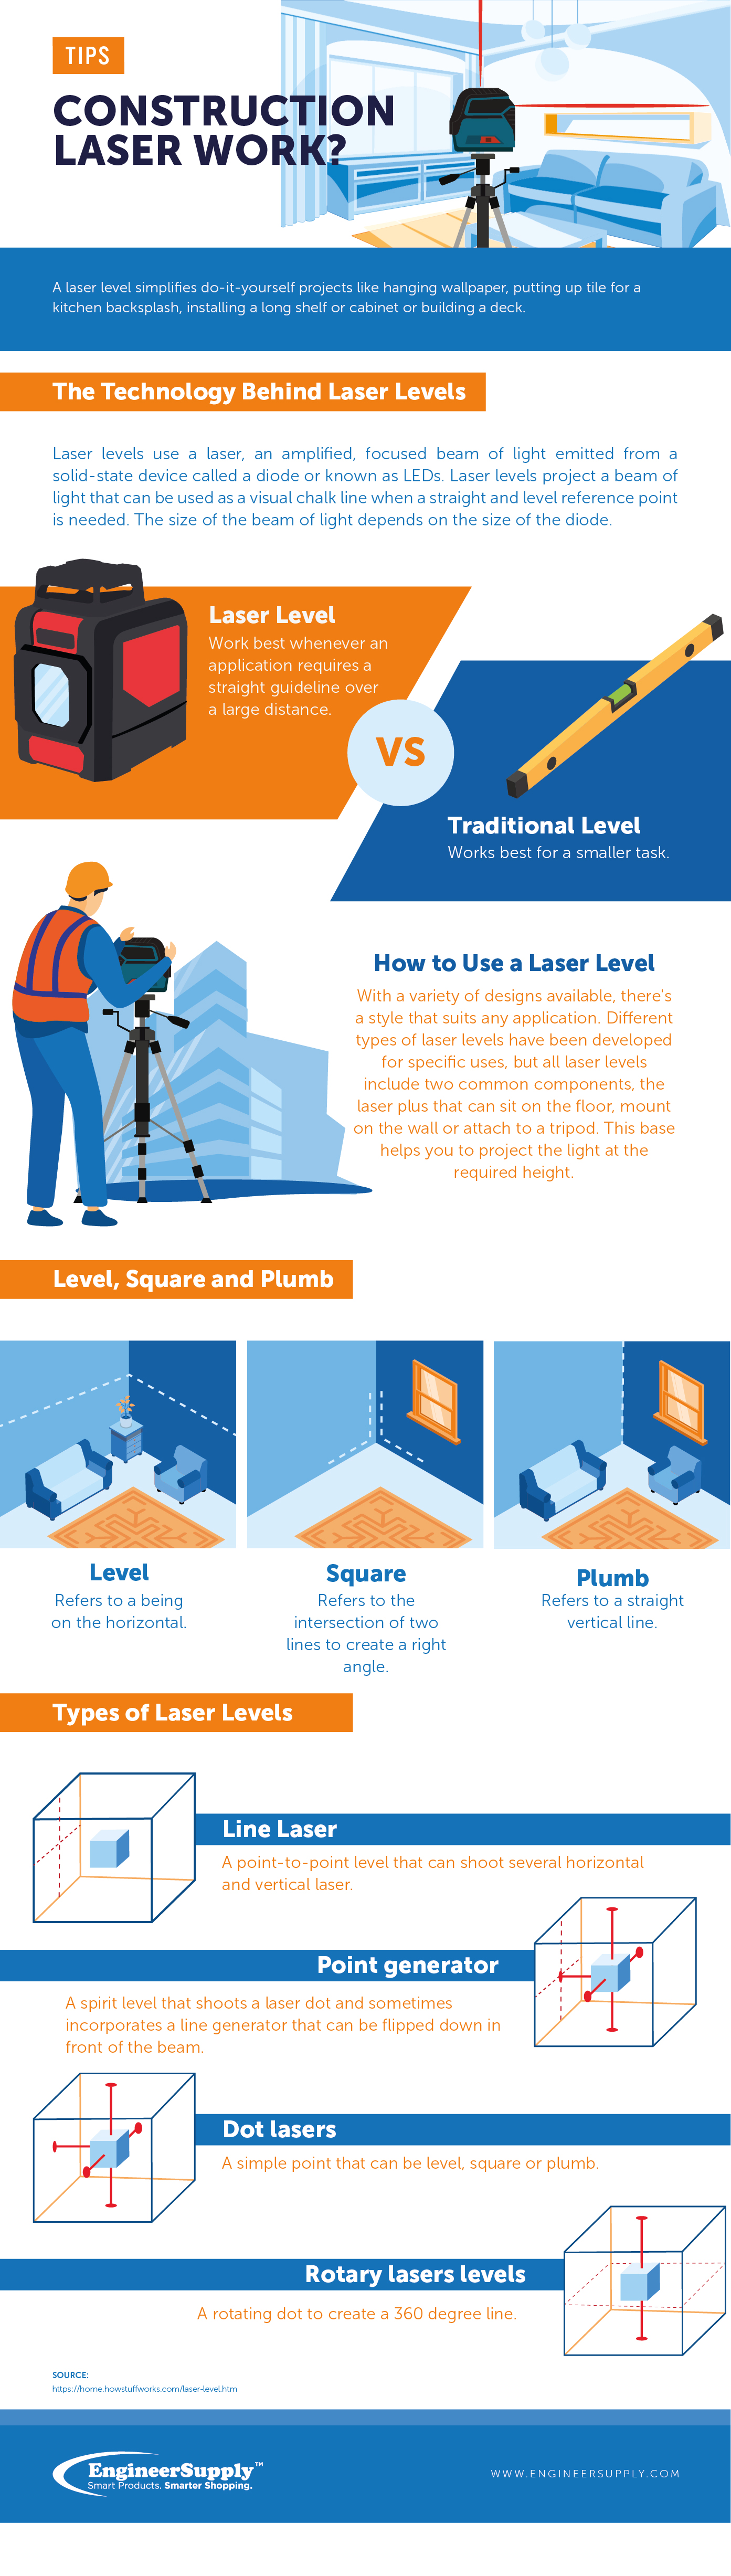
Laser levels come in various types, each suited to different tasks. There’s the rotary laser level, perfect for large outdoor projects like grading land. Then there’s the line laser level, ideal for indoor tasks such as installing shelves. Lastly, the dot laser levelis best for aligning points across a distance. Each type serves a unique purpose, so think about what you need before purchasing.
Features To Consider
When shopping for a laser level, consider features like range, accuracy, and visibility. A level with a longer range is better for expansive projects. High accuracy ensures precise measurements, saving you time and stress. Visibility in bright environments is also key; look for models with strong beams. Remember, not every laser level will have all features, so prioritize what matters most to you.
Suitability For Different Projects
Different projects require different tools. For example, if you’re working on a landscaping project, a rotary laser level is invaluable. But for home renovations, a line laser level might be more suitable. Think about your project’s scope and environment. Have you ever tried to use a tool that just wasn’t right for the job? Avoid that frustration by matching your laser level to your specific needs.
Choosing the right laser level doesn’t have to be overwhelming. By understanding the types, features, and project suitability, you’re on your way to making a smart choice. What project are you tackling next, and how can a laser level make it easier?
Setting Up Your Laser Level
Setting up a laser level involves placing it on a stable surface and adjusting the settings for accuracy. Ensure the area is clear and select the right mode for your task. Follow the manual instructions for precise alignment and calibration.
Setting up a laser level might seem like a daunting task, but with a little practice, it becomes second nature. Whether you’re hanging picture frames or laying tiles, a well-set laser level ensures precision. Let’s break down the process step by step to make sure your projects are perfectly aligned and level.Preparing The Work Area
Start by clearing your workspace of any obstacles or debris. A clean area allows for accurate measurements and prevents interference. Ensure that surfaces are stable and flat, reducing potential errors. Consider your surroundings—are there any reflective surfaces? Reflective surfaces can distort laser beams, so take note. If necessary, adjust the position to minimize interference.Mounting The Laser Level
Choose a secure spot to mount your laser level. A tripod often works best, as it provides stability and flexibility. If you don’t have a tripod, look for a flat surface like a table or a shelf. Secure the laser level firmly, ensuring it won’t wobble or shift. A shaky device can skew your results, leading to inaccurate measurements. Trust me, I’ve learned this the hard way when a slightly tilted level ruined an entire afternoon of work.Calibrating The Device
Once mounted, it’s time to calibrate your laser level. This step is crucial for ensuring your lines are true and precise. Follow the manufacturer’s instructions carefully—each device may have specific calibration steps. Check the horizontal and vertical alignment. Use a spirit level to verify accuracy if needed. Calibration might seem tedious, but it’s the key to achieving professional results. Skipping this step could lead to costly mistakes and rework. Have you ever set up a laser level only to find your lines aren’t perfectly straight? What tips do you have for ensuring accuracy? Remember, every detail counts, and preparation is key to success.Operating The Laser Level
Operating a laser level might sound technical, but once you get the hang of it, it’s like having a reliable friend on the job site. Whether you’re hanging pictures, installing shelves, or need precision in construction, mastering this tool is essential. Let’s dive into how you can make the most of your laser level.
Understanding Controls
First things first, familiarize yourself with the controls. Most laser levels have straightforward buttons or switches for power and mode settings. It’s crucial to know what each button does. Spend a few minutes experimenting with different settings to see how they affect the laser beam. A friend of mine once accidentally set his level to pulse mode and was confused why the beam was flickering—don’t let this happen to you.
Aligning The Beam
Once you’ve mastered the controls, aligning the beam is your next step. Place your laser level on a stable surface or tripod. Adjust it so the beam points directly at your target area. In a recent project, I was installing kitchen cabinets. I found that small shifts in alignment could make a big difference in the final outcome. Make sure to check the alignment from multiple angles to ensure precision.
Using The Laser Detector
If you’re working outside or over long distances, a laser detector is your best friend. It helps you find the beam when it’s hard to see with the naked eye. Attach the detector to a measuring rod and slowly move it until it picks up the beam. I recall a tricky outdoor setup where the detector saved me from endless adjustments. Think of it as an extra set of eyes in challenging conditions.
Why not take a moment to consider how a laser level can simplify your next project? It’s not just about precision; it’s about efficiency and confidence in your work. Embrace the learning curve, and soon you’ll wonder how you managed without it.
Safety Precautions
Laser levels are essential tools for precise measurements. Safety is crucial when using them. Improper use can lead to injuries or damage. Below are key precautions to ensure safe operation.
Protecting Your Eyes
Laser beams can harm your eyes. Always wear protective eyewear when operating a laser level. Ensure the eyewear is designed to block laser light. Never look directly into the laser beam. Keep the laser away from eye level. This helps prevent accidental exposure.
Avoiding Reflections
Reflections can be misleading and dangerous. Avoid shiny surfaces near the laser level. Reflected beams can hit unintended spots. This may cause inaccurate readings. Use matte surfaces to minimize reflection risks. Adjust the laser angle to reduce beam bounce.
Safe Handling Practices
Handle the laser level with care. Ensure the device is stable on flat surfaces. Secure it firmly to prevent falls. Keep the workspace clean and organized. Avoid clutter that might obstruct the laser path. Regularly check for loose parts or damage. This ensures the laser level operates correctly.
Troubleshooting Common Issues
Working with a laser level can sometimes be challenging. Common issues might arise, affecting accuracy and performance. Understanding how to troubleshoot these problems can save time and frustration. Here, we explore solutions to typical issues like calibration, power failures, and environmental interference.
Resolving Calibration Problems
Calibration ensures your laser level provides accurate readings. If your device is off, check its base. A stable base is crucial for precise calibration. Also, inspect the bubble vial. It must be centered for correct alignment. If the problem persists, consult the user manual for reset instructions.
Addressing Power Failures
Power issues can disrupt your work. Ensure the batteries are charged and properly inserted. Check the power button for any damage. If the level won’t turn on, inspect the battery contacts. Cleaning them might solve the issue. If nothing works, consider replacing the batteries.
Dealing With Environmental Interference
Environmental factors can affect laser visibility. Bright sunlight can reduce laser effectiveness. In such cases, use a laser detector. It helps in identifying the beam in bright conditions. Also, avoid using the level near reflective surfaces. Reflections can cause errors in readings.

Credit: www.laserlevelreview.com
Maintenance Tips
Maintaining a laser level ensures its efficiency and longevity. Proper care can enhance performance and avoid unexpected issues. Here are essential maintenance tips to keep your laser level in top shape.
Cleaning The Lens
A clean lens is crucial for accurate measurements. Use a soft, lint-free cloth to wipe the lens gently. Avoid abrasive materials that might scratch the surface. For stubborn dirt, use a lens cleaning solution. Apply it sparingly to the cloth, not directly on the lens. Regular cleaning prevents dust buildup.
Battery Care
Batteries power your laser level. Check them regularly for signs of wear or corrosion. Clean battery contacts with a dry cloth. Store batteries in a cool, dry place. Remove them if you won’t use the laser level for a while. This prevents battery leakage and damage. Always use the recommended battery type.
Storing Properly
Proper storage extends your laser level’s lifespan. Keep it in a protective case when not in use. Store in a dry, cool environment to prevent moisture damage. Avoid places with extreme temperatures. Secure the laser level to prevent falls or impacts. Regularly check for any signs of wear or damage.
Advanced Tips And Tricks
Using a laser level can transform your project efficiency. Advanced tips can elevate your skills. Whether you’re a seasoned pro or a curious beginner, these tricks refine your techniques.
Maximizing Accuracy
Ensure your laser level is on a stable surface. Even minor shifts affect precision. Keep the lens clean to avoid distortion. Dirt or smudges can misdirect the beam. Regularly check the calibration. A calibrated device ensures accurate readings every time.
Time-saving Techniques
Use a tripod for swift setup. It saves time aligning the laser. Mark reference points before starting. This minimizes guesswork during adjustments. Invest in a remote control. It allows you to adjust settings without moving from your spot.
Innovative Uses
Try using your laser level for art installations. It helps in aligning artwork perfectly. Use it for outdoor landscaping projects too. It ensures even slopes and paths. Consider ceiling installations. A laser level can guide perfect light fixture placements.
Credit: www.engineersupply.com
Frequently Asked Questions
How Do You Use A Laser Level For Beginners?
Place the laser level on a flat surface or tripod. Turn it on and ensure it’s level. Adjust the device until the laser beam aligns with your desired reference point. Use the marked line as a guide for precision tasks like hanging shelves or aligning tiles.
Always follow safety precautions.
How To Use A Laser To Check Floor Level?
Place the laser level on the floor. Turn it on to emit a laser line. Measure the distance from the laser line to the floor at various points. Identify any variations to determine unevenness. Adjust as needed to level the floor accurately.
How Does A Laser Work Step By Step?
A laser emits light through a process of optical amplification. Atoms get excited by an energy source. Excited atoms release photons. Photons stimulate other atoms to release more photons. Mirrors in the laser amplify the light. The laser emits a coherent and focused beam of light.
How Do I Make Sure My Laser Level Is Level?
Place the laser level on a flat surface. Adjust its position until the bubble is centered in the vial. Use the built-in calibration feature if available. Double-check alignment using a manual spirit level for accuracy. Regularly calibrate your laser level to maintain precision.
Conclusion
Mastering a laser level boosts your project’s accuracy. With practice, setting it up becomes simple. Check the area for obstructions first. Position the laser level on a stable surface. Adjust the settings for your task. Align the laser beam with your target.
Always follow safety tips to protect your eyes. A laser level is a handy tool for many tasks. It ensures straight lines effortlessly. With these steps, you’ll handle it like a pro. Remember, practice makes perfect. Happy leveling!


