
Ever been frustrated with a malfunctioning appliance and wondered what’s going wrong? One common culprit could be a faulty thermocouple.
If you’ve ever found yourself puzzled over why your heater isn’t working, or why your furnace seems to have a mind of its own, then understanding how to check a thermocouple might just save the day—and your patience. Imagine the satisfaction of diagnosing the issue yourself, with just a multimeter in hand.
You don’t need to be a tech wizard to get this right. This guide will walk you through the simple steps to check whether your thermocouple is functioning properly, empowering you to take control of your home maintenance. By the end of this article, you’ll have the confidence to troubleshoot this common problem, saving you time, money, and a lot of stress. So, grab your multimeter and let’s make sure your appliances are back on track.
Credit: support.johnstonehvac.biz
What Is A Thermocouple
A thermocouple measures temperature using two different metals. To check it with a multimeter, set the multimeter to ohms. Connect the multimeter probes to the thermocouple ends. A reading above zero but below 30 ohms indicates the thermocouple is working.
Understanding what a thermocouple is can be quite enlightening, especially if you’re venturing into the world of electronics and appliances. A thermocouple is a simple yet essential device that measures temperature. It plays a critical role in various applications, from home appliances like your oven to industrial machinery. Imagine cooking a perfect roast or ensuring your heater functions safely—all thanks to this tiny device.Understanding The Basics
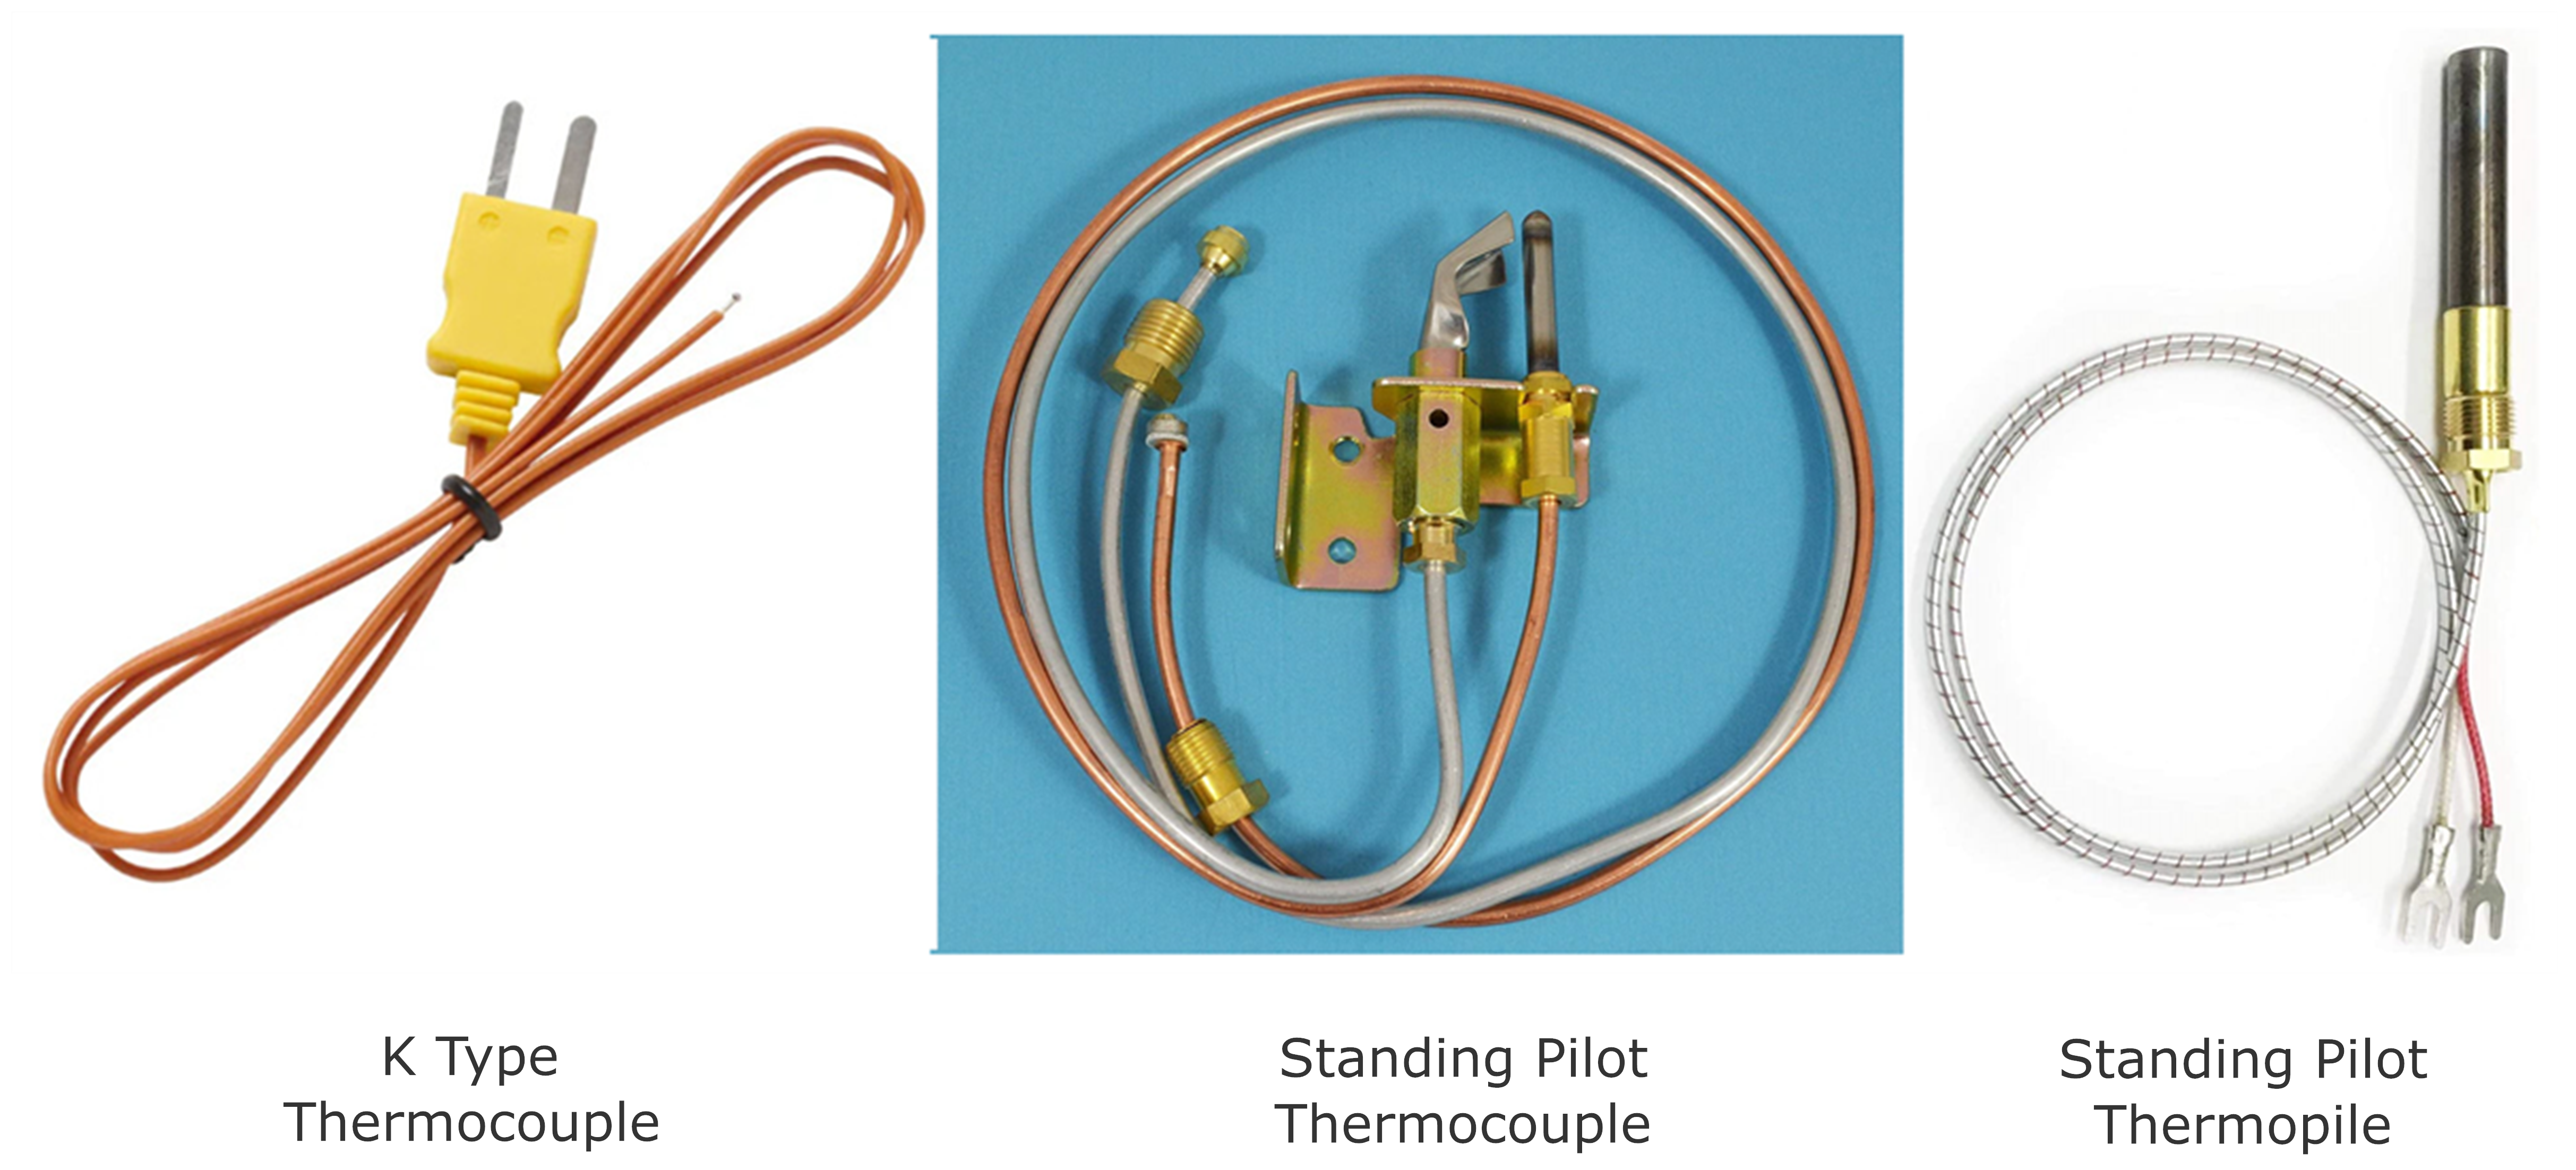
A thermocouple consists of two different metal wires joined at one end. When this junction experiences a change in temperature, it generates a voltage. This voltage can be measured to determine the temperature. This phenomenon is known as the Seebeck effect, and it’s the fundamental principle behind how thermocouples work. There are several types of thermocouples, each made from different metal combinations. The most common ones are Type K, Type J, and Type T. Each type has its own temperature range and environmental suitability. For example, a Type K thermocouple can measure temperatures from -200°C to 1,372°C, making it versatile for both high and low-temperature applications.Applications In Everyday Life
Thermocouples are everywhere—even if you don’t notice them. They’re in your oven, ensuring your cookies bake evenly. They’re in your furnace, maintaining a cozy home temperature in winter. Industrial settings use them to monitor and control processes. Without thermocouples, many modern conveniences would falter.Why You Need To Know This
Understanding thermocouples can save you time and money. If your heating system isn’t working properly, knowing how a thermocouple functions can help diagnose the issue. Before calling a technician, you might check it yourself with a multimeter. This knowledge empowers you to tackle minor issues without professional help, possibly extending the life of your appliances. Ever wondered how your oven knows when to stop heating? Or why your furnace doesn’t overheat? Those are thermocouples at work. Next time you face a temperature-related issue, will you consider checking the thermocouple yourself?Types Of Thermocouples
Checking a thermocouple with a multimeter is simple. First, identify the thermocouple type. Types include J, K, T, and E. Each has specific temperature ranges and applications. Use a multimeter to measure resistance and voltage. Ensure the connections are secure.
Compare readings with standard values to verify functionality.
Understanding the different types of thermocouples is crucial when you’re checking them with a multimeter. Each type has unique characteristics, and knowing these can help you choose the right one for your specific needs. Let’s dive into the most common types, their features, and how they might affect your measurements.Type K Thermocouples
Type K thermocouples are the most common and versatile. They are made from nickel-chromium and nickel-aluminum alloys. If you’re working in a standard industrial setting, this is likely what you’ll encounter. These thermocouples work well in a range of temperatures, from -200°C to 1,260°C. Imagine you’re testing equipment in a manufacturing plant; a Type K thermocouple would be your go-to choice due to its durability and reliability.Type J Thermocouples
Type J thermocouples use iron and constantan materials. They are ideal for lower temperature ranges, up to about 760°C. Their sensitivity makes them perfect for more precise applications. Picture yourself in a laboratory setting; Type J can provide the accuracy you need for delicate experiments.Type T Thermocouples
Type T thermocouples are made from copper and constantan. They are highly accurate at low temperatures, making them suitable for cryogenic applications. If you’re dealing with refrigeration systems, a Type T thermocouple could be the best tool for the job. Wouldn’t it be great to have precise control over your cold storage?Type E Thermocouples
Type E thermocouples consist of nickel-chromium and constantan. They offer a high output and are excellent for high-precision tasks. Their range is similar to Type K, but with better sensitivity. Consider using Type E when you need high accuracy in moderate temperature environments.Type N Thermocouples
Type N thermocouples are made of nicrosil and nisil. They are designed to withstand high temperatures and resist oxidation. If you’re working in an environment with high thermal stress, Type N provides stability and longevity. Are you ready to tackle those extreme conditions with confidence? Understanding these types can significantly impact your approach to using a multimeter with thermocouples. What type do you think suits your needs best? Knowing your options empowers you to make better decisions and improve your measurements.Essential Tools For Testing
Testing a thermocouple involves using a multimeter to measure voltage. First, set the multimeter to the millivolt range. Connect the thermocouple wires to the multimeter probes and check the reading. A consistent reading indicates proper function.
Checking a thermocouple with a multimeter might seem daunting at first, but having the right tools makes all the difference. Imagine you’re about to embark on a DIY project, and you realize halfway through that you’re missing essential equipment. Frustrating, right? To ensure your thermocouple testing goes smoothly, prepare your toolkit in advance. Let’s dive into the key tools you’ll need.Choosing The Right Multimeter
Selecting the right multimeter is crucial. You’ll want a digital multimeter with a temperature measurement feature. This type of multimeter provides more accurate readings and is user-friendly. If you’ve ever used a multimeter, you know how important a clear display is—especially when you’re squinting at tiny numbers. Look for one with a backlit screen for those poorly lit environments. A multimeter with auto-ranging capabilities simplifies the process. It automatically selects the correct measurement range, saving you time and reducing the risk of incorrect readings. Remember the time you had to manually switch settings and wondered if you’d set it right? Auto-ranging eliminates that guesswork.Additional Equipment Needed
Beyond the multimeter, a few other tools will streamline your testing process. First, ensure you have a pair of alligator clips. These handy clips help you connect the thermocouple wires securely to the multimeter probes. Ever tried holding wires steady with one hand while reading measurements with the other? Alligator clips solve that problem. Consider having a heat source available, such as a lighter or a heat gun. This lets you test the thermocouple’s response to temperature changes. It’s one thing to see numbers on a screen, but watching them change as you apply heat gives you firsthand confirmation that the thermocouple is working. Lastly, keep a small screwdriver on hand. You might need it to adjust connectors or open compartments. It’s those little moments—when you realize you need a screwdriver and have to search your entire toolbox—that can disrupt your workflow. Having one ready ensures you’re prepared for any minor adjustments. Are you ready to test your thermocouple with confidence? By gathering these essential tools, you’re setting yourself up for success.Preparing For Testing
Testing a thermocouple is simple with a multimeter. Start by setting the multimeter to measure millivolts. Connect the multimeter probes to the thermocouple wires. Read the voltage to see if it matches the expected range.
Preparing for testing a thermocouple with a multimeter is an essential step in ensuring accurate results. Before you dive into the technicalities, it’s crucial to set up your workspace and equipment properly. This not only guarantees precision but also ensures your safety throughout the testing process. Let’s walk through the necessary preparations that will lead you to successful testing.Safety Precautions
Before reaching for your multimeter, prioritize safety. Wear protective gloves to safeguard against unexpected electrical shocks. Make sure your workspace is dry and free from clutter. This minimizes the risk of accidents and provides a clear area to focus on the task at hand. Double-check that your multimeter is in good working condition. A malfunctioning device can lead to inaccurate readings or even personal harm.Ensuring Proper Setup
Start by organizing your tools. Keep your multimeter, thermocouple, and any additional accessories within easy reach. Ensure your multimeter is set to the correct setting. Typically, you’ll want it on the millivolt (mV) scale for thermocouple testing. Verify the connections. Securely attach the thermocouple wires to the multimeter leads. Loose connections can result in misleading readings. By following these steps, you’re not just preparing for testing; you’re setting yourself up for accuracy and safety. What’s your usual routine when preparing for a task that requires precision?Testing The Thermocouple
Testing the thermocouple is a critical step in ensuring that your heating systems are functioning properly. A faulty thermocouple can lead to inefficient heating or even safety hazards. By learning how to test a thermocouple with a multimeter, you can save time and avoid unnecessary service calls. This guide will walk you through the process, making it simple and straightforward.
Setting Up The Multimeter
First, get your multimeter ready. Set it to measure voltage. If you’re unfamiliar with the settings, check the multimeter manual for guidance. Make sure the multimeter is on and the probes are securely attached.
Place the thermocouple in the environment where it normally operates. This helps simulate real conditions and provides accurate readings. Proper setup ensures you’re getting the right information.
Measuring Voltage Output
Now, connect the multimeter probes to the thermocouple. The red probe goes to the positive terminal, while the black probe connects to the negative terminal. Keep the connections tight for precise measurements.
Observe the multimeter reading. You should see a voltage output. This number represents the thermocouple’s ability to measure temperature changes. A stable environment helps achieve consistent results.
Interpreting The Results
With the voltage output in hand, compare it against expected values. Each thermocouple type has standard voltage outputs for specific temperatures. Consult your thermocouple’s specifications to know what numbers you should expect.
If the voltage is off, it might mean the thermocouple is faulty or your setup needs adjustment. Is it worth replacing, or can it be fixed? These results guide your next steps.
By understanding these readings, you can make informed decisions about maintenance or replacement. Are you ready to tackle your heating system challenges with confidence?

Credit: www.youtube.com
Troubleshooting Common Issues
Easily check a thermocouple using a multimeter to ensure it’s working correctly. Set the multimeter to millivolts, then connect the probes to the thermocouple wires. Compare the reading to standard temperature values to determine functionality.
Checking a thermocouple with a multimeter can sometimes feel like a daunting task, especially when things don’t go as planned. Even the most seasoned technicians encounter issues. Knowing how to troubleshoot common issues is crucial for getting accurate readings and ensuring your thermocouple is functioning correctly. Let’s dive into some common problems you might face and how to solve them.Identifying Faulty Connections
A simple, yet often overlooked issue is faulty connections. Loose or corroded connections can lead to incorrect readings. Start by inspecting the connections visually. Look for any signs of wear or corrosion. Tighten any loose connections you find. Use your multimeter to test the continuity of the thermocouple wires. Set the multimeter to the ohms setting. Touch one probe to each wire end. A reading close to zero indicates a good connection. If you get a high resistance or an infinite reading, you might have a broken wire or a faulty connection. Sometimes, the problem lies in the terminals themselves. Make sure they’re clean and free from oxidation. A small brush or sandpaper can help you clean them without much hassle. Regular maintenance can save you from unexpected breakdowns.Dealing With Inconsistent Readings
Inconsistent readings can be frustrating. They can stem from several sources, making it tricky to pinpoint the exact problem. First, ensure the thermocouple is properly seated in its measurement location. A loose thermocouple can cause fluctuating readings. Check the temperature range of your multimeter. Ensure it matches the expected range for your thermocouple. Using the wrong setting can lead to inaccurate readings. Consider the environment where the thermocouple is placed. External factors like drafts or radiation can impact readings. If possible, shield the thermocouple from these elements. Have you calibrated your multimeter recently? Calibration errors can cause inconsistencies. Regular calibration ensures your device provides accurate data. Don’t overlook this simple step. Remember, patience and systematic troubleshooting are key. Have you ever faced a similar issue? How did you handle it? Your experiences could provide valuable insights to others facing the same challenges.When To Replace A Thermocouple
Thermocouples play a vital role in heating systems. They ensure the safe operation of your appliances. Knowing when to replace a thermocouple can prevent potential issues. Faulty thermocouples can lead to inefficient heating or even complete failure. Regular checks can help maintain your heating system’s efficiency.
Signs Of A Failing Thermocouple
One sign of failure is the pilot light going out frequently. If this happens, the thermocouple may not be functioning correctly. Another sign is a burner that won’t stay lit. This can indicate a thermocouple issue as well. Unusual fluctuations in appliance temperature are also a warning sign. Regular monitoring is crucial to catch these early.
Age Of The Thermocouple
Thermocouples have a limited lifespan. Typically, they last several years. Once they age, their efficiency decreases. Consider replacement every few years to ensure reliability. Routine maintenance helps prolong their lifespan. But knowing their age is essential for timely replacement.
Visible Damage Or Wear
Check your thermocouple for visible damage. Look for signs of wear or corrosion. Damaged thermocouples often fail to work properly. If you see any physical damage, consider replacing it. Regular visual inspections can help identify potential issues. This ensures consistent appliance performance.
Frequent Repairs Needed
If repairs are needed often, it might be time for a replacement. Constant repairs indicate an underlying issue. The thermocouple may not be functioning efficiently. Replacing it can save time and reduce maintenance costs. This can lead to smoother appliance operation.
Inconsistent Appliance Performance
Noticeable changes in appliance performance can signal a thermocouple problem. If your appliance isn’t heating evenly, the thermocouple might be faulty. Inconsistent performance often points to a malfunctioning thermocouple. Addressing these issues promptly can prevent further complications.
Expert Tips For Accurate Testing
Testing a thermocouple with a multimeter requires precision. Accurate testing ensures reliable temperature readings. Expert tips can guide you to avoid errors and maintain your tools effectively. These insights will help achieve precise results and prolong equipment life.
Avoiding Common Mistakes
Misreading the multimeter settings can lead to incorrect results. Always check the settings before testing. Ensure the multimeter is set to measure voltage accurately. Connecting the probes incorrectly may also cause errors. Double-check connections before starting the test. Handling the thermocouple improperly can affect readings. Avoid bending or twisting the thermocouple while testing. Improper technique might damage the device.
Maintaining Equipment For Longevity
Regular calibration of your multimeter ensures accurate readings. Calibration prevents errors in measurements. Clean the multimeter probes frequently to maintain their sensitivity. Dirt and debris can affect results. Store your multimeter in a dry place to avoid moisture damage. Moisture can impair functionality over time. Inspect your thermocouple for signs of wear regularly. Replace damaged thermocouples promptly to ensure reliable performance.

Credit: www.wikihow.com
Frequently Asked Questions
How To Tell If A Thermocouple Is Bad?
Check for erratic temperature readings or a non-functioning appliance. Inspect for physical damage or corrosion. Use a multimeter to test continuity. If resistance is high, the thermocouple may be faulty. Regular maintenance can prevent issues.
How Many Ohms Should A Thermocouple Have?
A thermocouple typically has a resistance of less than 1 ohm. Resistance varies based on wire length and type. Always check the manufacturer’s specifications for exact values.
Should A Thermocouple Have Continuity?
Yes, a thermocouple should have continuity. Continuity indicates the thermocouple circuit is complete and can measure temperature accurately. Use a multimeter to test for continuity. A reading of zero or near-zero ohms means good continuity. Broken or damaged thermocouples show infinite resistance and need replacement.
How Many Millivolts Is A Thermocouple?
A thermocouple typically generates between 1 to 50 millivolts, depending on the temperature difference between its junctions. The exact output varies based on the thermocouple type and temperature range. Common types include K, J, and T, each providing different millivolt outputs.
Conclusion
Checking a thermocouple with a multimeter is straightforward. First, gather your tools. A multimeter is essential. Next, follow the steps outlined. Ensure connections are secure. Observe the multimeter readings closely. Compare these readings to expected values. This helps you detect issues.
Regular checks prevent bigger problems. Now, you’re equipped with valuable skills. Practice makes the process easier. Remember, safety is important. Always handle tools with care. With these steps, you maintain your device efficiently. This knowledge is practical for everyone. Keep learning and applying your skills.
Your thermocouple will thank you.




