Have you ever faced the challenge of dealing with brake lines and felt a little overwhelmed? You’re not alone.
Brake lines are a crucial component of your vehicle’s safety, and understanding how to handle them properly can save you both time and money. One essential tool in this process is the flaring tool. But how exactly do you use it to ensure your brake lines are secure and efficient?
By mastering the use of a flaring tool, you not only enhance your vehicle’s performance but also boost your confidence in handling automotive tasks. Stick around, and you’ll discover how simple it is to use a flaring tool for brake lines, making you the go-to person for car maintenance in your circle. Let’s dive into the details that will empower you to tackle this task with ease and precision.

Credit: www.wikihow.com
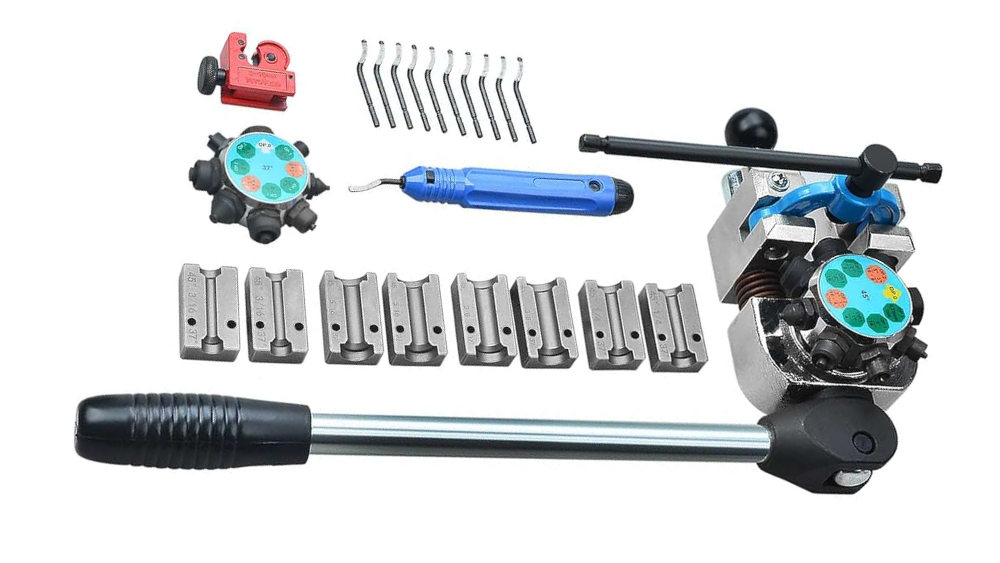
Choosing The Right Flaring Tool
Choosing a flaring tool is crucial for brake line repairs. The right tool ensures safety and precision. Not all tools are equal. Consider the type of flares you need. Different tools create different flares. Quality matters, too. A sturdy tool lasts longer. It also delivers better results.
Manual Vs. Hydraulic Flaring Tools
Manual tools are affordable and easy to use. They suit small jobs well. Hydraulic tools are better for frequent use. They apply more force with less effort. Choose based on your workload and budget.
Single Vs. Double Flaring Tools
Single flares are quicker but less durable. They are suitable for low-pressure systems. Double flares offer more strength and reliability. For brake lines, double flaring is recommended. It provides a stronger seal.
Material Compatibility
Check if the tool works with your brake line material. Some tools work only with specific metals. Ensure compatibility to avoid damage. This step prevents costly repairs later.
Ease Of Use
A user-friendly tool saves time. It also reduces frustration. Look for clear instructions and simple designs. This ensures smooth operation, even for beginners.
Price Vs. Quality
Price often reflects quality. Investing in a good tool pays off. It provides better performance and longevity. Balance your budget with the need for quality.

Credit: www.amazon.com
Step-by-step Flaring Process
Flaring brake lines might seem daunting at first, but with the right guidance, it becomes a manageable task. The flaring process is crucial in ensuring your brake lines function correctly, preventing leaks and ensuring safety. With a flaring tool in hand, you can tackle this task confidently.
Step 1: Gather Your Tools
Before you start, ensure you have a flaring tool kit, brake line tubing, a cutting tool, and a deburring tool. Having everything within reach saves time and reduces frustration. Remember, a well-prepared workspace makes the task smoother.
Step 2: Cut The Brake Line
Use the cutting tool to slice the brake line to the desired length. Make sure the cut is clean and straight. A crooked cut can lead to improper flares and potential leaks.
Step 3: Deburr The Edges
After cutting, use the deburring tool to remove any sharp edges or burrs. This step ensures a smooth surface for the flare to form correctly. Skipping this can lead to a poor seal.
Step 4: Secure The Brake Line In The Flaring Tool
Position the brake line in the flaring tool, aligning it with the appropriate size hole. Clamp it tightly to prevent slipping during the flaring process. A secure fit is crucial for an effective flare.
Step 5: Create The Flare
Use the flaring tool to create the flare by turning the handle steadily. Apply even pressure to form a uniform flare. Have you ever tried rushing this step? It often leads to mistakes.
Step 6: Inspect The Flare
Once formed, inspect the flare for evenness and proper shape. A good flare should be symmetrical without cracks. If it’s not right, it’s worth redoing to ensure safety.
Completing each step with attention to detail ensures your brake lines are flared to perfection. Have you ever experienced a brake line leak because of a poor flare? Avoiding such issues starts with mastering this process. With practice, you’ll find that flaring brake lines becomes second nature, and you’ll wonder why you ever found it challenging in the first place!
Common Mistakes To Avoid
Incorrect alignment can lead to leaks in brake lines. Ensure the flaring tool is tightly secured during operation. Avoid using excessive force, which might damage the tubing.
Using a flaring tool for brake lines is crucial for maintaining your vehicle’s safety and performance. However, certain common mistakes can lead to leaks or brake failure, putting you and others at risk. By understanding these pitfalls, you can ensure your brake lines are installed correctly and safely.Not Cleaning The Brake Line Properly
Before you start flaring, ensure the brake line is clean. Dirt or debris can affect the quality of the flare, causing it to be uneven. Use a clean cloth or a specialized cleaner to wipe the line thoroughly. A clean line ensures a smoother flare and reduces the risk of leaks.Incorrect Tool Alignment
Aligning the flaring tool properly is crucial. If the tool is not centered, the flare will be uneven. Double-check the alignment before tightening. A slight misalignment can cause a significant problem, making the brake line ineffective. Proper alignment is the key to a successful flare.Over-tightening Or Under-tightening
Finding the right balance when tightening is essential. Over-tightening can damage the brake line, while under-tightening might not create a secure flare. Feel the resistance as you tighten; it should be firm but not too hard. This balance ensures the flare holds up under pressure.Using The Wrong Type Of Brake Line
Not all brake lines are the same. Ensure you’re using the correct type for your vehicle. Some lines require specific flaring techniques or tools. Check the vehicle’s manual or consult a professional. Using the wrong line can lead to safety issues or vehicle damage.Skipping Practice Runs
Before working on the actual brake line, practice with spare pieces. Practicing helps you get a feel for the tool and technique. This trial run allows you to make mistakes without consequences. It’s a proactive step to avoid costly errors on your vehicle.Ignoring Safety Precautions
Safety should always be your priority. Wear gloves and eye protection to prevent injuries. Ensure your workspace is well-lit and free from hazards. Taking these precautions not only protects you but ensures a smoother working experience. Are you ready to take safety seriously? By avoiding these mistakes, you ensure the longevity and reliability of your brake lines. Every step you take towards precision and safety is a step towards a smoother, safer drive. Have you checked your brake lines lately?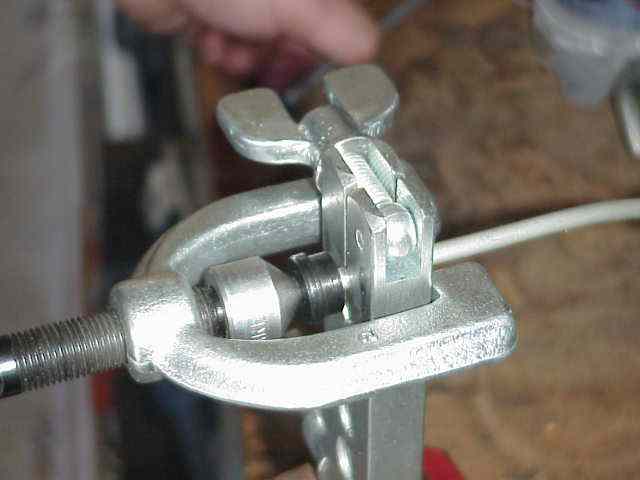
Credit: jeepspecs.com
Frequently Asked Questions
Do Brake Lines Need To Be Double Flared?
Yes, brake lines need to be double flared for safety. Double flaring ensures a secure seal and prevents leaks. It also provides durability against vibrations and pressure. Single flares can crack under stress, risking brake fluid loss. Always use the correct tools and techniques for flaring brake lines.
How To Single Flare A Brake Line?
Cut the brake line to length and deburr the edges. Secure it in a flaring tool. Tighten the clamp, then use a flaring punch to form the flare. Ensure it’s even and fits well with connectors. Double-check for leaks after installation.
What Angle Should I Flare For Brake Lines?
Flare brake lines at a 45-degree angle. This ensures a secure and leak-free connection. Use a double flare technique for enhanced durability and safety in automotive brake systems. Always check manufacturer guidelines for specific requirements.
How Do You Use A Flaring Tool?
To use a flaring tool, first cut the pipe end cleanly. Slide the flare nut onto the pipe. Secure the pipe in the flaring tool and tighten. Rotate the cone to flare the pipe end. Ensure the flare fits snugly into the fitting.
Check for leaks after assembly.
Conclusion
Using a flaring tool for brake lines is simple with practice. Start by gathering your tools and materials. Ensure your work area is clean and well-lit. Follow each step carefully for best results. Avoid rushing, as precision is crucial. Double-check your work to ensure safety and functionality.
If unsure, consult a professional or a reliable guide. Regular practice will improve your confidence and skill. Properly flared brake lines enhance vehicle safety. Remember, patience is key. Keep learning and improving your skills. With time, you’ll handle brake line tasks with ease.
Stay safe and always prioritize accuracy.


