
Have you ever found yourself staring at a glass jar, wondering how you could transform it into something uniquely yours? Maybe you’re thinking of turning it into a stylish lamp, a hanging planter, or a custom storage solution.
Whatever your project, drilling a hole in a glass jar might seem like a daunting task. But don’t worry—it’s easier than you think! In this guide, you’ll discover simple, step-by-step instructions to safely and efficiently drill a hole in your glass jar.
Imagine the satisfaction you’ll feel once you’ve conquered this DIY challenge. Ready to unleash your creativity? Let’s get started!
Credit: www.homedepot.com
Materials Needed
Drilling a hole in a glass jar requires careful preparation. Gather the right materials before starting. This ensures a smooth process. It also keeps you safe. Below are the key materials needed.
Glass Jar Selection
Choose a glass jar of good quality. Avoid jars with cracks. Thin glass is more prone to breaking. Thick glass is sturdier. It withstands drilling better. Use jars with smooth surfaces. It makes drilling easier.
Essential Tools
A diamond drill bit is essential. It cuts through glass smoothly. A power drill is necessary too. It provides the force needed. Use masking tape to mark the spot. It prevents slipping. Keep a spray bottle with water nearby. It cools the drill bit. This prevents overheating.
Safety Gear
Wear safety goggles to protect your eyes. Glass shards can fly. Gloves are important too. They protect your hands. Use a dust mask. It prevents inhaling fine particles. Safety is a priority. Always use the right gear.
Preparing The Workspace
Preparing your workspace is essential when drilling a hole in a glass jar. A well-organized space ensures safety and efficiency during the process. Let’s explore how to set up your workspace for this delicate task.
Choosing A Safe Area
Pick a spot free from distractions and hazards. The area should have a sturdy table or workbench. Make sure there’s good lighting to see clearly. Keep children and pets away from the workspace. This prevents accidents and keeps everyone safe.
Organizing Tools And Materials
Gather all necessary tools before starting. You need a drill, glass drill bit, and protective gear. Keep these tools within easy reach. Lay out a towel or rubber mat to cushion the jar. This prevents the jar from slipping during drilling.
Have a spray bottle filled with water nearby. Water cools the glass and reduces the risk of cracks. Arrange everything neatly to avoid clutter. This helps you find each item quickly when needed.
Safety Precautions
Wear safety goggles and gloves to protect yourself while drilling a hole in a glass jar. Ensure the jar is stable and use a drill bit designed for glass. Apply gentle pressure and keep the area cool with water to prevent cracking.
Drilling a hole in a glass jar requires careful attention to safety. Glass can be dangerous if not handled correctly. Taking appropriate precautions ensures your safety and prevents accidents. Follow these guidelines to safely drill a hole in a glass jar.Wearing Protective Gear
Protective gear is essential when working with glass. Safety goggles shield your eyes from flying glass shards. Wear gloves to protect your hands from cuts. A dust mask prevents inhalation of glass dust. Ensure your clothing covers your arms and legs. This minimizes the risk of injury.Handling Glass With Care
Handle the glass jar gently to avoid breakage. Inspect the jar for any cracks before starting. Use a stable surface to place the jar. This reduces the risk of slipping. Hold the jar firmly but not too tightly. Excessive force can shatter the glass. Apply moderate pressure while drilling to prevent breakage.
Credit: www.youtube.com
Marking The Drill Spot
Identify the exact spot on the glass jar where you want the hole. Use a marker to clearly mark it. This ensures precision and prevents mistakes during drilling.
Marking the drill spot is a crucial step in drilling glass jars. Proper marking ensures precision, reducing the risk of cracks. Choose a method that offers clear visibility. This helps maintain control during drilling. Two popular techniques are using a marker and using tape.Using A Marker Or Tape
Markers provide a clear visual guide. Use a dark-colored marker for contrast. First, clean the jar’s surface thoroughly. Dirt can interfere with the mark’s visibility. After cleaning, dry the surface completely. Wet surfaces can cause the marker to smudge. Once dry, mark the intended drill spot. Ensure the mark is visible from different angles. Tape can also be effective for marking. Use painter’s tape or masking tape. These tapes stick well to glass surfaces. Cut a small piece of tape and place it where you plan to drill. The tape helps prevent the drill bit from slipping. It also reduces the chance of cracking.Ensuring Accurate Placement
Accurate placement is vital for successful drilling. First, determine the exact spot for the hole. Measure distances from the jar’s edges. This ensures symmetry and balance. Double-check your measurements for accuracy. Use a ruler or measuring tape for precision. Mark the center of your measurements. This will be your drill spot. If using tape, place it precisely over this center. Check alignment by viewing the jar from different sides. Ensure the mark or tape is level. A level mark ensures a straight hole. Finally, take a step back. Reassess the placement with fresh eyes. Adjust if necessary. Once satisfied, you’re ready for drilling. Following these steps ensures a clean, precise hole.Drilling Process
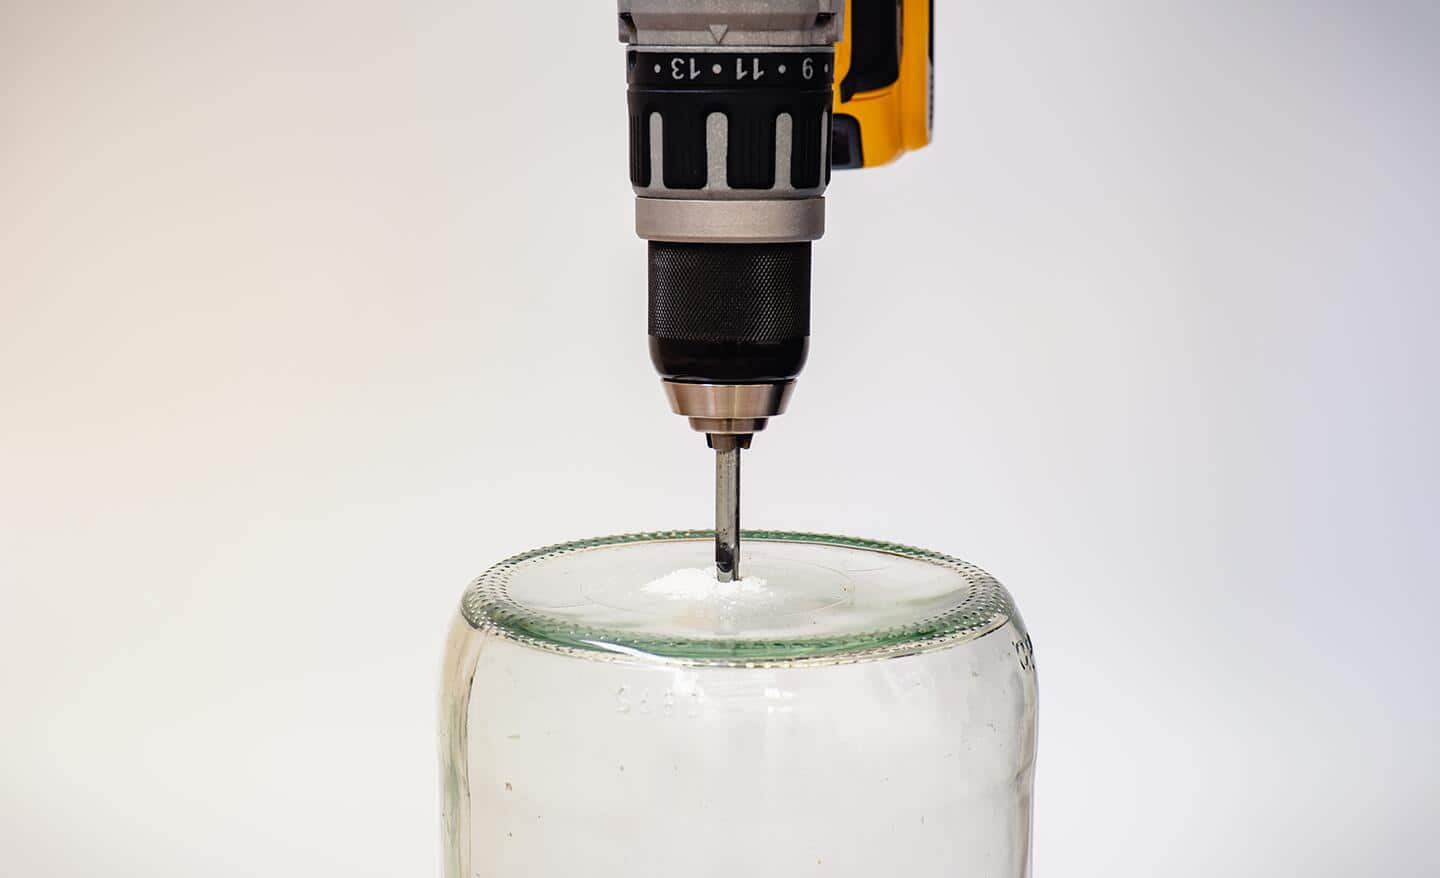
Drilling a hole in a glass jar requires careful handling. Use a diamond-tipped drill bit for clean results. Apply steady pressure and keep the drill bit cool with water to prevent cracking.
Drilling a hole in a glass jar requires patience and care. This process involves precision and the right tools. Each step needs careful attention to avoid breaking the glass. Let’s dive into the method that ensures safety and effectiveness.Setting Up The Drill
Begin by selecting a drill with variable speed settings. This allows for slow, controlled drilling. Attach a diamond-tipped drill bit. It cuts through glass smoothly. Secure the glass jar in a stable position. Use a clamp or non-slip surface to prevent movement. Mark the spot where you want the hole. Use a permanent marker for clear visibility.Applying Gentle Pressure
Start drilling at a low speed. Keep your hand steady and apply light pressure. Let the drill do the work. Avoid forcing the drill bit into the glass. This can cause cracks or breakage. Gradually increase the speed if needed. Always maintain control over the drill.Using Water For Cooling
Water helps keep the drill bit cool. It reduces the risk of overheating. Overheating can crack the glass. Keep a small container of water nearby. Dip the drill bit into the water frequently. Alternatively, use a spray bottle to mist the area. This ensures both the drill bit and glass stay cool. Following these steps ensures a smooth drilling process. Always prioritize safety and patience.Finishing Touches
After successfully drilling a hole in your glass jar, attend to the finishing touches. These final steps ensure the jar remains safe and looks polished. Proper finishing enhances the appearance and prevents injuries. Let’s explore how to smooth the edges and clean the glass jar.
Smoothing The Edges
Use fine-grit sandpaper to smooth the hole’s edges. This prevents sharpness that can cause cuts. Hold the sandpaper gently against the edge. Move it in a circular motion. Check the surface often to ensure evenness. You want a smooth, rounded finish. This step is crucial for safety and aesthetics.
Cleaning The Glass Jar
After smoothing, clean the jar thoroughly. Glass dust can linger from drilling. Rinse the jar with warm water. Use a mild soap for additional cleaning. Ensure all soap residue is gone. Dry the jar with a soft towel. This prevents water spots and keeps it clear. A clean jar enhances its beauty and function.
Common Mistakes
Drilling a hole in a glass jar can be tricky. Many people make mistakes that lead to broken jars or wasted time. Knowing these common errors can save you from frustration. Here’s what to avoid for a smooth drilling experience.
Avoiding Excessive Force
Applying too much pressure can shatter the glass. Use a gentle touch instead. Let the drill bit do the work. Maintain a steady pace for best results. This prevents damage and keeps the jar intact.
Preventing Cracks
Cracks occur from uneven pressure or wrong technique. Start with a small pilot hole. Gradually increase the size if needed. Use a diamond-tipped drill bit for precision. Keep the drill at a low speed. High speed generates heat, leading to cracks.

Credit: www.instructables.com
Troubleshooting Tips
Drilling a hole in a glass jar requires patience and precision. Use a carbide drill bit for clean cuts. Keep the glass wet to prevent cracks and overheating.
Drilling a hole in a glass jar can be quite an art, requiring patience and precision. Despite the best preparations, things can sometimes go awry. Whether you’re a beginner or have some experience, you might face challenges that need quick fixes. Here are some troubleshooting tips to help you navigate common obstacles and ensure your project goes smoothly.Dealing With Breakages
Sometimes, even with the utmost care, a glass jar can crack or shatter. If this happens, don’t panic. First, ensure your workspace is clean and free of sharp fragments to prevent injury. Consider using a thicker jar next time, as these are often more resilient. Make sure you apply consistent, gentle pressure when drilling to minimize stress on the glass. Have you thought about using masking tape? It can help distribute pressure and reduce the risk of breakage. Just place a piece where you plan to drill.Ensuring Drill Bit Compatibility
Not all drill bits are suited for glass. Using the wrong one could lead to disaster. Always choose a diamond-tipped or carbide bit for the best results. Check the compatibility of your drill’s speed settings. Glass requires a slower speed to prevent cracks. Have you adjusted yours accordingly? Sometimes, it’s tempting to rush. But remember, patience is key. Let the drill bit do the work without forcing it, ensuring a clean and precise hole. By focusing on these practical tips, you’ll be well-equipped to troubleshoot and succeed in your glass drilling endeavors. What challenges have you faced, and how did you overcome them? Sharing your experiences could help others on their DIY journey.Frequently Asked Questions
What Kind Of Drill Bit Do I Need To Drill Through A Glass Bottle?
Use a diamond-tipped drill bit to drill through a glass bottle. It ensures precision and reduces cracking. Always keep the glass wet while drilling to minimize heat and prevent breakage. Use a low-speed setting on your drill for better control and safety.
Do You Need A Special Drill Bit For Glass?
Yes, you need a special drill bit for glass. Carbide or diamond-tipped bits work best for drilling glass. Use low speed and gentle pressure to prevent cracking. Always keep the drill bit cool with water or oil during the process.
Proper technique ensures clean and precise holes in glass surfaces.
How Do You Drill A Hole In A Mason Jar?
Use a diamond drill bit and electric drill for the mason jar. Secure the jar, apply water for cooling, and drill slowly to prevent cracking.
How To Make A Hole In A Glass Jar Without A Drill?
Use a carbide-tipped tool or glass cutter to score the jar. Heat the scored area with a candle. Quickly cool it with ice or cold water. The temperature change should cause a clean break. Sand the edges for safety. Always wear safety goggles and gloves.
Conclusion
Drilling a hole in a glass jar is simple with the right steps. Use the correct tools to avoid cracks. Safety is important, so wear goggles and gloves. Start with a small drill bit. Go slow and steady to prevent damage.
Practice makes perfect, so try on old jars first. Soon, you’ll create beautiful crafts and projects. Remember to clean the jar afterwards. Enjoy your new skills and creativity. Now, you can confidently drill glass jars for any purpose. Happy crafting!


