Ever found yourself puzzled about how to attach a hole saw to a drill? You’re not alone.
Whether you’re a DIY enthusiast or just someone looking to tackle a home improvement project, understanding this simple yet crucial task can make all the difference. Imagine the frustration of starting a project only to realize you can’t even get your tools ready.
By knowing how to properly attach a hole saw, you not only save time but also ensure your project runs smoothly. This guide is designed to walk you through the process step-by-step, ensuring you can start your project with confidence and precision. Ready to get started? Let’s dive in and make sure you’re equipped with the knowledge you need to succeed.
Choosing The Right Hole Saw
Choosing the right hole saw for your drill can make all the difference in achieving a smooth and efficient cut. Whether you’re tackling a DIY project or a professional task, understanding what hole saw suits your needs is crucial. Let’s dive into the essential considerations for selecting the perfect hole saw.
Material Considerations
When selecting a hole saw, consider the material you will be cutting. Different materials require different types of hole saws. For wood, a bi-metal or carbide-tipped saw works well. Metal demands a more robust option like a high-speed steel or carbide-tipped saw. If you’re working with drywall, a simple carbon steel hole saw will suffice. Remember, using the wrong type can lead to damaged tools or unfinished cuts. Have you ever struggled with a task simply because the tool wasn’t right?
Size And Diameter Selection
The size and diameter of the hole saw are equally important. What size hole do you need? Measure twice to ensure accuracy. Hole saws come in various diameters, typically ranging from ¾ inch to 6 inches. For larger holes, you might need an arbor extension. Think about the project’s requirements and choose a size that fits precisely. Too small, and the hole won’t serve its purpose; too large, and you risk structural issues. Have you ever had to redo a project because of a miscalculation?
Credit: woodworking.stackexchange.com
Necessary Tools And Equipment
Attaching a hole saw to a drill requires specific tools and equipment. Ensuring you have the right gear simplifies the process. This section highlights what you need to complete the task efficiently. From drills to safety gear, having the proper items is crucial. Let’s dive into the necessary tools and equipment.
Types Of Drills
Not all drills fit a hole saw. A power drill with adjustable speed is ideal. Cordless drills offer convenience and mobility. Choose a drill with a strong motor for thick materials. Hammer drills are suitable for concrete and masonry. Check your drill’s chuck size for compatibility. Most hole saws fit standard chucks. Ensure your drill can handle the hole saw’s size and weight.
Safety Gear
Safety is a priority when using drills. Wear protective goggles to shield your eyes from debris. Gloves protect your hands from sharp edges. Ear protection is necessary for loud drilling environments. Ensure your workspace is clean and clutter-free. Secure any loose clothing or hair to avoid accidents. Using the right safety gear prevents injuries and ensures a smooth drilling process.
Preparing The Drill
Attaching a hole saw to a drill is simple. First, secure the drill’s chuck tightly around the arbor. Then, ensure the pilot bit is firmly in place. Finally, check the hole saw’s teeth for any damage before starting the drill.
Preparing the drill is an essential step when attaching a hole saw. It’s not just about connecting parts; it’s about ensuring everything is set for a smooth and efficient process. Imagine the frustration of starting a project only to realize your drill isn’t correctly prepared. From personal experience, overlooking this part can lead to delays and, sometimes, a trip to the store. To avoid such setbacks, let’s dive into how you can effectively prepare your drill for attaching a hole saw.Ensuring Power Source
Before anything else, verify your drill’s power source. Is it corded or cordless? If it’s cordless, ensure the battery is fully charged. A dying battery can weaken your drill’s performance and halt your progress unexpectedly. On the other hand, a corded drill should be plugged into a reliable outlet. Picture this: you’re halfway through a task, and the power cuts out. Frustrating, right? That’s why checking the power source is crucial.Checking Drill Settings
Next, focus on the drill settings. You need to match the drill’s speed and torque settings to the hole saw size and material you’re cutting. For softer materials, a lower speed setting might suffice. But for harder materials, crank it up a notch. Adjusting these settings ensures precision and prevents damage to your materials. Remember, your drill’s performance relies heavily on these initial settings. Have you ever found yourself wondering why a hole saw isn’t cutting as expected? Often, it’s due to incorrect drill settings. Taking a moment to adjust can make all the difference.
Credit: www.youtube.com
Attaching The Arbor
Attaching the arbor is a crucial step in using a hole saw. It connects the hole saw to the drill. This ensures a stable and effective operation. Understanding how to properly attach the arbor enhances performance. It also boosts safety during your project.
Inserting The Arbor Into The Drill
First, ensure your drill is turned off. Safety is always a priority. Locate the drill chuck. This is where the arbor will be inserted. Open the drill chuck by turning it counterclockwise. This creates space for the arbor. Insert the arbor into the chuck carefully. Ensure the arbor is straight and centered.
Securing The Arbor Properly
After inserting the arbor, tighten the drill chuck. Turn the chuck clockwise until it grips the arbor firmly. Use a chuck key if your drill has one. This provides a tighter hold. Check the arbor’s stability by gently tugging it. It should not move or wobble. A secure arbor ensures precise drilling. It also prevents accidents during operation.
Mounting The Hole Saw
Attach a hole saw to a drill by securing the arbor into the drill chuck tightly. Ensure the pilot bit is correctly positioned, then tighten the chuck. Check stability by gently wiggling the hole saw. This ensures safe and precise drilling.
Mounting a hole saw onto a drill might seem straightforward, but it requires a little attention to detail to ensure safety and precision. Whether you’re tackling a DIY project or getting into serious construction work, knowing how to properly attach a hole saw can make all the difference in your results. Have you ever tried cutting through a surface only to find the hole saw wobbling uncontrollably? It can be frustrating. But with the right steps, you can secure the hole saw effectively and get cleaner, smoother cuts.Aligning The Hole Saw
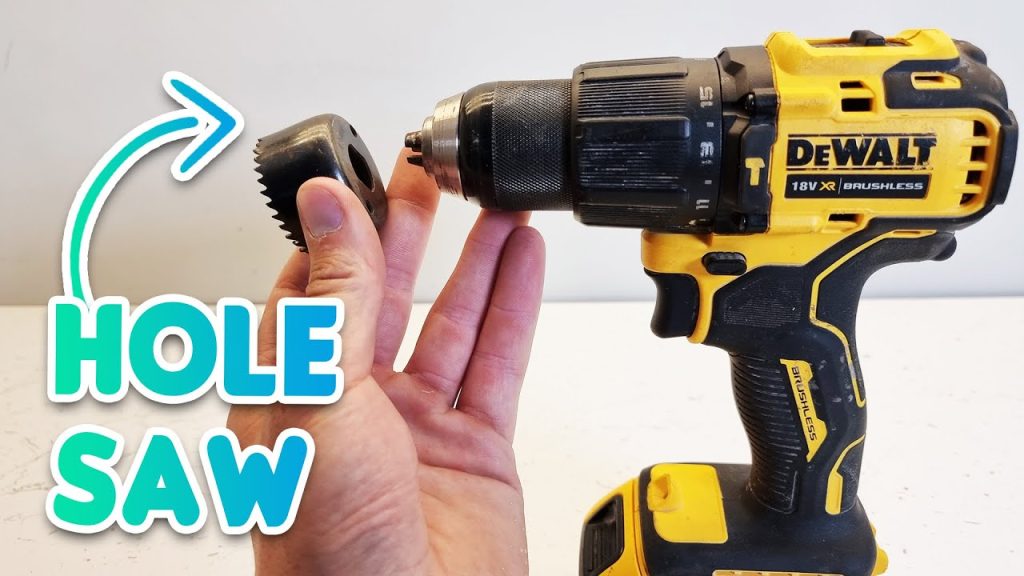
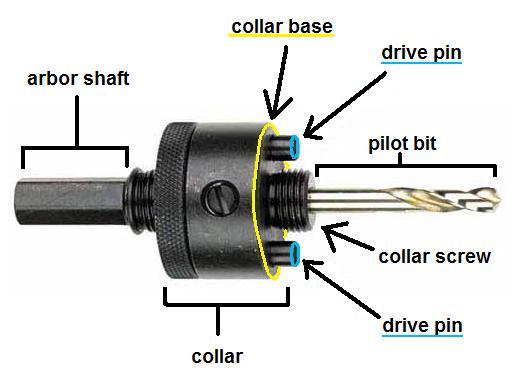
Aligning the hole saw properly is the first crucial step. Make sure the teeth of the saw are facing the direction you intend to drill. Hold the hole saw and examine it closely. You’ll notice a pilot bit at the center, which guides the saw and keeps it steady. Ask yourself: is the pilot bit in good shape? This small detail can significantly affect your drilling outcome.Fastening The Hole Saw To The Arbor
Once aligned, it’s time to fasten the hole saw to the arbor. The arbor is the component that connects the hole saw to the drill, allowing it to rotate. Insert the arbor through the hole saw. Ensure it fits snugly and securely. Twist the hole saw clockwise onto the arbor threads. If it feels loose, tighten it further. A tightly fastened hole saw reduces vibration and improves accuracy. Think about the importance of a secure fit. Can you imagine drilling with a loose saw? It can lead to uneven cuts and potentially damage your materials. Mounting the hole saw might seem like a small task, but it plays a significant role in achieving the perfect cut. By focusing on alignment and securing the saw properly, you’re setting yourself up for success in your projects.Testing The Assembly
Attach a hole saw to a drill easily. First, insert the arbor into the drill chuck. Next, secure the hole saw to the arbor. Make sure it’s tight and ready for use. Then, start drilling with confidence.
Testing the assembly of your hole saw attachment is crucial to ensure safety and accuracy in your project. Before diving into the actual task, it’s important to make sure everything is securely in place and functioning correctly. This step not only safeguards your equipment but also enhances your confidence in handling the tool effectively.Safety Checks
Before you power up the drill, perform a thorough safety inspection. Ensure the drill is unplugged to avoid accidental activation. Check that the hole saw is tightly attached to the arbor, and the arbor is firmly secured in the drill chuck. Take a moment to look over the condition of the hole saw teeth. They should be sharp and intact, without any visible damage. Wearing safety goggles and gloves is also a smart move to protect yourself from any unexpected mishaps.Running A Trial Cut
With safety checks complete, it’s time for a trial run. Choose a scrap piece of material similar to what you plan to cut. This practice run will help you gauge the tool’s performance and make necessary adjustments. Start the drill at a slow speed, gently pressing the hole saw against the test material. Feel the tool’s response—does it cut smoothly, or does it snag? If the latter, reassess your assembly for any misalignment or loose parts. Testing the assembly isn’t just a step; it’s an opportunity to familiarize yourself with the tool’s behavior. Have you ever skipped this step, only to face a problem mid-project? This simple practice can save you from unexpected setbacks and ensure a smoother workflow.Tips For Efficient Drilling
Attaching a hole saw to a drill sounds simple but requires technique. Efficient drilling ensures clean cuts and extends tool life. By following a few tips, you can improve your drilling experience. This section provides practical advice on maintaining speed, pressure, cooling, and lubrication during drilling.
Maintaining Speed And Pressure
Keep a steady speed for smooth drilling. Fast speeds can damage the saw. Too slow, and it might bind. Adjust your drill’s speed based on the material. Apply consistent pressure while drilling. Light pressure prevents overheating. Heavy pressure wears out the tool. Find a balance for best results.
Cooling And Lubrication
Cooling extends tool life. It prevents overheating during use. Pause occasionally to let the tool cool. Use water or cutting oil for cooling. Lubrication helps reduce friction. It makes cutting smoother. Apply lubricant before starting. This ensures a clean cut. It also protects the hole saw.
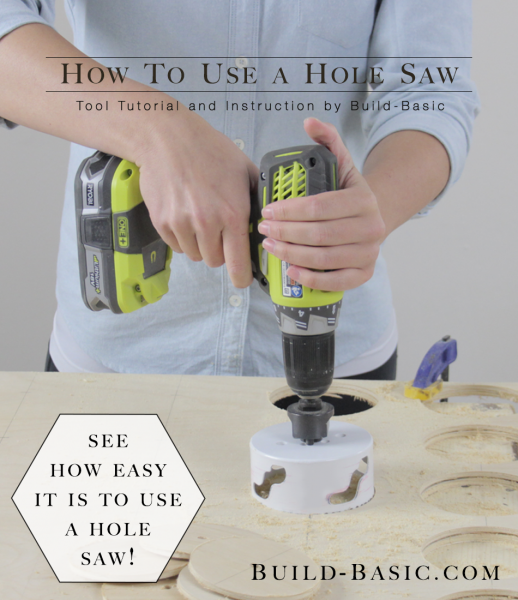
Credit: build-basic.com
Frequently Asked Questions
Can You Attach A Hole Saw To Drill?
Yes, you can attach a hole saw to a drill. Ensure compatibility by using the correct arbor and chuck size. Secure the hole saw tightly to avoid accidents. Use the drill’s low-speed setting for better control and precision. Always wear protective gear while drilling.
Can You Use A Regular Drill For A Hole Saw?
Yes, you can use a regular drill for a hole saw. Ensure the drill has enough power. Use a drill with adjustable speed settings for better control. Always wear safety gear and follow manufacturer instructions for safe operation.
How To Attach An Attachment To A Drill?
Insert the drill bit into the chuck. Tighten the chuck by rotating it clockwise. Ensure the bit is secure by pulling it gently. Use the drill’s key or hand-tighten, if necessary. Check the attachment is centered and straight before use.
Always follow the drill manufacturer’s instructions for safety.
What Attachment Do You Need For A Hole Saw?
For a hole saw, attach an arbor to connect the saw to the drill. Ensure it fits securely. Use a pilot drill bit for guidance and stability. Check compatibility with drill and hole saw size for effective cutting. Proper attachment ensures accurate and efficient hole drilling.
Conclusion
Attaching a hole saw to a drill is simple with practice. Start with the right drill and hole saw. Ensure the arbor fits securely. Always tighten the components properly. Safety first—wear goggles and gloves. Steady hands prevent mistakes. Test the setup on scrap material.
If it works smoothly, you’re ready. Now, you can tackle various projects. Remember to keep tools clean and maintained. Simple steps lead to successful drilling. With these tips, you’re equipped for your next DIY task. Enjoy the process and learn as you go.


