
Are you ready to tackle your next DIY project but unsure how to drill a screw into wood without splitting it? You’re not alone.
Many people find themselves staring at a piece of wood and a handful of screws, unsure of the next step. But imagine the satisfaction of smoothly driving that screw into place, creating a sturdy bond that holds your project together.
This might seem tricky at first, but once you know the right techniques and tools, it becomes second nature. In this guide, we’ll break down each step, ensuring you feel confident and capable. By the end, you’ll be ready to pick up your drill and tackle your woodwork with ease. Let’s get started!
Choosing The Right Screw
Choosing the right screw is crucial for a successful wood project. The wrong screw can damage your wood or fail to hold. Understanding the types and sizes of screws helps in making the right choice. This ensures your project is strong and durable.
Types Of Screws For Wood
Wood screws come in various types. Each serves a specific purpose. Common types include flathead, roundhead, and oval head screws. Flathead screws sit flush with the wood surface. Ideal for a smooth finish. Roundhead screws protrude slightly. They provide a decorative touch. Oval head screws offer a balance between flush and raised heads.
Length And Diameter Considerations
The length of the screw is important. It should be long enough to hold pieces together. But not too long to poke through. The diameter of the screw affects its strength. A thicker screw offers more holding power. But it can also split the wood. Choose a diameter that matches the wood thickness.
Selecting The Proper Drill Bit
Choosing the right drill bit is crucial for drilling screws into wood. Use a bit slightly smaller than the screw’s diameter to ensure a snug fit. This prevents splitting and allows for smooth drilling.
Selecting the proper drill bit is crucial when drilling a screw into wood. It ensures you achieve the desired result without damaging the material or the screw. You might think any drill bit will do, but choosing the right one can make all the difference. As someone who has learned this the hard way during a DIY project, I can tell you that matching the drill bit to the screw is not just a suggestion; it’s essential for a smooth and successful task.Match The Bit To The Screw
The first step in selecting the proper drill bit is matching it to the screw you intend to use. Different screws require different bits to ensure a secure fit. If the drill bit is too large, the screw won’t grip the wood effectively. If it’s too small, you risk splitting the wood or damaging the screw. Consider the screw’s diameter and length. A simple trick is to hold the screw and bit side by side—the bit should be slightly smaller than the screw’s diameter but not by much. This ensures the screw will hold tightly in the wood.High-speed Steel Vs. Cobalt Bits
Choosing between high-speed steel (HSS) and cobalt bits can be confusing. High-speed steel bits are versatile and work well with softwoods and most hardwoods. They’re affordable and perfect for general-purpose drilling. On the other hand, cobalt bits are more durable and withstand higher temperatures. They’re ideal for harder woods or frequent use, especially if you’re working with denser materials. While they might be pricier, their longevity and performance can be worth the investment. Which bit suits your project best? Consider the wood type and your budget. If you’re drilling into oak or mahogany, cobalt might be your best bet. For a simple pine project, HSS will do just fine. Have you ever tried drilling a screw only to find it slips or doesn’t hold? It could be the wrong drill bit. Selecting the proper bit is not just technical know-how; it’s about achieving the results you want without frustration or setbacks.Preparing The Wood Surface
Before drilling screws into wood, it’s crucial to prepare the surface. A well-prepared wood surface ensures the screws fit securely and the final product is sturdy. Preparation involves marking the spot and creating a pilot hole. These steps make the drilling process smoother and more precise.
Marking The Drilling Spot
Identify where you want the screw to go. Use a pencil or marker. Mark the exact spot on the wood. Clear markings prevent mistakes during drilling. Ensure the spot is accurately placed and visible. Double-check measurements for precision. This step is fundamental for a neat finish.
Creating A Pilot Hole
Drill a small guide hole before inserting the screw. This is called a pilot hole. It helps prevent wood splitting. Choose a drill bit slightly smaller than the screw. Place the drill bit on the marked spot. Drill straight to maintain alignment. This makes screwing easier and safer.

Credit: www.thehandymansdaughter.com
Drilling The Pilot Hole
Drilling a pilot hole is a crucial step when you’re preparing to drive a screw into wood. It helps prevent the wood from splitting and ensures the screw goes in smoothly. If you’ve ever struggled with split wood or misaligned screws, you know how frustrating it can be. The pilot hole acts like a guide, making your woodworking projects more precise and rewarding.
Proper Drilling Technique
When drilling the pilot hole, use a drill bit slightly smaller than the screw’s diameter. This allows the screw threads to grip the wood firmly. Hold the drill perpendicular to the wood surface for a straight hole.
Keep a steady hand and apply gentle pressure. Let the drill do the work. Have you ever noticed how rushing can lead to mistakes? Taking your time with this step pays off.
Depth Control Tips
Controlling the depth of the pilot hole is essential. Use a depth stop or a piece of tape on the drill bit as a marker. This prevents drilling too deep, which can weaken the wood.
Consider the length of the screw and adjust accordingly. If you drill too shallow, the screw may not hold well. Too deep, and it could compromise the structure. How do you find the balance? Trial and error can teach valuable lessons.
Remember, the pilot hole sets the stage for the screw’s performance. Taking a moment to ensure proper technique and depth can save you from headaches later on. What challenges have you faced with pilot holes? Share your experiences and tips below!
Inserting The Screw
Inserting a screw into wood is a fundamental skill for any DIY enthusiast. Whether you’re building furniture or fixing a loose shelf, knowing how to insert a screw properly is essential. The process involves using either a manual screwdriver or a power drill. Each method has its own benefits and can be applied based on the tools you have on hand and the nature of your project.
Using A Manual Screwdriver
For small projects, a manual screwdriver works well. First, align the screw with the pre-drilled hole. Hold the screwdriver tightly and position its tip on the screw head. Apply firm pressure and turn the screwdriver clockwise. Keep turning until the screw is flush with the wood surface. This method gives you control over the screw placement.
Using A Power Drill
A power drill speeds up the process for larger tasks. Insert the appropriate drill bit into the chuck. Place the screw on the bit and hold it steady. Align the screw with the hole and squeeze the drill trigger gently. Gradually increase the pressure as the screw goes deeper. Stop drilling when the screw head is level with the wood.
Avoiding Common Mistakes
Drilling screws into wood requires precision to avoid splitting. Start by choosing the right drill bit size for the screw. Ensure steady pressure and maintain a straight angle for clean results.
Avoiding mistakes while drilling screws into wood is crucial. It can save time and prevent damage. Many beginners face issues like wood splitting or misaligned screws. These are common but avoidable with a few tips. Understanding these mistakes can lead to smoother woodworking projects.Preventing Wood Splitting
Wood splitting is a frequent problem. It often occurs due to the screw’s pressure. Use a pilot hole to reduce this risk. A pilot hole guides the screw into the wood. It also helps manage the pressure exerted. Choose a drill bit smaller than the screw’s diameter. This ensures the screw fits snugly. Soft woods split easily. Be gentle when working with them. Apply steady pressure, not too fast. This helps maintain the wood’s integrity. If the wood is hard, use a lubricant. This makes the drilling process smoother.Correcting Misaligned Screws
Misaligned screws can ruin your project. They often occur due to improper starting angles. Begin drilling at a straight angle. This helps keep the screw aligned. If a screw goes in crooked, stop immediately. Remove it and fill the hole with wood filler. Let it dry before trying again. Using a drill guide can help. It ensures consistent angles while drilling. Consider using one for tricky projects. Regularly check your screw’s alignment. Small adjustments early can prevent major errors later.Safety Tips
Drilling a screw into wood requires precision and care. Choose the right drill bit size and align it with the screw. Maintain steady pressure and control to avoid damaging the wood or the screw.
Drilling a screw into wood might seem like a straightforward task, but safety should always be your top priority. Even seasoned DIY enthusiasts can sometimes overlook safety precautions, leading to unnecessary accidents. Whether you’re a beginner or a pro, taking time to focus on safety can save both fingers and frustration. Let’s dive into some essential safety tips.Protective Gear
Before you even think about picking up a drill, ensure you’re wearing the right protective gear. A simple pair of safety goggles can protect your eyes from flying wood chips. Consider wearing gloves to prevent blisters and improve grip. However, make sure they’re not too loose to avoid getting caught in the drill. Hearing protection is often overlooked, but power tools can be loud. Earplugs or earmuffs can prevent long-term hearing damage. Have you ever had ringing in your ears after a DIY session? That’s a sign your ears need protection.Handling Tools Safely
Handling tools safely starts with understanding your tools. Always read the manual. It might sound tedious, but knowing how your drill works can prevent mishaps. When drilling, maintain a firm grip on the tool. A steady hand ensures precision and prevents the drill from slipping. If you’ve ever drilled at an awkward angle, you know how quickly things can go awry. Use a clamp to secure your wood. Holding the wood with your hand while drilling is risky. A clamp keeps your work stable and your hands away from danger. Do you double-check your drill bit? Ensure it’s securely attached before starting. A loose bit can fly off and cause injury. Remember, safety is not just about protecting yourself; it’s about ensuring a smooth and successful project. So next time you pick up that drill, gear up and handle it with care. Your future self will thank you.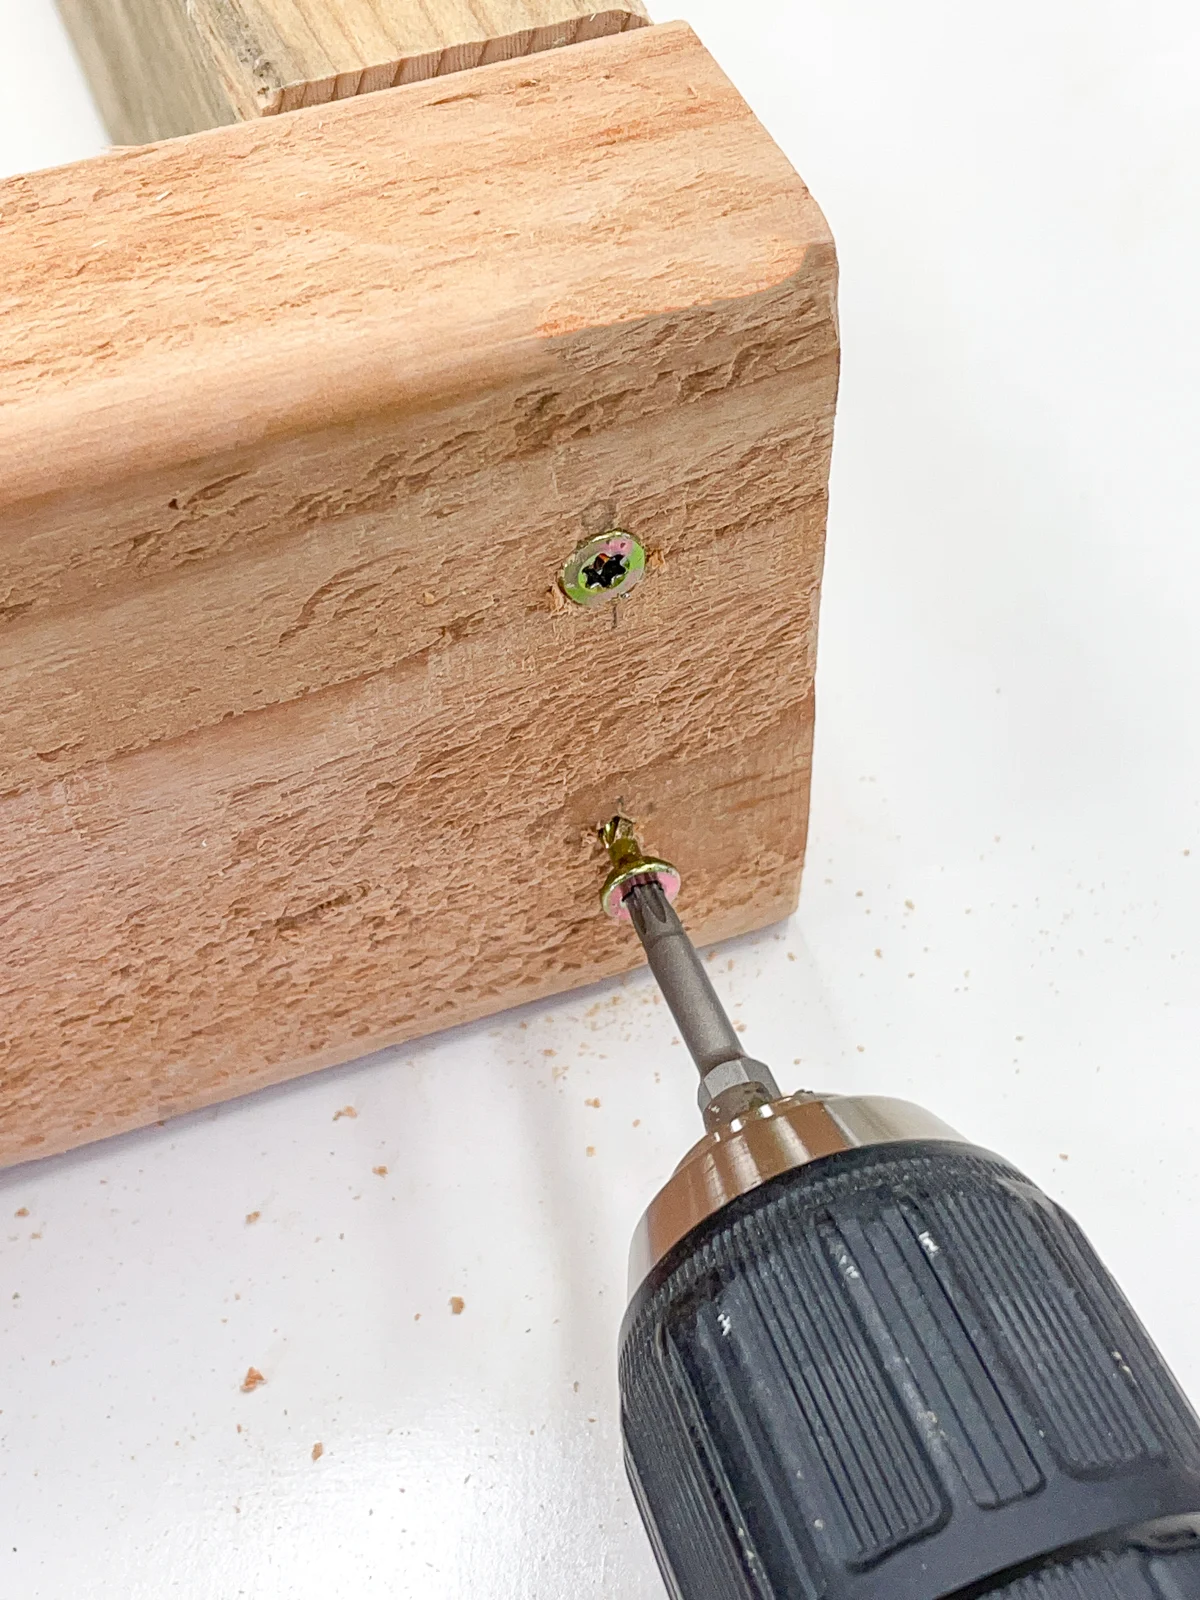
Credit: www.thehandymansdaughter.com

Credit: www.youtube.com
Frequently Asked Questions
Can I Drill A Screw Directly Into Wood?
Yes, you can drill a screw directly into wood. It’s best to use a pilot hole first for harder woods. This prevents splitting and ensures easier insertion. Use a suitable screwdriver or drill with the correct bit size for optimal results.
What Kind Of Drill To Put Screws In Wood?
Use a cordless drill with a screwdriver bit for putting screws in wood. Ensure the drill has adjustable torque settings to prevent overdriving. A variable-speed trigger is helpful for better control. For optimal performance, choose a drill with at least 18 volts of power.
Why Can’t I Drill A Screw Into Wood?
The wood might be too hard or dense. Use a pilot hole to make drilling easier. Ensure the screw is the right type and size. Check your drill for power issues or a dull bit. Use a wood screw and proper technique to avoid splitting the wood.
How Do You Put Screws Into Wood?
Drill a pilot hole slightly smaller than the screw diameter. Align the screw with the hole. Use a screwdriver or drill to drive the screw into the wood. Ensure the screw head is flush with the wood surface. Avoid over-tightening to prevent wood splitting.
Conclusion
Drilling a screw into wood seems tricky at first. But it gets easier with practice. Start with the right tools. Choose the correct drill bit and screw. Mark your spot carefully. Apply steady pressure while drilling. Avoid rushing to prevent mistakes.
Remember to wear safety gear. Goggles and gloves protect you. With these steps, your projects will succeed. Drilling into wood becomes a skill you’ll enjoy. Practice makes perfect. Soon, you’ll handle tasks confidently. Happy woodworking!


