Struggling with how to put a drill bit in a drill? You’re not alone.
Many people find themselves puzzled when faced with this seemingly simple task. But fear not! This guide is here to help you conquer that confusion once and for all. Imagine the satisfaction of tackling your DIY projects with confidence, knowing that your drill is ready to go, just like you envisioned.
You’ll discover a step-by-step process that’s easy to follow and quick to apply. Whether you’re a DIY enthusiast or a first-timer, this guide promises to make the task straightforward and hassle-free. You’ll gain the skills to move from hesitation to action, transforming your approach to drilling. Keep reading to unlock the secrets of efficient and successful drilling, and never let another project stall again.
Credit: sawsonskates.com
Choosing The Right Drill Bit
Choosing the right drill bit is crucial for any drilling task. It ensures efficiency and precision. Drill bits come in various shapes and sizes. Each has a specific purpose. Picking the wrong one can damage your material or tool. Let’s dive into the essentials of choosing the right drill bit.
Types Of Drill Bits
There are many types of drill bits available. Each designed for specific tasks. Twist bits are common for wood and metal. Spade bits work well for larger holes in wood. Masonry bits are ideal for concrete and brick. Specialized bits exist for glass and tile. Each type has a unique design and function.
Material Considerations
The material you’re drilling into dictates your choice. Wood, metal, and concrete need different bits. Drill bits for wood are sharp and pointed. Metal bits are often coated for durability. Masonry bits have a special tip for hard surfaces. Match the bit material to your task for best results.
Credit: www.homedepot.com
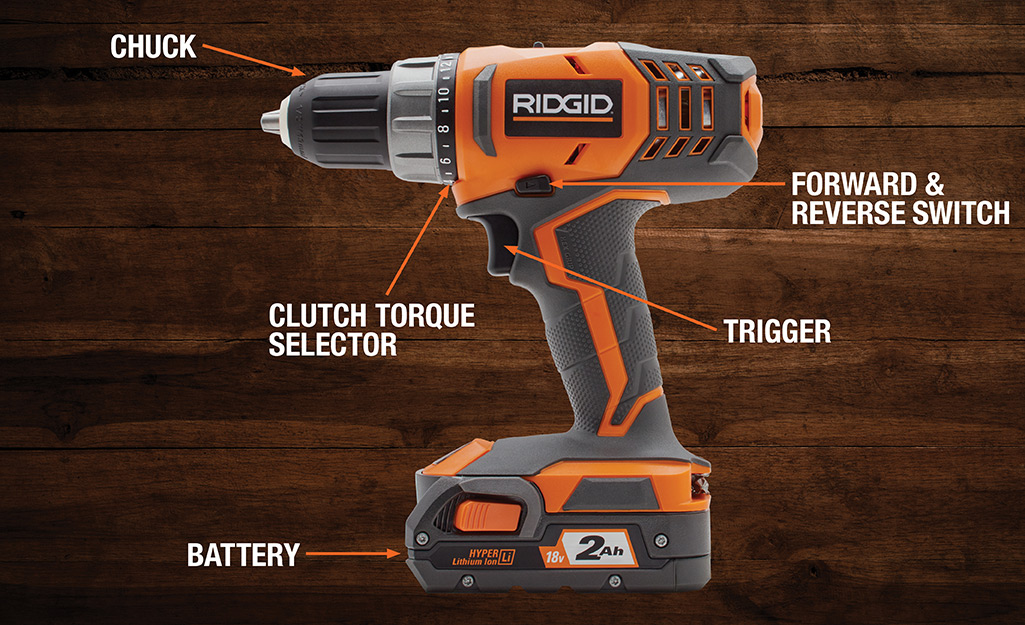
Preparing The Drill
Inserting a drill bit into a drill is simple. First, loosen the chuck by turning it counterclockwise. Next, insert the drill bit into the chuck, ensuring it’s centered. Finally, tighten the chuck by turning it clockwise until secure.
Preparing your drill might seem straightforward, but it’s a crucial step to ensure smooth operation and safety. Before you start drilling, it’s important to make sure your equipment is in perfect condition. This preparation can save you from mishaps and ensure your project runs seamlessly.Safety Precautions
Safety should always be your first priority when handling a drill. Are you wearing safety goggles to protect your eyes from debris? Make sure you are. It’s also wise to wear gloves for a better grip and protection against sharp bits. Ensure the drill is unplugged or the battery is removed before touching any parts. This small step can prevent accidental starts and potential injuries.Inspecting The Drill
Before you install the drill bit, take a close look at your drill. Is the chuck clean and free of debris? Dust or small particles can affect the drill’s performance. Check that the chuck spins smoothly without any unusual noises. If you notice anything odd, it might be time to have it serviced. Inspect the drill bit itself. Does it have any visible damage or dullness? A flawed bit can lead to uneven drilling or even breakage, so it’s better to replace it if necessary. These simple inspections can make a huge difference in the success of your project. Have you ever skipped these steps and faced issues later? Taking time now can prevent frustration later.Inserting The Drill Bit
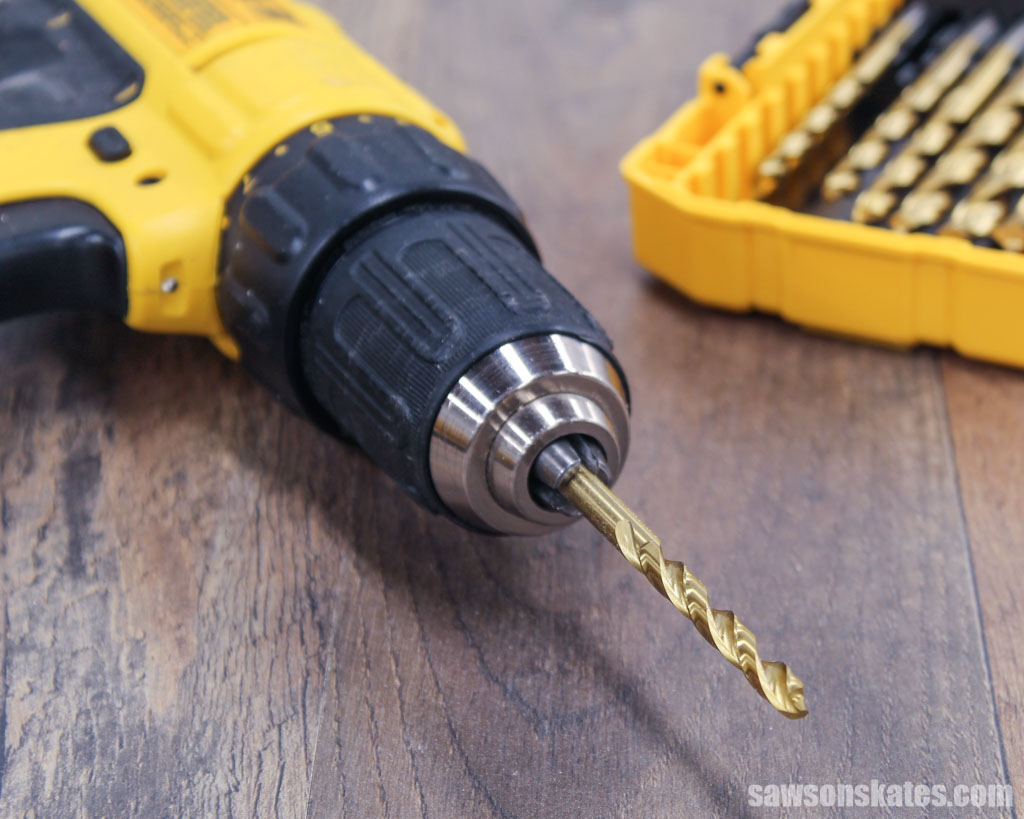
Putting a drill bit into a drill is easy. It’s an essential step for any drilling task. With proper guidance, you can insert a drill bit quickly and safely. Follow these steps to ensure the drill bit is secure and ready for use.
Opening The Chuck
First, locate the chuck on your drill. The chuck is the part that holds the drill bit. To open it, turn it counterclockwise. This loosens the grip on the drill bit. Make sure it’s wide enough to fit the drill bit.
Some drills have a keyless chuck. For these, simply grip the chuck and twist. If your drill has a keyed chuck, use the chuck key. Insert the key into the hole on the side of the chuck. Turn the key counterclockwise to open it.
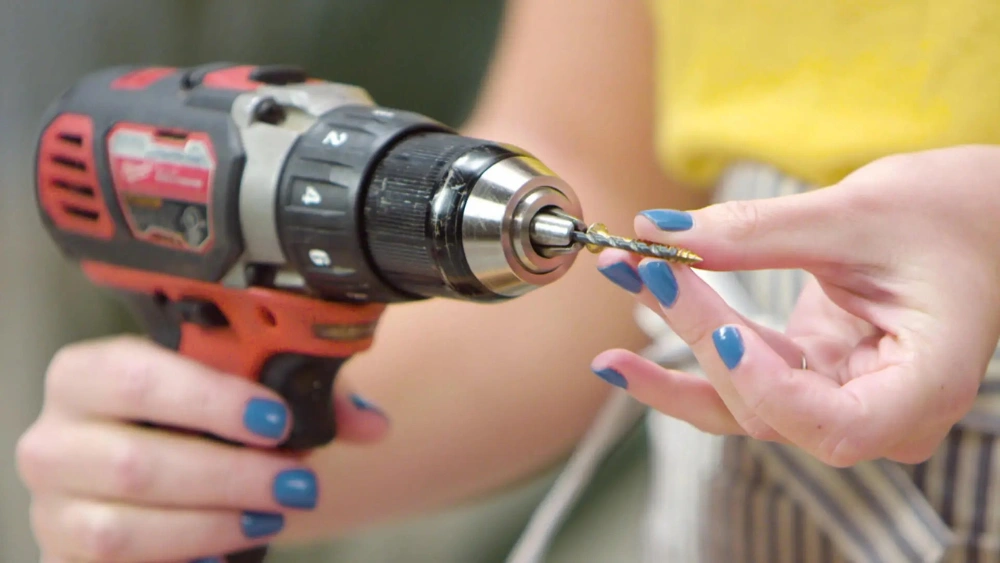
Positioning The Bit
Once the chuck is open, position the drill bit. Hold the bit straight and steady. Align it with the chuck’s center. Slide the bit into the chuck until it stops. Ensure the bit is centered and not tilted.
Check the depth of the bit in the chuck. The bit should be inserted deep enough to hold firmly. If it’s too shallow, it might slip during use. Double-check the alignment before proceeding to tighten the chuck.
Securing The Drill Bit
Inserting a drill bit requires a few simple steps. First, loosen the drill’s chuck by turning it counterclockwise. Next, insert the bit into the chuck, ensuring it’s straight. Finally, tighten the chuck by turning it clockwise. This secures the bit, ready for use.
Securing the drill bit is crucial for safety and efficiency. Imagine the frustration of starting a project only to have the bit wobble or detach mid-task. We’ve all been there, right? It’s not just about getting the bit in place; it’s about ensuring it stays there. Let’s dive into the steps to secure that drill bit effectively.Tightening The Chuck
First, ensure your drill is unplugged or the battery is removed. Safety comes first! To tighten the chuck, simply turn it clockwise. This action clamps the drill bit securely. You may use the key if your drill has a keyed chuck. Insert it into the side holes and twist it firmly. Feel the resistance? That’s your cue that the bit is snug. A loose grip can lead to unstable drilling, risking damage to both your project and your bit.Testing Stability
Before you start drilling, test the stability of the bit. Hold the drill upright and give the bit a gentle tug. Does it move? If yes, tighten the chuck again. A stable bit won’t budge when tugged. Try a test run on scrap material. Is the hole smooth and precise? This indicates your bit is secure. Taking these steps can prevent mishaps. Have you ever drilled with a loose bit? It can ruin your materials and your day. Securing the drill bit might seem like a minor step, but it makes a big difference. How confident are you that your drill bit is secure every time?Common Mistakes
Drilling is a straightforward task. Yet, many people make mistakes when inserting a drill bit. These errors can affect the performance of your drill. They can also lead to damage or injury. Knowing the common mistakes helps ensure a smooth drilling experience.
Over-tightening
Over-tightening is a frequent mistake. It happens when you twist the chuck too hard. This can damage the drill bit or the drill itself. It can also strip the chuck’s threading. A loose chuck is easier to adjust. Tighten it just enough to hold the bit securely.
Using The Wrong Bit
Using the wrong bit is another common error. Different materials need different bits. Wood, metal, and masonry each require specific bits. Using the wrong one can lead to poor results. It can also wear out the bit quickly. Always check the material and choose the right bit for the job.

Credit: www.wikihow.com
Maintenance Tips
Maintaining your drill and drill bits is crucial for efficiency. Proper care ensures longevity and better performance. Learn simple maintenance tips to keep your tools in top shape. Focus on cleaning and storing them correctly.
Cleaning The Drill
Clean your drill regularly to prevent dust buildup. Use a soft cloth to wipe the exterior after each use. For stubborn dirt, dampen the cloth slightly. Be careful not to soak the drill. Check the vents for dust and debris. Use a small brush to remove any blockages.
Inspect the drill chuck and remove any lodged particles. This helps maintain a firm grip on the bit. Regular cleaning prevents overheating and extends the drill’s life.
Storing Drill Bits
Store drill bits in a cool, dry place. Use a dedicated case or holder to keep them organized. This prevents them from getting lost or damaged. Ensure bits are dry before storing them. Moisture can lead to rust, affecting performance.
Label your drill bit case for easy identification. Organize them by size or type for quick access. Proper storage keeps your bits sharp and ready for use.
Frequently Asked Questions
How Do You Attach A Drill Bit To A Drill?
Attach a drill bit by loosening the chuck, inserting the bit, and tightening the chuck securely. Ensure it’s aligned properly and test it before use. Regularly check for wear and replace if necessary to maintain efficiency and safety.
How To Get A Drill Bit Inside A Drill?
Insert the drill bit by loosening the chuck. Place the bit inside and tighten the chuck securely. Ensure it is straight. Test by running the drill briefly to confirm it’s properly attached. Always check the manufacturer’s instructions for specific guidance on your drill model.
Can You Put A Drill Bit Straight Into A Drill?
Yes, you can insert a drill bit directly into a drill. Ensure the drill is compatible and securely tighten the chuck around the bit. This guarantees stability and precise drilling, preventing slippage during use. Always check the drill’s manual for specific instructions to avoid any damage or malfunction.
How Do I Change The Bit On A Drill?
Turn off the drill and unplug it. Loosen the chuck by rotating it counterclockwise. Insert the new bit and tighten the chuck by rotating it clockwise. Ensure the bit is secure before using the drill.
Conclusion
Putting a drill bit in a drill is simple and easy. Start by selecting the right bit for your task. Ensure the drill is unplugged or the battery is removed. Loosen the chuck by turning it counterclockwise. Insert the bit into the chuck, then tighten it securely.
Make sure it’s centered and straight. Test the drill briefly to check the bit’s stability. These steps will help you drill efficiently and safely. Practice makes perfect, so don’t hesitate to try it yourself. Happy drilling!


