
Imagine transforming raw wood into intricate designs with precision, right from your own workshop. Building a CNC wood router can unlock this incredible ability for you.
It’s not just about crafting beautiful pieces; it’s about enhancing your skill set and gaining control over every project you undertake. Whether you’re a hobbyist looking to expand your capabilities or a professional seeking a cost-effective solution, constructing your own CNC wood router is a rewarding challenge.
You might think it’s complex, but with the right guidance, you can master each step and have your machine up and running in no time. Curious about how you can make this happen? Dive into this article, and you’ll discover the secrets to building a CNC wood router that can elevate your woodworking to new heights.
Planning And Design
Building a CNC wood router starts with careful planning and design. This stage lays the foundation for success. Understand what you need before you start.
Consider the router type, size, and your budget. Each factor influences the final outcome. Make informed decisions to ensure your project meets your goals.
Choosing The Right Type Of Cnc Router
Decide which CNC router type fits your needs. There are different types available. Each has unique features and benefits.
Research each type to understand their functions. Choose a router that matches your project requirements.
Determining Size And Specifications
Size matters. Choose a size that fits your workspace. Consider the materials you plan to work with.
Check the specifications. Ensure the router can handle your projects. The right size and specs lead to better performance.
Budgeting For Materials And Components
Set a budget for materials and components. Costs can vary based on quality and type.
Research prices for each component. Plan your budget to avoid overspending. A clear budget keeps your project on track.
Gathering Materials
Building a CNC wood router can be a rewarding project. Before starting, gather the right materials. This step sets the foundation for a successful build. Each component plays a crucial role in crafting a precise machine. It helps ensure smooth operation and durability. Proper preparation saves time and reduces errors in the long run.
Essential Tools And Equipment
Begin with essential tools. A drill, saw, and screwdriver are necessary. These tools help in assembling and adjusting parts. Ensure you have measuring tools like a ruler and calipers. They ensure accuracy in cutting and fitting. Safety gear like goggles and gloves are vital. Protect yourself while working with sharp tools.
Selecting Wood And Hardware
Choose the right wood for your router. Plywood and MDF are popular choices. They offer stability and ease of cutting. Consider the thickness of the wood. It affects the strength and weight of the router. Select screws, nuts, and bolts carefully. Ensure they match the specifications of your design. Quality hardware enhances the router’s durability.
Sourcing Electronics And Software
Electronics form the heart of your CNC router. Start with a stepper motor and driver. They control the movement of the machine. Look for a reliable power supply. It supports the electronics consistently. Choose a controller board compatible with your software. Software guides the router in cutting patterns. Research options that suit your needs. Many free and paid versions are available online.
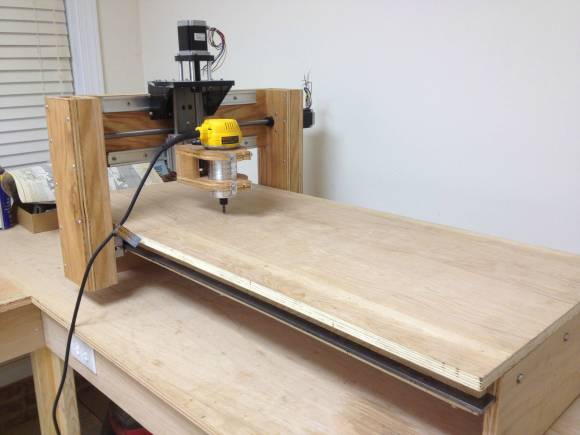
Building The Frame
Building the frame of a CNC wood router is crucial. It is the foundation that supports the machine’s entire structure. A sturdy frame ensures the router operates smoothly. Every component must be precise for optimal performance.
Cutting And Assembling Components
Begin by selecting quality materials for the frame. Use durable wood or metal. Cut each piece with accurate measurements. This guarantees a perfect fit. Assemble the parts carefully. Align each component properly. Check for any gaps. A tight fit is essential.
Ensuring Stability And Precision
Stability is key for effective operation. Reinforce the frame with cross beams. They provide extra support. Precision ensures the router’s movements are accurate. Use a level to check alignment. Adjust where necessary. Precision affects the quality of the finished product.
Securing Joints And Connections
Secure all joints firmly. Use bolts and screws for strength. Apply glue where needed. This prevents any wobbling. Check each connection twice. Make sure they are tight. Loose joints affect stability. They can lead to errors during cutting.

Credit: www.instructables.com
Installing Mechanical Parts
Building a CNC wood router involves several critical steps. Installing mechanical parts is one of them. This phase ensures the machine operates smoothly. Precision and attention to detail are vital here. Let’s delve into the process of installing mechanical components.
Mounting Rails And Bearings
Start with the rails. They guide the router’s movement. Secure them firmly to the base. Use high-quality materials for durability. Bearings are next. They allow smooth sliding of parts. Proper lubrication is essential. It reduces friction and wear. Check alignment after mounting. Misalignment causes operational issues.
Aligning Motors And Drive Systems
Motors are crucial for movement. Position them correctly. Connect them to the drive systems. Ensure tight connections. Loose parts can disrupt function. Drive systems transmit power. They need precise alignment. This ensures efficient force transfer. Test connections regularly. Any errors can affect performance.
Testing Movements And Adjustments
Testing is the final step. Begin with small movements. Observe the router’s response. Adjust any misaligned parts. Repeat until movements are smooth. Listen for unusual noises. They indicate mechanical issues. Adjust settings for optimal performance. Regular testing prevents long-term problems.
Setting Up Electronics
Building a CNC wood router is an exciting project that combines creativity with technical prowess. One of the most critical steps in this process is setting up the electronics. It’s like giving life to your machine, enabling it to perform precise and complex tasks. Whether you’re a beginner or a seasoned builder, understanding how to wire controllers, integrate sensors, and configure the power supply will ensure your router runs smoothly.
Wiring Controllers And Drivers
The heart of your CNC wood router lies in the controllers and drivers. Proper wiring is crucial for accurate machine movements. Start by organizing your wires neatly, avoiding tangled messes that can lead to errors. Label each wire to prevent confusion and ensure easy troubleshooting.
Consider using shielded cables to reduce electrical interference. This simple step can dramatically improve your router’s performance. Remember, a clean and organized wiring setup reflects a well-functioning machine.
Have you ever faced unexpected glitches? Double-checking your connections often reveals loose wires or incorrect placements. A meticulous approach can save you from future headaches.
Integrating Sensors And Switches
Sensors and switches are your CNC router’s senses, allowing it to respond to its environment. Start with limit switches to prevent your machine from exceeding its physical boundaries. This safeguards both the router and your workpiece.
Proximity sensors enhance precision, helping detect the exact position of your tool. Incorporating these can significantly improve your router’s accuracy.
Ever wondered how professionals achieve flawless results? It’s often their strategic use of sensors that make all the difference. Take time to understand how each sensor contributes to your machine’s efficiency.
Configuring Power Supply
A reliable power supply is the backbone of your CNC wood router. Choose a power supply that matches the requirements of your motors and electronics. Adequate power ensures consistent performance and prevents overheating.
Consider installing a surge protector to guard against voltage spikes. This small investment can protect your electronics from unexpected damage.
Have you ever experienced a sudden power outage? Having a backup power source can keep your project on track, preventing costly disruptions.
Setting up electronics for your CNC wood router might seem daunting, but with attention to detail and a systematic approach, you’ll be on your way to creating a powerful tool. Every wire, sensor, and power connection plays a pivotal role in your machine’s success. How will you ensure your CNC router stands out? Keep these tips in mind as you build your masterpiece.
Software Setup
Setting up a CNC wood router involves assembling hardware, installing software, and ensuring proper calibration. Detailed instructions simplify the process, ensuring smooth operation and precise cuts. Carefully follow guidelines to achieve efficient and accurate results in your woodworking projects.
Setting up the software for your CNC wood router is a critical step that can make or break your project. The right software transforms your digital designs into commands that the CNC machine can understand. This process can seem daunting at first, but with the right tools and some patience, you’ll be ready to carve out your masterpiece in no time.Choosing Cnc Software
Your first task is selecting the software that best suits your needs. There are many options available, from beginner-friendly to professional-grade programs. Consider your project’s complexity and your level of expertise. If you’re just starting, look for software with user-friendly interfaces and strong community support. Programs like Easel or Carbide Create are often recommended for beginners due to their simplicity. Remember, the right software is an investment in your project’s success.Installing And Calibrating Programs
Once you’ve chosen your software, it’s time to install and calibrate it. Follow the installation instructions carefully, as this will ensure the software runs smoothly. Check for any updates, as they often fix bugs and enhance functionality. Calibration is crucial to ensure that the CNC router executes commands accurately. Use the calibration tools within the software to align the machine’s movements with the digital design. This step can save you from costly mistakes and wasted materials.Programming Tool Paths
Programming tool paths is where your creativity and technical skills come together. This process involves defining the routes your CNC router will take to carve your design. Think of tool paths as the roadmap for your project. Start with simple shapes to get the hang of how your machine moves. Gradually, you can progress to more complex designs. Pay attention to cutting speeds and depths, as these can affect the quality of your finished piece. Have you ever programmed a path that didn’t turn out as expected? Analyzing what went wrong can be a valuable learning experience. By experimenting and tweaking your tool paths, you’ll become more adept at bringing your designs to life. — Setting up the software might feel like a hurdle, but it’s an essential part of the CNC journey. Each step brings you closer to transforming your creative ideas into tangible woodwork. With the right software and a bit of practice, you’ll be crafting intricate designs before you know it.Testing And Calibration
Testing and calibration are crucial steps in building a CNC wood router. These processes ensure your machine operates accurately and efficiently. Proper calibration improves the quality of your woodwork projects. It also extends the machine’s lifespan. Let’s explore how to test and calibrate your CNC wood router effectively.
Running Initial Tests
Start by powering on your CNC wood router. Check all connections to avoid malfunctions. Use a simple design for the first test. A square or circle works well. Load the design into your CNC software. Initiate the cutting process. Observe the machine’s movements. Ensure they match the design’s path. If the router completes the design, the test is successful. Initial tests verify basic functionality. They also identify obvious issues early.
Fine-tuning Accuracy
Fine-tuning accuracy involves adjusting the machine’s settings. Use a caliper to measure cut dimensions. Compare them with the design specifications. Adjust the stepper motor settings if needed. Small changes can improve precision. Check the spindle speed settings too. Incorrect speeds may cause errors. Adjust them for better results. Repeat the process until measurements are accurate. Fine-tuning enhances the machine’s performance.
Troubleshooting Common Issues
Common issues can arise during testing. Misalignment is a frequent problem. Check for loose screws and bolts. Tighten them to fix alignment issues. Sometimes, the machine skips steps. This can affect accuracy. Check the belt tension. Adjust it if necessary. Electrical issues may also occur. Inspect wiring and connections. Replace any damaged components. Regular maintenance prevents many common issues. Consistent troubleshooting ensures smooth operation.
Credit: hackaday.com
Maintenance And Upgrades
Building a CNC wood router is an exciting project that combines creativity with technical skills. Once you’ve crafted your machine, you enter a new phase: maintenance and upgrades. This stage is not just about keeping your router in tip-top shape; it’s about pushing its boundaries. You can enhance its capabilities and ensure it runs smoothly for years. It’s like nurturing a plant—your CNC router needs regular care and attention to thrive.
Routine Care And Cleaning
Think of your CNC router as a friend that needs regular check-ins. Dust and debris can affect its performance. Make it a habit to clean your machine after each use. Use a soft brush or compressed air to remove particles. Don’t forget to check the nuts and bolts. Tighten them if needed. Routine care keeps your router efficient and prolongs its lifespan.
Enhancing Performance
Are you satisfied with how your CNC router performs? If not, consider upgrading some components. Adding a more powerful spindle can improve cutting speed and precision. Invest in better software for smoother operations. Sometimes, even a small adjustment can make a big difference. Experiment with different settings to find what works best for your projects.
Exploring Advanced Features
Your CNC router is full of potential. Why not tap into advanced features? Install sensors for automatic tool changes. This saves time and boosts productivity. Explore the possibility of adding a laser module for detailed engravings. Think about integrating Wi-Fi connectivity for remote operations. These features elevate your router from a basic machine to a versatile tool.
Maintaining and upgrading your CNC wood router is an ongoing journey. Each enhancement and care step improves your experience. Your router becomes a trusted partner in your woodworking projects. What will you try next to maximize its capabilities?
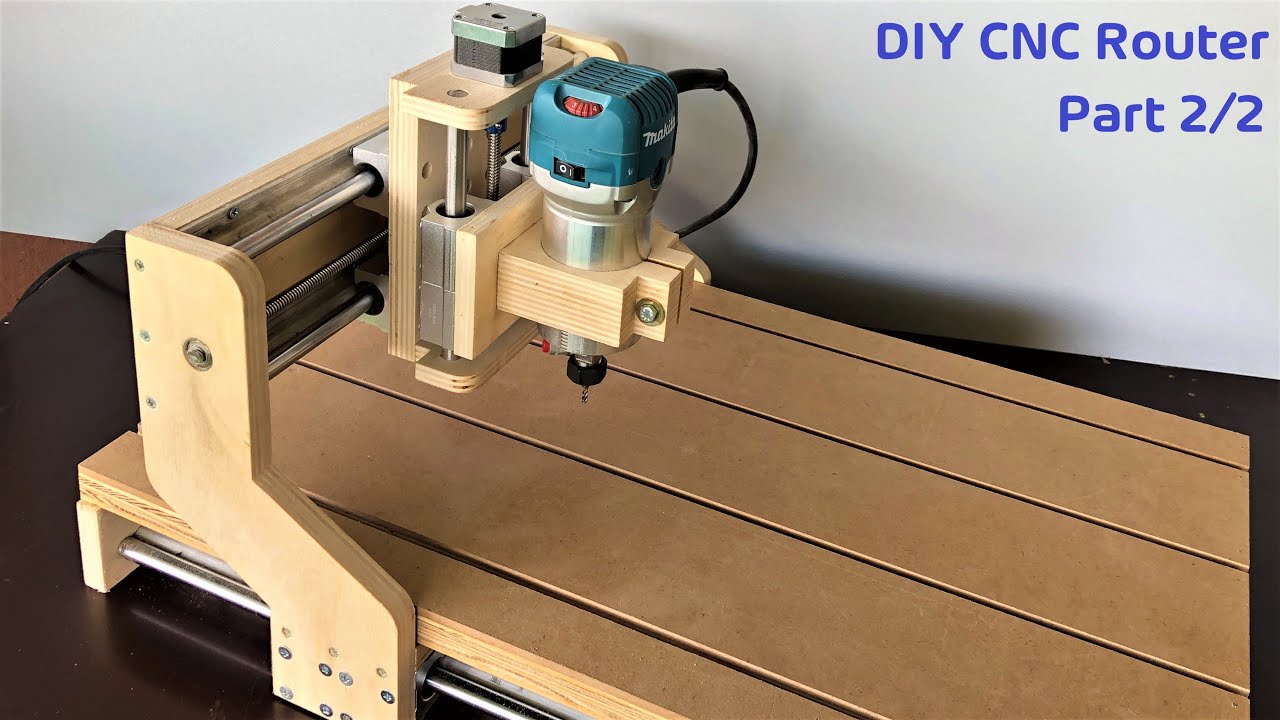
Credit: www.youtube.com
Frequently Asked Questions
Is It Cheaper To Build Your Own Cnc Machine?
Building your own CNC machine can be cheaper if you source affordable parts. DIY projects reduce labor costs but require technical skills and time. Compare the total cost of components and tools to pre-built models to ensure savings. Evaluate your expertise before deciding on a DIY CNC machine.
What Parts Do You Need To Build A Cnc Router At Home?
To build a CNC router at home, you’ll need a frame, stepper motors, control board, spindle, power supply, linear rails, and software. Assemble these components carefully for efficient operation. Ensure all parts are compatible and fit your design specifications. Always prioritize safety during construction and usage.
What Is The Best Wood For Cnc Router?
Baltic Birch plywood is the best wood for CNC routers. It offers durability, smooth surfaces, and consistent layers. Maple and MDF are also great choices for precise cuts and detailed designs. Choose based on your project’s requirements and desired finish.
What Is The Most Profitable Cnc Product?
The most profitable CNC products include custom furniture, intricate wood carvings, and precision-engineered automotive parts. High demand and low competition can boost profitability. Always research market trends and customer preferences to identify lucrative opportunities. Quality and innovation play crucial roles in maximizing profit margins in the CNC industry.
Conclusion
Building a CNC wood router requires patience and precision. Start with a solid plan. Gather all necessary materials. Follow each step carefully. Ensure safety measures are in place. Test your machine thoroughly. Adjust settings as needed. Practice will improve your skills.
Enjoy the creative possibilities. With dedication, your CNC wood router will serve you well. It opens up new woodworking opportunities. Share your projects with others. Inspire creativity in your community. Building your own machine is rewarding. A CNC wood router offers endless potential.
Explore new designs and ideas. Your craftsmanship will grow. Keep learning and experimenting.


