Are you worried about the safety of the electrical outlets in your home? Or perhaps you’re curious about the mysterious workings behind your walls.
Whatever the reason, understanding how to check an electrical outlet with a multimeter can save you time, money, and even prevent potential hazards. Imagine the peace of mind you’ll have knowing your outlets are functioning properly and safely. In this guide, we’ll walk you through the simple steps to test your outlets with confidence, using a tool that’s more accessible than you might think.
Ready to demystify your electrical outlets and take charge of your home’s safety? Let’s get started!
Credit: shockleyelectric.com
Tools Needed
Checking an electrical outlet with a multimeter is essential for safety. To start, gather the right tools. This ensures the process is smooth and accurate. The tools you need are simple but crucial. Each tool plays a role in helping you test safely and effectively.
Multimeter
A multimeter is the main tool for this task. It measures voltage and continuity in outlets. Choose a digital multimeter for easy reading. Ensure it has a clear display. This helps avoid mistakes during testing.
Test Leads
Test leads connect the multimeter to the outlet. They come with the multimeter usually. Ensure they are in good condition. Look for any damage before use. Damaged leads can give wrong readings.
Screwdriver
A screwdriver is needed to remove outlet covers. It gives you access to the wiring. Use the right size to avoid stripping screws. A flathead or Phillips screwdriver works best.
Safety Gloves
Safety gloves protect your hands from electric shocks. They are essential when working with electricity. Choose gloves that fit well and are comfortable. This ensures you work safely and confidently.
Flashlight
A flashlight helps you see clearly in dim areas. It is useful if the outlet is in a dark spot. Ensure the flashlight has fresh batteries. Proper lighting prevents mistakes during testing.
Safety Precautions
Ensuring safety involves careful steps when checking electrical outlets with a multimeter. Begin by wearing insulated gloves to protect from electric shocks. Verify that the multimeter is set to measure voltage, ensuring accurate readings and safety compliance.
Working with electricity can be daunting, especially if you’re not familiar with the tools or the risks involved. Checking an electrical outlet with a multimeter is a task many DIY enthusiasts undertake, but safety should always be your top priority. Before you dive in, consider the potential hazards and how you can protect yourself.Wear Proper Safety Gear
Always start by wearing the right safety gear. Insulated gloves are essential to protect your hands from electric shocks. Consider wearing rubber-soled shoes to reduce the risk of grounding yourself. Remember, these are simple measures, but they can save you from serious harm.Turn Off The Power
Never work on an outlet without first turning off the power. Locate your home’s circuit breaker and switch off the circuit that powers the outlet you plan to check. Use this opportunity to confirm that other devices in the room have powered down. It’s a small step that could prevent a big accident.Use Proper Tools
Ensure your multimeter is in good working order. Check that the probes are intact and free from damage. Set your multimeter to the correct setting for measuring AC voltage. This is crucial for obtaining accurate readings and avoiding mishaps.Verify The Outlet’s Power Status
Before testing, verify the outlet’s power status with a non-contact voltage tester. This device helps detect live wires without making physical contact. It’s a quick check that provides peace of mind before using your multimeter. Have you ever thought about how a small tool can act as your first line of defense?Avoid Distractions
Stay focused while performing electrical tasks. Keep your workspace clear of distractions like loud noises or interruptions. If you’re interrupted, take a moment to double-check your setup before resuming. Your safety is worth the extra time.Stay Informed And Educated
Continuously educate yourself about electrical safety. Online resources and community workshops can offer valuable insights. Have you considered learning from a professional? Sometimes, firsthand experience can be the best teacher. By adhering to these safety precautions, you can confidently and safely measure the electrical output of your outlets. Always prioritize your safety to make your DIY projects not just successful, but also secure.Setting Up The Multimeter
Setting up a multimeter is easy for testing electrical outlets. First, ensure the multimeter is on the correct setting. Then, insert the probes into the outlet slots.
Setting up a multimeter correctly is crucial for accurately checking an electrical outlet. When you know how to do it right, you can confidently troubleshoot electrical issues around your home. Whether you’re a first-time user or just need a refresher, understanding the setup process can save you time and effort.Understanding The Multimeter’s Functions
Before you dive into testing, familiarize yourself with the multimeter’s functions. Most multimeters have settings for measuring voltage, current, and resistance. These are usually labeled as V (for voltage), A (for current), and Ω (for resistance). You’ll typically use the voltage setting for checking electrical outlets. Double-check that your multimeter can handle the voltage levels you plan to test. This will help you avoid damaging the device or getting inaccurate readings.Switching To The Correct Mode
Set your multimeter to measure AC voltage. This is crucial because outlets provide alternating current (AC) power. Look for the “V” symbol with a squiggly line on your multimeter, which indicates AC voltage mode. Don’t forget to adjust the range setting if your multimeter has one. Selecting a range that’s too low can damage the device, while a range too high might lead to less precise readings. Aim for a range slightly above the expected voltage level.Connecting The Probes
Properly connecting the probes is essential for accurate measurements. Insert the black probe into the COM port and the red probe into the VΩmA port. This arrangement allows the multimeter to measure voltage correctly. Ensure the probes are firmly connected to the multimeter to prevent false readings. Loose connections can lead to inaccurate results and potentially unsafe testing conditions.Testing The Multimeter
Before testing an outlet, check that your multimeter is working correctly. You can do this by measuring the voltage of a known power source, like a battery. This step confirms that both the multimeter and its probes are functioning as expected. If the readings are off, double-check the settings and connections. Address any issues before proceeding to test an electrical outlet. Have you ever tried setting up a multimeter and wondered if you did it right? Remember, a well-set-up multimeter is your best ally in diagnosing electrical problems safely and effectively.
Credit: www.wikihow.com
Testing Voltage
Testing the voltage of an electrical outlet is essential for safety. A multimeter is a handy tool for this task. It measures the voltage accurately. Learning to use it properly is crucial for any homeowner. Follow these steps to ensure your outlets are functioning correctly.
Ac Voltage Settings
Most outlets use Alternating Current (AC). Set your multimeter to AC voltage. Look for a “V~” symbol on the dial. This ensures accurate readings. Adjust it to the highest setting to start. Once you confirm the outlet type, lower the setting if needed. This helps pinpoint the exact voltage.
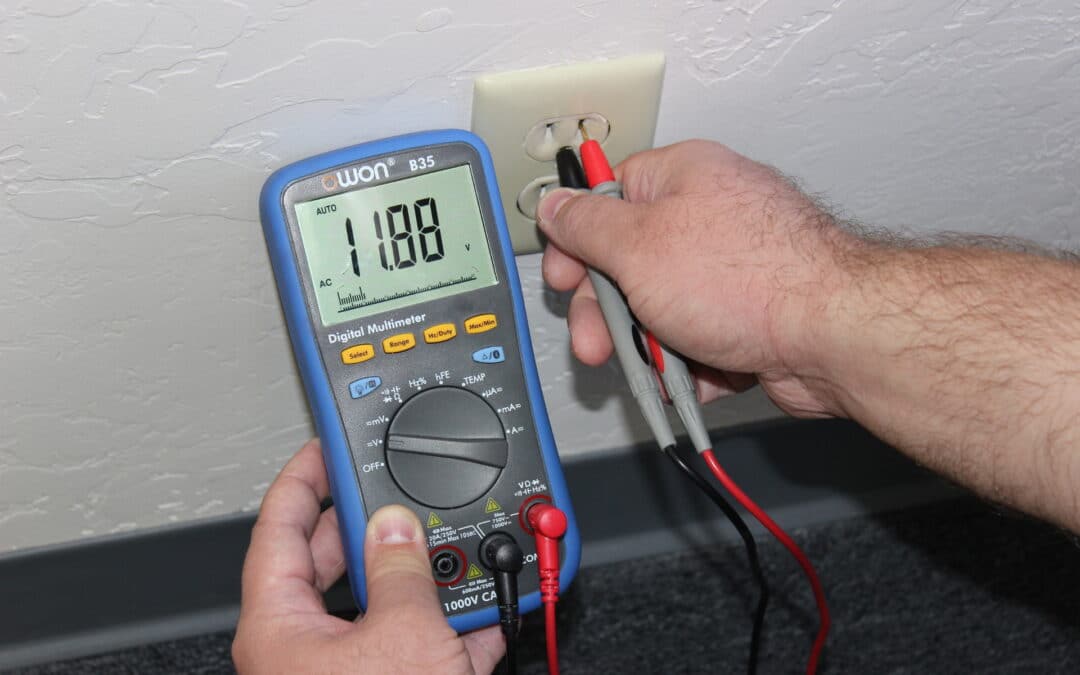
Measuring Outlet Voltage
Insert the black probe into the neutral slot. The neutral slot is usually larger. Place the red probe in the live slot. The multimeter will display the voltage. A typical reading should be around 120 volts for standard outlets. If the reading is significantly lower or higher, there may be an issue. Check all connections and wiring.
Ensure your probes are inserted securely. This avoids false readings. Handle the probes carefully. They conduct electricity. Stay safe by wearing rubber gloves. This adds an extra layer of protection.
Checking Continuity
Testing electrical outlets with a multimeter ensures safety. Set the multimeter to measure AC voltage. Insert the probes into the outlet slots. Check the reading for accurate voltage levels.
Checking continuity is a crucial step when diagnosing electrical issues. It’s a way to determine if electricity can flow freely through a circuit or wire. If you’ve ever wondered why your lamp won’t light up, checking continuity can help pinpoint the problem. Using a multimeter for this task is straightforward, even if you’re not an electrician. It can save you time, money, and a lot of frustration.Continuity Settings
To start checking continuity, you’ll first need to set your multimeter correctly. Look for the continuity symbol, usually a small wave or a diode symbol. Turn the dial to this setting. Some multimeters will beep when they detect continuity, while others might show a number on the display. Remember to ensure your multimeter is in good condition and the probes are intact. A damaged probe can lead to inaccurate readings.Testing Outlet Continuity
Now, let’s test the outlet. Before you begin, make sure the power is off. You don’t want any surprises! Take the multimeter probes and insert them into the outlet slots. Listen for a beep or check the display for numbers indicating continuity. If there’s no beep or the display shows a high number, there might be an interruption in the circuit. This could be due to a broken wire or faulty outlet. Imagine discovering an issue with your outlet before calling a professional. It gives you a head start in understanding the problem. Testing continuity can be particularly rewarding. You gain confidence with each successful test, knowing you can tackle other small electrical problems in your home. Have you ever felt the satisfaction of solving a puzzle? Checking continuity is like piecing together an invisible puzzle, where the solution brings both relief and empowerment. So, why not give it a try and see what mysteries you can uncover in your own home?:strip_icc()/removed-outlet-voltage-test-77726753-773f780dcaf3473eb22d1c1802467f8e.jpg)
Credit: www.bhg.com
Troubleshooting Common Issues
Using a multimeter can help identify electrical outlet issues. It is essential to understand common problems. This ensures your home remains safe. Let’s explore some issues you might face.
Identifying Faulty Wiring
Faulty wiring can cause many electrical problems. Start by testing the outlet’s voltage. Set your multimeter to AC voltage. Insert the probes into the outlet slots. A reading of 110 to 120 volts is normal.
If the reading is lower, wiring might be faulty. Check for loose connections. Tighten any loose wires. Ensure the breaker is not tripped. If unsure, contact an electrician for help.
Recognizing Faulty Outlets
Sometimes, the outlet itself may be the issue. Test the outlet with a multimeter. Set it to resistance mode. Insert the probes into the outlet slots. The reading should show continuity.
If there is no continuity, the outlet is faulty. Replace the outlet promptly. Ensure power is off before replacing it. Faulty outlets can pose safety hazards. Regular checks can prevent accidents.
Safety Measures Post-test
After testing electrical outlets with a multimeter, ensure safety by unplugging devices. Inspect for any damages or unusual signs. Always handle equipment with dry hands to prevent accidents.
After testing your electrical outlet with a multimeter, safety should remain a top priority. Ensuring everything is secure and functioning correctly can prevent potential hazards. Let’s dive into some essential safety measures you should follow post-test.Double-check The Outlet
After completing your test, it’s important to double-check the outlet. Make sure it is securely mounted on the wall and there are no loose screws or parts. A loose outlet can be a fire hazard and should be fixed immediately.Inspect For Signs Of Wear Or Damage
Look closely for any signs of wear or damage around the outlet. Cracks, burn marks, or unusual discoloration can indicate bigger problems. If you notice any of these signs, consider consulting a professional electrician to avoid potential risks.Ensure Proper Wiring
It’s crucial to ensure that all wires are properly connected and secure. Improper wiring can lead to electrical faults. If you’re unsure about the wiring, seek guidance from an electrician rather than attempting to fix it yourself.Test The Outlet Functionality
Plug in a device to confirm the outlet is working correctly. A simple lamp or phone charger can do the trick. If the device doesn’t power on, recheck your multimeter results or consult a professional.Secure The Cover Plate
Make sure the cover plate is securely fastened to the wall. A loose cover can expose wires and increase the risk of electric shock. Tightening the screws ensures safety and prevents debris from entering the outlet.Stay Informed And Educated
Electrical safety is an ongoing learning process. Stay informed about new safety standards and practices. Engaging in regular maintenance and inspections can save you from future headaches and hazards. Always remember, electricity is not something to take lightly. Have you ever encountered a surprise issue after testing an outlet? Share your experiences in the comments to help others avoid similar pitfalls.Frequently Asked Questions
How To Check If An Outlet Is Bad With A Multimeter?
Set the multimeter to AC voltage. Insert probes into outlet slots. Check for 110-120 volts reading. If reading is low or zero, outlet is bad.
How To Check Power Output With A Multimeter?
Set the multimeter to measure voltage. Connect the probes to the power source terminals. Read the displayed voltage. Multiply voltage by current to calculate power output. Always ensure safety while performing measurements.
What Is The Voltage Coming Out Of An Outlet?
In the United States, outlets typically provide 120 volts of electricity. In Europe, outlets usually deliver 230 volts. Always check your local electrical standards and consult a professional for any concerns.
How To Test 110v Wires With A Multimeter?
To test 110v wires, set the multimeter to AC voltage. Touch the black probe to the ground wire. Place the red probe on the live wire. The multimeter should display around 110 volts, indicating power flow. Ensure safety by wearing insulated gloves and avoiding direct contact.
Conclusion
Checking an electrical outlet with a multimeter is simple. Follow the steps carefully. Ensure safety first. Always turn off the power before starting. Use the multimeter to check voltage and continuity. This helps identify issues like loose wires. Regular checks can prevent electrical problems.
Save time and money by catching issues early. With practice, anyone can do it. Remember, safety is the top priority. Always consult an electrician for complex issues. Keep learning and stay safe.


