
Are you tired of your sound system not delivering the crisp audio quality you expected? It might be a simple issue: incorrect speaker polarity.
Checking speaker polarity is crucial for ensuring the best sound performance, and guess what? You can easily do it with a multimeter. Imagine the satisfaction of hearing every beat and note in perfect harmony, transforming your listening experience. In this guide, we’ll walk you through the steps to check your speaker polarity using a multimeter.
Don’t let a simple polarity problem rob you of audio bliss. Dive in, and let’s make sure your speakers are in sync, giving you the rich sound you deserve.
Speaker Polarity Basics
Understanding speaker polarity is crucial for anyone who wants to set up a sound system. Simply put, polarity refers to the direction of the electrical current through your speaker. Correct polarity ensures that your speakers push air in the right direction, producing sound waves as intended. It’s a bit like making sure your car’s wheels are moving in the right direction when you hit the gas pedal. Getting this right means your audio experience will be crisp and clear. But how do you check if your speakers are wired correctly? That’s where a multimeter comes in handy.
Importance Of Correct Polarity
Correct polarity is not just a technical detail; it’s the backbone of audio clarity. When your speakers are aligned correctly, they work together to create a seamless sound experience. Imagine watching your favorite movie and feeling the bass thump precisely as intended. Correct polarity is what makes this possible. If you’ve ever set up a speaker system, you’ll know the difference it makes when everything is in sync. It’s the difference between feeling the music and just hearing it.
Consequences Of Incorrect Polarity
Incorrect polarity can lead to disappointing audio performance. You might notice that your music sounds flat or lacks depth. Imagine listening to a symphony where the instruments sound out of tune. That’s the effect of incorrect polarity. It can cause speakers to cancel each other out, leading to weak or muffled sound. You may find yourself constantly adjusting the volume, trying to achieve clarity that won’t come. This frustration can be avoided by checking polarity with a multimeter.
Have you ever set up your sound system and felt like something was off? Checking speaker polarity might be the missing step in your setup process. It’s a simple check that can transform your listening experience from mediocre to magnificent. Why settle for less when you can easily ensure your speakers are performing their best?
Credit: www.hollyland.com
Tools Needed
A multimeter and speaker wires are essential for checking speaker polarity. Ensure the multimeter has a continuity setting. This tool combination helps verify correct speaker connection, ensuring optimal sound quality.
Checking speaker polarity with a multimeter is a simple yet essential task to ensure your audio system functions correctly. To do this, you’ll need a few tools that are readily available and easy to use. In this section, we’ll focus on the tools required to effectively check speaker polarity, ensuring you have everything you need to get the job done right.Choosing The Right Multimeter
A multimeter is a versatile tool, and choosing the right one can make all the difference. You don’t need an expensive model for checking speaker polarity; a basic digital multimeter will do the trick. Look for one that measures both voltage and continuity. Why is this important? Accurate measurements are crucial in determining polarity. I once used a multimeter that was slightly off calibration, and it led to hours of troubleshooting. Learn from my mistake and ensure your multimeter is properly calibrated.Additional Necessary Tools
In addition to a multimeter, you’ll need a few other items to streamline the process: – Speaker Wires: Have spare wires on hand to test connections. It’s frustrating when you need to check polarity and realize your wires are too short or damaged. Keep extras in your toolkit. – Alligator Clips: These are useful for connecting your multimeter to the speaker terminals securely. They prevent slipping and ensure consistent contact, saving you from repeated checks. – Notebook and Pen: Recording your findings can help track any issues or patterns. A quick jot down can prevent future headaches if you need to remember which speaker was out of phase. Have you ever started a project only to realize you didn’t have everything you needed? With these tools at your disposal, you’ll be set up for success. Are there any tools you swear by that aren’t listed here? Let me know in the comments!Preparing For The Test
Testing speaker polarity with a multimeter ensures correct sound quality. First, gather your multimeter and set it to measure resistance. Then, connect the multimeter probes to the speaker terminals to check polarity.
Before diving into testing speaker polarity with a multimeter, it’s crucial to prepare adequately. This stage is often overlooked, yet it’s as important as the test itself. Proper preparation ensures accuracy and safety, making the entire process smoother and more efficient. Whether you’re a tech enthusiast or someone who’s just trying to set up a home theater, the preparation phase is your foundation. Are you ready to ensure everything is set for a successful test?Safety Precautions
Safety should be your top priority. Before you start, ensure your multimeter and speaker are both powered off. This minimizes the risk of electrical shock. Keep your workspace clear of any clutter to avoid tripping or accidental damage. Gather all necessary tools and check that the multimeter is functioning properly. If you have pets or children, make sure they are not in the area to prevent distractions or accidents. It’s easy to overlook, but a peaceful environment can significantly impact your focus and accuracy.Setting Up The Speaker
Begin by disconnecting the speaker from any audio source or amplifier. This isolates the speaker, ensuring accurate test results. Identify the positive and negative terminals on your speaker. These are usually marked with a ‘+’ and ‘-‘. If not, consult the speaker’s manual or manufacturer website for guidance. Next, position your speaker in a stable, flat area. This prevents it from moving during the test, which could disrupt your readings. I remember once testing a speaker on an uneven surface, and it nearly fell over—lesson learned! Do you have your multimeter ready? Set it to the resistance (ohms) setting. This is essential for measuring the speaker’s polarity accurately. Take a moment to double-check everything. Are all connections secure? Is the multimeter set correctly? This quick review can save you time and prevent errors later on.
Credit: www.youtube.com
Using A Multimeter
Checking speaker polarity with a multimeter is simple. First, set the multimeter to the ohms setting. Then, connect the probes to the speaker terminals. A positive reading indicates correct polarity, while a negative reading shows reversed polarity. This ensures your speakers are wired correctly for optimal sound.
Using a multimeter to check speaker polarity is a straightforward process that can save you a lot of time and frustration. Imagine you’ve just set up a new audio system in your living room, but something doesn’t sound quite right. Your favorite song doesn’t have the punch it used to. Could it be that the speakers are wired incorrectly? It’s a common issue and, thankfully, easy to resolve with a multimeter. This handy tool helps you confirm that your speakers are correctly connected, ensuring optimal sound quality.Setting Up The Multimeter
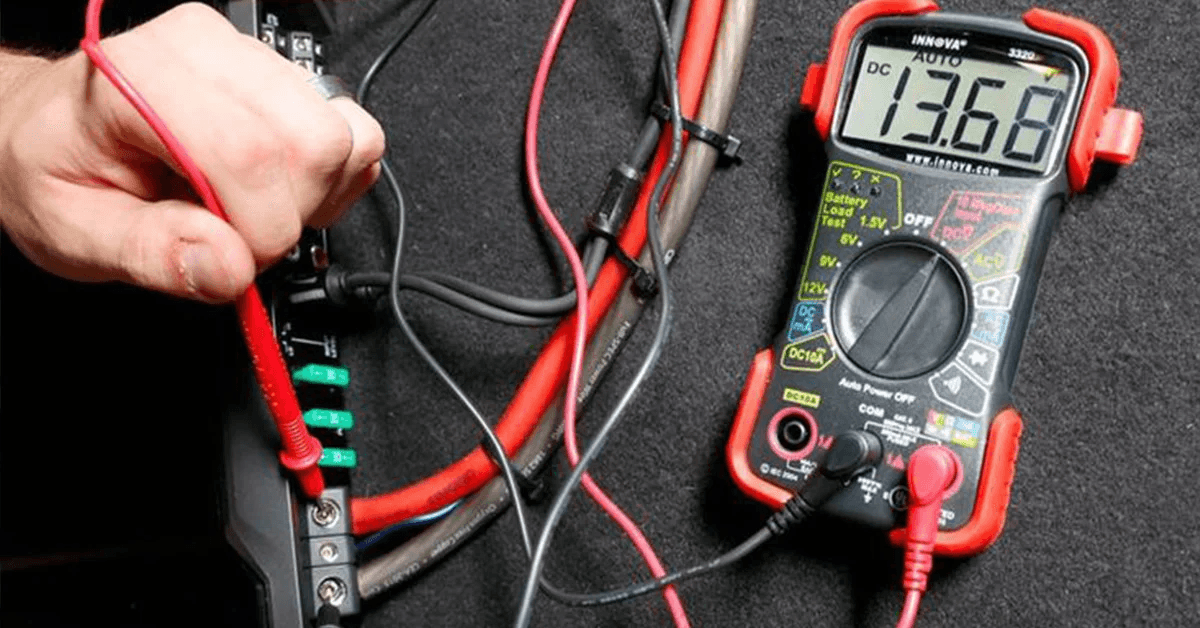
First, ensure your multimeter is correctly set up. You need to set it to measure DC voltage. This is crucial because incorrect settings can lead to inaccurate readings. Start by turning the dial to the appropriate setting, usually indicated by a “V” with a straight line. If you’re unsure about your multimeter model, check the manual or online resources. Many digital multimeters have auto-ranging features, making this step even simpler. Don’t forget to insert the black probe into the COM port and the red probe into the VΩmA port.Connecting Leads To The Speaker
Now, it’s time to connect the leads to the speaker. Begin by identifying the positive and negative terminals on your speaker. Usually, these are marked with a “+” or “-” sign. If the markings are not visible, remember that the larger terminal often indicates the positive side. Attach the red probe to the positive terminal and the black probe to the negative terminal. This step is vital to get an accurate polarity reading. If your multimeter shows a positive reading, your speaker’s polarity is correct. A negative reading indicates the polarity is reversed, and you may need to switch the wiring. Have you ever noticed how a small detail like speaker polarity can alter your listening experience? It’s fascinating how a simple multimeter can make a big difference in your setup. Checking polarity might seem like a minor task, but it ensures your audio system performs at its best. Isn’t it worth taking a few minutes to ensure your speakers deliver the best sound possible? With this simple technique, you’re not only optimizing your current setup but also gaining valuable troubleshooting skills for the future.Interpreting Results
Interpreting results after checking speaker polarity is crucial. It helps ensure sound quality and system efficiency. Correct polarity ensures speakers work harmoniously. Misinterpretation can lead to sound distortion or damage. Understanding positive and negative readings is key. It aids in identifying issues and achieving optimal performance.
Positive And Negative Readings
Positive readings indicate correct polarity. The speaker’s positive terminal connects properly. Sound output remains clear and balanced. Negative readings suggest reversed connections. This can cause sound distortion. Check for correct wiring to resolve this. Use the multimeter’s display for guidance. Positive readings show a consistent voltage flow. Negative readings may fluctuate or show zero.
Troubleshooting Common Issues
Common issues arise from incorrect wiring. Loose connections can affect readings. Check all wires and ensure tight connections. Multimeter malfunction can mislead results. Verify multimeter settings before testing. Incorrectly set multimeters can show wrong polarity. Double-check settings for accuracy. Damaged wires can lead to false readings. Inspect wires for wear or damage. Replace any faulty wires promptly.
Ensuring Accurate Polarity
Checking speaker polarity with a multimeter ensures accurate sound quality. Attach the multimeter probes to the speaker terminals. A positive reading confirms correct polarity, while a negative reading indicates reversed connections.
Ensuring speaker polarity is correct prevents sound quality issues. Incorrect polarity can cause sound distortion. A multimeter helps verify this. Ensuring accurate polarity is vital for audio systems. It enhances your listening experience. Let’s explore how to ensure accurate speaker polarity.Double-checking Connections
Always inspect connections before testing. Ensure all wires connect securely. Loose wires can affect results. Check the speaker terminals. Make sure they’re clean and tight. This prevents false readings. Use the multimeter after confirming connections. This ensures accurate polarity testing.Verifying With Additional Tests
Conduct additional tests for certainty. Use a battery test for extra verification. Connect a battery’s terminals to the speaker. Listen for a popping sound. This indicates correct polarity. The cone should move outward. If it moves inward, reverse the connections. This simple test confirms multimeter results. It ensures the best audio quality.Practical Applications
Checking speaker polarity with a multimeter has many benefits. It ensures your speakers are set up correctly. Correct setup leads to better sound quality and speaker performance. This simple test can help in various practical situations.
Improving Sound Quality
Reversed speaker polarity can cause sound distortion. This distortion affects music and movie experiences. Regular checks can prevent this. Use a multimeter to confirm polarity. Consistent sound quality relies on correct speaker alignment. Clear and balanced audio enhances enjoyment.
Optimizing Speaker Performance
Correct polarity supports optimal speaker function. It prevents unnecessary strain on components. Proper alignment aids in delivering accurate sound waves. This improves the overall performance of the audio system. Regular checks can extend speaker life. This simple task ensures your investment lasts longer.
Tips From Experts
Checking speaker polarity with a multimeter ensures sound quality. Experts share valuable tips to make this task easier and more accurate. Follow their advice to avoid common errors and enhance your skills.
Common Mistakes To Avoid
Skipping multimeter calibration leads to inaccurate readings. Always calibrate your device before testing. Inadequate contact with speaker terminals can result in faulty measurements. Ensure a firm connection for precise results.
Using the wrong multimeter setting confuses many beginners. Set your multimeter to continuity or resistance mode. This checks the speaker’s polarity correctly. Avoid touching the multimeter probes together during testing. This causes false readings and misinterpretations.
Advanced Techniques For Accuracy
Utilize a known polarity battery for testing. Connect it to the speaker terminals. Observe the cone movement. If it moves outward, polarity is correct. The cone should move inward for reverse polarity.
Employ the pulse method for precision. Send a short audio pulse through the speaker. Observe cone direction closely. A correct polarity moves the cone forward. Reverse polarity pushes it backward.
Consider using a polarity tester for advanced accuracy. These devices simplify the testing process. They provide clear visual indications of polarity.

Credit: www.ifixit.com
Frequently Asked Questions
How To Confirm Speaker Polarity?
Use a 9V battery to check speaker polarity. Connect the battery to the speaker terminals. The cone moves outward with correct polarity. If the cone retracts, reverse the connections. Ensure the positive battery terminal connects to the positive speaker terminal for accurate polarity confirmation.
Can You Check Polarity With A Multimeter?
Yes, you can check polarity with a multimeter. Set it to DC voltage mode. Connect the probes to the terminals. A positive reading means correct polarity; a negative reading indicates reversed polarity. Always ensure correct connections to avoid damage.
How To Tell If Speaker Polarity Is Reversed Without A Multimeter?
Play a track with strong bass and listen for thin or weak sound quality. Swap wires on one speaker, and check if sound improves. Reversed polarity often causes reduced bass response.
How To Check Speaker Terminals With A Multimeter?
Set the multimeter to measure resistance (ohms). Connect probes to the speaker terminals. A reading around 4-8 ohms indicates a working speaker. If the reading is zero or infinite, the speaker might be faulty. Ensure correct probe placement for accurate results.
Conclusion
Checking speaker polarity with a multimeter is simple and effective. Follow the steps to ensure clear sound. Proper polarity prevents sound distortion. Always connect wires correctly. Multimeters offer precise readings. No need for expert skills. Just a bit of patience and focus.
A correctly wired speaker enhances your audio experience. Enjoy better sound quality and longer speaker life. Regular checks keep your sound system in top shape. Troubleshooting becomes easier with this method. Practice makes perfect. With time, you’ll gain confidence. Use these tips to maintain your audio equipment.
Happy listening!


