
Imagine this: you’re trying to shut your door, but it just won’t close properly. The culprit?
A misaligned door strike plate. Frustrating, right? But here’s the good news: you can fix it yourself. Learning how to chisel a door strike plate might sound daunting, but it’s simpler than you think. In this guide, you’ll discover straightforward steps to tackle this common household issue.
By mastering this skill, not only will you enhance your DIY abilities, but you’ll also save time and money. Plus, there’s a certain satisfaction that comes from solving these little problems on your own. Get ready to transform your door from a stubborn adversary into a smooth-operating friend. Dive in, and let’s make sure your door locks with ease every time.
Tools And Materials
Chiseling a door strike plate requires the right tools and materials. This process ensures a snug fit for door hardware, enhancing security and functionality. Understanding the essential tools and selecting suitable materials is crucial for a smooth and effective installation.
Essential Tools
Having the right tools makes the job easier and more precise. A sharp chisel is vital for clean cuts and smooth edges. Choose a chisel that fits comfortably in your hand. A hammer helps apply force without damaging the surface. Use a wood mallet for gentler taps. A measuring tape ensures accuracy in marking the area. Marking the spot with a pencil guides your chiseling efforts. A screwdriver is necessary for removing and fixing screws.
Material Selection
The choice of materials impacts the durability and look of the strike plate. Opt for metal strike plates for strength and longevity. Brass and stainless steel are popular choices for their robustness. Wood fillers help repair any mistakes in chiseling. Choose high-quality filler for seamless finishes. Use sandpaper to smooth out rough edges. A protective finish like varnish guards against wear and tear. Ensure all materials match the door’s style and color.
Credit: www.youtube.com
Preparation Steps
Chiseling a door strike plate requires careful preparation. Proper steps ensure safety and effectiveness. Before starting, gather necessary tools and materials. A well-prepared area makes the task smoother.
Safety Measures
Safety is crucial in any DIY project. Wear protective eyewear to shield your eyes. Use gloves to protect your hands from sharp edges. Ensure tools are in good condition. A dull chisel can cause accidents. Check your workspace for stability. Avoid clutter that may lead to trips or falls.
Area Cleaning
A clean working area is essential. Remove any debris from the door frame. Dust can hinder your progress. Wipe the area with a damp cloth. Ensure the door is securely open. Use a wedge or stopper. Prevent the door from moving during chiseling. This ensures precision in your work.
Marking The Strike Plate Location
Accurately marking the strike plate location ensures a secure door fit. Align the plate with the latch for a precise fit. Use a pencil to trace the outline on the door frame before chiseling.
Marking the strike plate location is a crucial step in ensuring your door functions smoothly and securely. A misplaced strike plate can lead to misalignment, making it difficult to close or lock the door properly. By taking the time to accurately mark the location, you set the foundation for a successful installation. It’s an opportunity to enhance your DIY skills and ensure that your home is as secure as possible.Measuring Precision
Accuracy is key when measuring the strike plate location. Use a measuring tape to determine the exact spot where the latch meets the door frame. Ensure both the latch and the strike plate align perfectly by marking the center of the latch on the frame. This will be your reference point. Double-check your measurements to avoid any mistakes. A small error can cause significant issues.Guideline Marking
Once you have your measurements, it’s time to mark the guidelines. Use a pencil to lightly outline the strike plate’s position on the door frame. Consider using a square or ruler to keep your lines straight and accurate. This will help you avoid crooked or uneven installations. Remember, the clearer your guidelines, the easier it will be to chisel the perfect spot for your strike plate. How often do we rush through these steps only to regret it later? Taking a few extra moments now can save you a lot of hassle down the road. A well-placed strike plate not only improves the function of your door but also enhances the security of your home. So, are you ready to make your mark?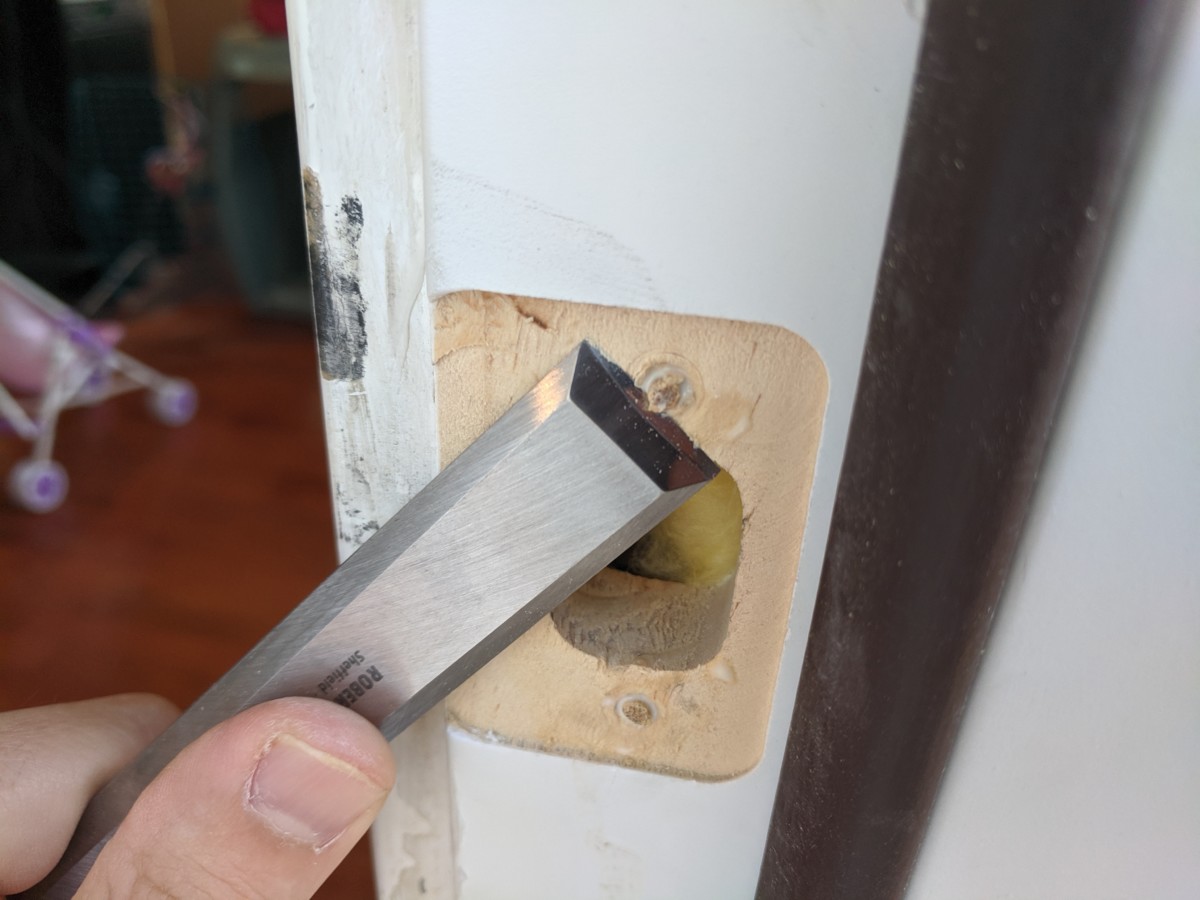
Credit: taso.mn
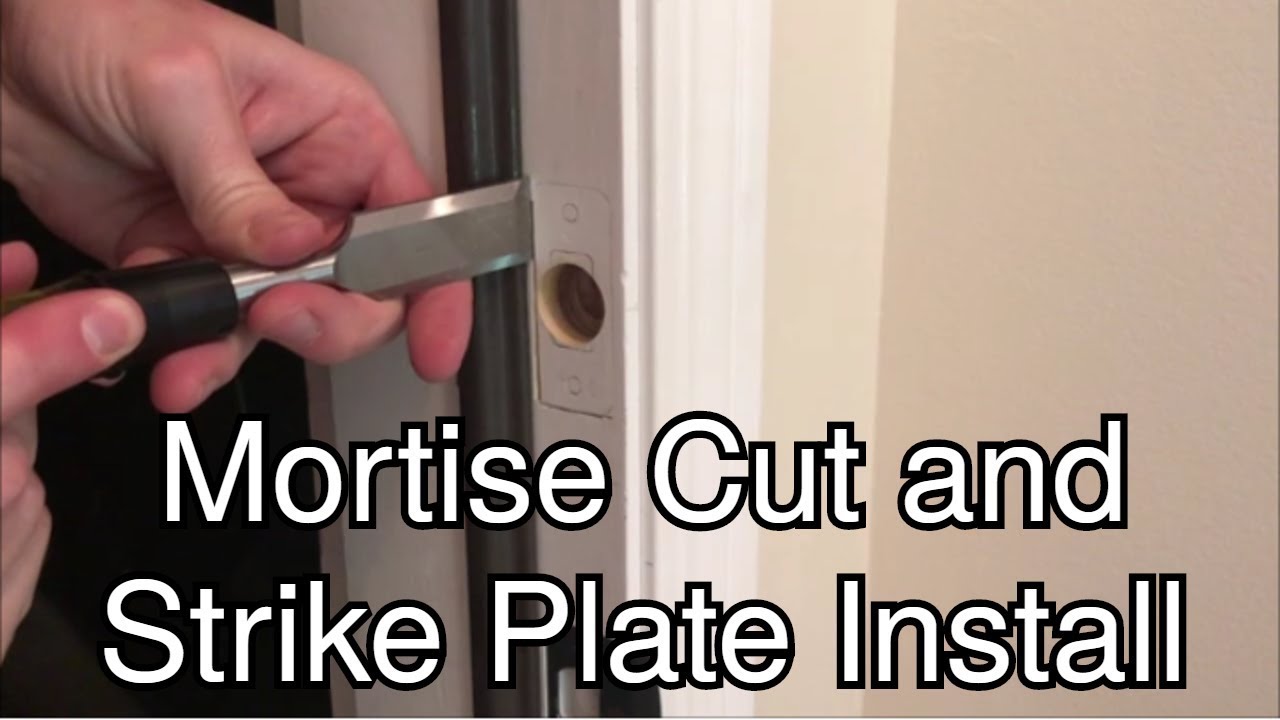
Chiseling Techniques
Learning how to chisel a door strike plate can save you from unnecessary headaches when installing or adjusting doors. Whether you’re a seasoned DIYer or a first-timer, mastering chiseling techniques will ensure a snug fit and smooth operation. Let’s dive into choosing the right chisel and the chiseling method to achieve the best results.
Choosing The Right Chisel
Picking the right chisel is crucial for a clean and precise cut. You might be tempted to use whatever you have on hand, but a chisel that’s too big or too small can lead to uneven edges.
Look for a chisel that matches the width of your strike plate. A 1/2-inch chisel often works well. If you’re unsure, measure the plate’s width and find a chisel that closely fits those dimensions.
Opt for a sharp chisel. A dull tool requires more effort and can damage the wood. Sharpening stones are an affordable way to maintain your chisel’s edge.
Have you ever tried using a blunt chisel? It’s frustrating. Avoid this by inspecting your tool before starting.
Chiseling Method
Now, let’s talk about the method. The technique you use will determine the precision and cleanliness of your cut. Start by marking the area where the strike plate will sit using a pencil or marking knife.
Make shallow cuts first. This helps prevent splitting the wood and guides your deeper cuts. Consider using a light mallet to tap the chisel gently.
Work slowly and carefully. It’s not a race. Take your time to ensure each cut is straight and even.
Clear out debris regularly. Wood chips can obstruct your view, leading to uneven chiseling. Keep your workspace clean for clarity and accuracy.
Have you ever wondered why some doors don’t close smoothly? Often, it’s because the strike plate wasn’t chiseled properly. Pay attention to detail to avoid this common issue.
Remember, practice makes perfect. If you’re new to chiseling, try practicing on a scrap piece of wood first. This will boost your confidence and improve your skills.
Installing The Strike Plate
Installing the strike plate is crucial for door security. It ensures the latch fits snugly and operates smoothly. Proper installation prevents misalignment and enhances door functionality. Follow these steps to install the strike plate effectively.
Securing The Plate
Align the strike plate with the chiseled area. Ensure it sits flush with the door frame. Use screws to secure the plate firmly. Choose screws that match the plate’s design. Tighten each screw carefully to avoid damaging the frame.
Testing Alignment
Close the door gently to check alignment. The latch should enter the strike plate smoothly. If misaligned, adjust the plate slightly. Ensure it does not obstruct the latch. Repeat the test until the door closes perfectly.
Troubleshooting Common Issues
Chiseling a door strike plate involves precision and patience. Begin by marking the area with a pencil, ensuring alignment. Use a chisel and hammer to carefully remove excess wood, achieving a snug fit for the strike plate.
Chiseling a door strike plate can sometimes lead to unexpected hurdles. Whether you’re a DIY enthusiast or tackling this task for the first time, troubleshooting is an integral part of the process. Knowing how to address common issues can save you time and frustration. Let’s dive into some practical solutions you can apply.Misalignment Fixes
Misalignment is a frequent issue when installing a door strike plate. One simple way to check alignment is by closing the door slowly and observing where the latch hits the strike plate. If it doesn’t fit snugly, you might need to adjust the plate slightly. To fix a misalignment, try loosening the screws on the strike plate. Shift the plate until the latch fits perfectly, then retighten the screws. This small adjustment can make a big difference. Have you ever wondered why your door sometimes sticks or doesn’t close smoothly? Often, it’s just a minor alignment issue with the strike plate. Addressing these minor tweaks can enhance your door’s functionality.Depth Adjustments
Another common problem is the depth of the strike plate. If the plate is set too deep or too shallow, it can prevent the door from latching properly. Check if the latch rests comfortably within the strike plate hole. You can adjust the depth by using a chisel to carefully carve out more space if needed. Be cautious not to over-chisel, as this can lead to other problems. If the hole is too deep, consider using a filler like wood putty to adjust the depth. Have you faced the annoyance of a door that rattles every time there’s a breeze? This could be due to improper depth. By ensuring the strike plate is set just right, you can avoid these common issues and enjoy a quieter, more secure door. The next time you’re faced with these challenges, remember: small, precise adjustments can lead to big improvements. Keep your toolkit handy and don’t hesitate to make those necessary tweaks.Maintenance Tips
Chiseling a door strike plate requires precision and the right tools. Start by marking the outline of the plate on the door frame. Use a chisel to carefully remove excess wood, ensuring a snug fit for smooth operation.
Ensuring your door strike plate is in top condition can prevent many headaches. Proper maintenance not only extends the life of the hardware but also guarantees your door locks securely. A little attention here and there can save you from future repair costs and security issues.Regular Checks
Performing regular checks on your door strike plate is crucial. Look for signs of wear or misalignment. If the door doesn’t latch smoothly, it might be time for an adjustment. Consider checking the screws to see if they’ve loosened over time. Tighten them if necessary. Loose screws can lead to misalignment and cause the door to not close properly. Have you noticed any rust or corrosion? This could weaken the plate. Replace it before it becomes a bigger issue.Cleaning Guidelines
Keeping your strike plate clean is simpler than you think. Use a damp cloth to wipe away dust and grime. Avoid harsh chemicals that could damage the finish. A mixture of mild soap and water works wonders for deeper cleaning. Gently scrub the plate with a soft brush. Rinse and dry thoroughly to prevent moisture build-up. Regular cleaning can also reveal hidden issues. You might spot cracks or other damage that needs immediate attention. How often do you clean your strike plate? Consistency is key to maintaining its integrity. Maintaining your door strike plate doesn’t require a professional. With these simple tips, you can ensure its longevity and functionality. Why not start a routine today and keep your door’s heart beating strong?
Credit: www.reddit.com
Frequently Asked Questions
How To Chisel For A Strike Plate?
To chisel for a strike plate, mark the plate location on the door frame. Use a sharp chisel and hammer to carefully carve out the outlined area. Ensure depth matches the plate thickness. Test fit and adjust as needed for a snug fit.
Secure the strike plate with screws.
How To Bend A Door Strike Plate?
To bend a door strike plate, remove it using a screwdriver. Gently bend with pliers to desired angle. Reattach securely.
How To Fix A Misaligned Strike Plate On A Door?
To fix a misaligned strike plate, first unscrew it. Adjust its position to align with the door latch. Use a pencil to mark new screw holes. Drill pilot holes at the marked spots. Reattach the strike plate with screws. Test the door for smooth closing.
How To Cut A Door Strike Plate Hole?
Mark the strike plate position on the door frame. Use a chisel to cut the outline. Remove excess wood for a proper fit. Use a drill for screw holes. Ensure the strike plate sits flush with the frame for secure installation.
Conclusion
Chiseling a door strike plate is simple with practice. Start by gathering basic tools like a chisel and hammer. Measure carefully for precise fitting. Mark the area to chisel. This ensures accuracy. Chisel slowly, removing small wood pieces. Check your work often.
Align the plate correctly for smooth door operation. Patience is key to avoiding mistakes. With these steps, your door will function better. Remember to wear safety gear to protect yourself. Practice makes perfect. Soon, you’ll handle door projects with ease.
Enjoy a well-fitted door strike plate. Happy chiseling!


