
Are you ready to tackle your next home improvement project? Cutting crown molding can seem daunting, but with the right tools and guidance, you can achieve professional results in no time.
Imagine the sense of accomplishment you’ll feel when you transform your space with perfectly fitted crown molding. All you need is a miter saw and a little know-how. We’ll guide you through each step, making the process straightforward and stress-free.
Whether you’re a DIY enthusiast or a beginner looking to enhance your skills, this guide is crafted just for you. Dive in, and discover how easily you can elevate your home’s aesthetic!
Credit: www.homedepot.com
Choosing The Right Miter Saw
Selecting the right miter saw ensures smooth crown molding cuts. Accurate angles and a sharp blade make a big difference. Proper alignment reduces errors and enhances the finish.
Choosing the right miter saw is a crucial step when you’re planning to cut crown molding. The accuracy and ease of your project largely depend on this choice. A well-chosen miter saw can make the difference between a perfect fit and a frustrating mismatch. Let’s dive into the types of miter saws and essential features that will make your crown molding project a success.Types Of Miter Saws
There are several types of miter saws, each with its strengths and weaknesses. The most common ones you’ll come across are the standard miter saw, compound miter saw, and sliding compound miter saw. A standard miter saw allows you to make angled cuts, which is sufficient for basic molding tasks. It’s a good starting point if you’re on a budget. The compound miter saw can tilt in one direction, enabling you to cut at an angle and a bevel simultaneously. This feature is particularly useful for crown molding as it helps in creating precise joints. For more flexibility, the sliding compound miter saw adds a sliding feature. This allows you to move the saw head back and forth, accommodating wider pieces of wood. It’s ideal for larger crown molding projects.Essential Features For Crown Molding
When cutting crown molding, there are specific features you should look for in a miter saw. Consider these essentials to enhance your cutting experience. Positive stops are a key feature. They allow you to quickly set the saw to common angles, saving time and reducing errors. Imagine not having to adjust the angle every single time! Look for a laser guide. This handy feature projects a line onto your wood, helping you see exactly where the blade will cut. It’s like having a personal guide ensuring each cut is spot on. Another feature to consider is the bevel capacity. A saw that bevels in both directions can make compound cuts without needing to reposition your wood. This is especially beneficial for complex crown molding angles. Think about your workspace as well. If space is limited, a compact design might be necessary. But don’t sacrifice functionality for size if your projects require more robust features. Choosing the right miter saw is not just about ticking boxes. It’s about understanding your needs and making an informed decision. What features are non-negotiable for you? How does your usual project size influence your choice? Keep these questions in mind, and you’ll find the miter saw that fits your crown molding projects perfectly.Understanding Crown Molding Angles
Understanding crown molding angles can be tricky for beginners. This skill is crucial for a perfect fit. Cutting crown molding on a miter saw requires precision. You must grasp the angles involved for a flawless finish. Let’s break down the essential aspects of crown molding angles.
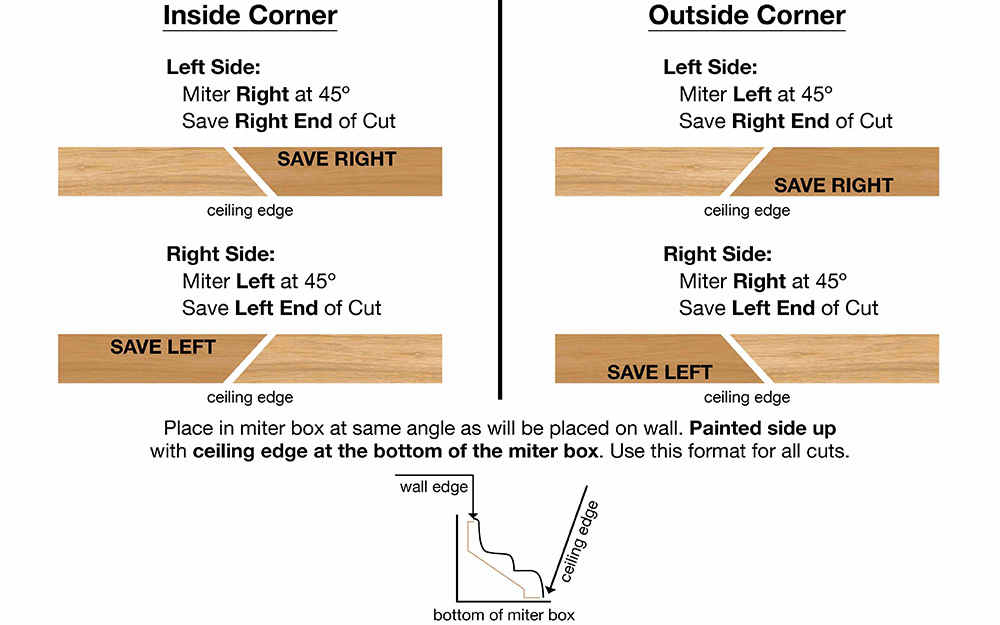
Inside And Outside Corners
Inside corners form when two walls meet inwardly. These angles can often be less than 90 degrees. Outside corners occur when walls extend outward. These angles are usually more than 90 degrees. Knowing these distinctions helps in setting your miter saw accurately.
Angle Measurement Techniques
Measuring crown molding angles can be done with a protractor. Place it against the wall to read the angle. For more precision, use a digital angle finder. These tools simplify the process, ensuring accurate cuts every time. Always double-check your measurements before cutting.
Setting Up The Miter Saw
Position the miter saw on a stable surface for accurate crown molding cuts. Adjust the saw’s angle to match the desired cut. Carefully secure the molding, ensuring a clean and precise cut every time.
Setting up your miter saw is crucial for cutting crown molding accurately. It’s the foundation of your project, ensuring each cut is precise and fits seamlessly. Whether you’re a seasoned woodworker or a beginner tackling your first molding project, setting up your miter saw correctly can save you time and prevent costly mistakes. Let’s dive into the essential steps to get your miter saw ready for action.Adjusting The Bevel And Miter
Begin by adjusting the bevel angle on your miter saw. This angle determines how the saw blade tilts side to side. For crown molding, the bevel often needs to be set at 33.9 degrees. Next, adjust the miter angle. This controls the swivel of the blade from left to right, typically set at 31.6 degrees for crown molding. Check your saw’s manual for specific settings, as they can vary slightly. It might feel like a dance with numbers, but these angles are vital for a perfect fit. A quick tip: use a digital angle finder for precise adjustments, ensuring your cuts are spot on.Securing The Molding
Once your angles are set, securing the molding is next. Use clamps to hold the molding firmly against the saw fence. This prevents movement during the cut, ensuring clean and accurate edges. Double-check the molding’s position. It should sit at the same angle as it will be installed on the wall. This prevents any misalignment when you go to install the pieces. Ever had a molding slip mid-cut? It’s frustrating and can ruin a piece. Secure it tightly, but not so tight that it damages the molding. Feel the grip; it should be snug yet gentle. By setting up your miter saw with precision, you’re paving the way for a successful crown molding project. Do you often rush through the setup, only to regret it later? Take the time to adjust and secure everything properly. Your future self will thank you.
Credit: www.jacksonville.com
Cutting Techniques
Cutting crown molding with a miter saw requires skill and precision. Proper techniques can make the process easier and ensure a neat finish. This section explains essential cutting techniques for crown molding. Learn about positioning the molding and making precise cuts.
Positioning The Molding
Proper positioning of the molding is crucial for accurate cuts. Place the molding against the saw fence. Ensure the decorative side faces up. The molding should sit at a 45-degree angle. This simulates how it will appear on the wall. Use a clamp to secure the molding if needed. Avoid movement during the cut.
Making Precise Cuts
Precise cuts depend on accurate measurements. Measure twice to ensure correctness. Set the miter saw to the desired angle. Common angles are 45 degrees or 90 degrees. Align the blade with the cut mark on the molding. Start the saw and cut slowly. Avoid forcing the blade through the material. Check the cut for smoothness and adjust if necessary.
Troubleshooting Common Issues
Cutting crown molding on a miter saw can be challenging. Problems like misaligned cuts and gaps in joints often occur. Knowing how to troubleshoot these issues can save time and frustration. Let’s explore common problems and their solutions.
Dealing With Misaligned Cuts
Misaligned cuts result from incorrect angles or saw settings. Check your miter and bevel angles first. Ensure they match the molding’s angle. Double-check your saw settings before cutting. Secure the molding firmly on the saw table. This prevents movement and ensures accuracy. Use a test piece to verify the setup. Adjust as needed for precise alignment.
Fixing Gaps In Joints
Gaps in joints can occur due to minor miscalculations. They can ruin the look of your crown molding. Start by ensuring your cuts are clean and sharp. Dull blades can cause rough edges. Sand the edges lightly for a smooth finish. Apply a small amount of wood filler to fill any gaps. Choose a filler that matches the molding color. Once dry, sand it for a seamless look. Painting over the joints can also help disguise gaps.
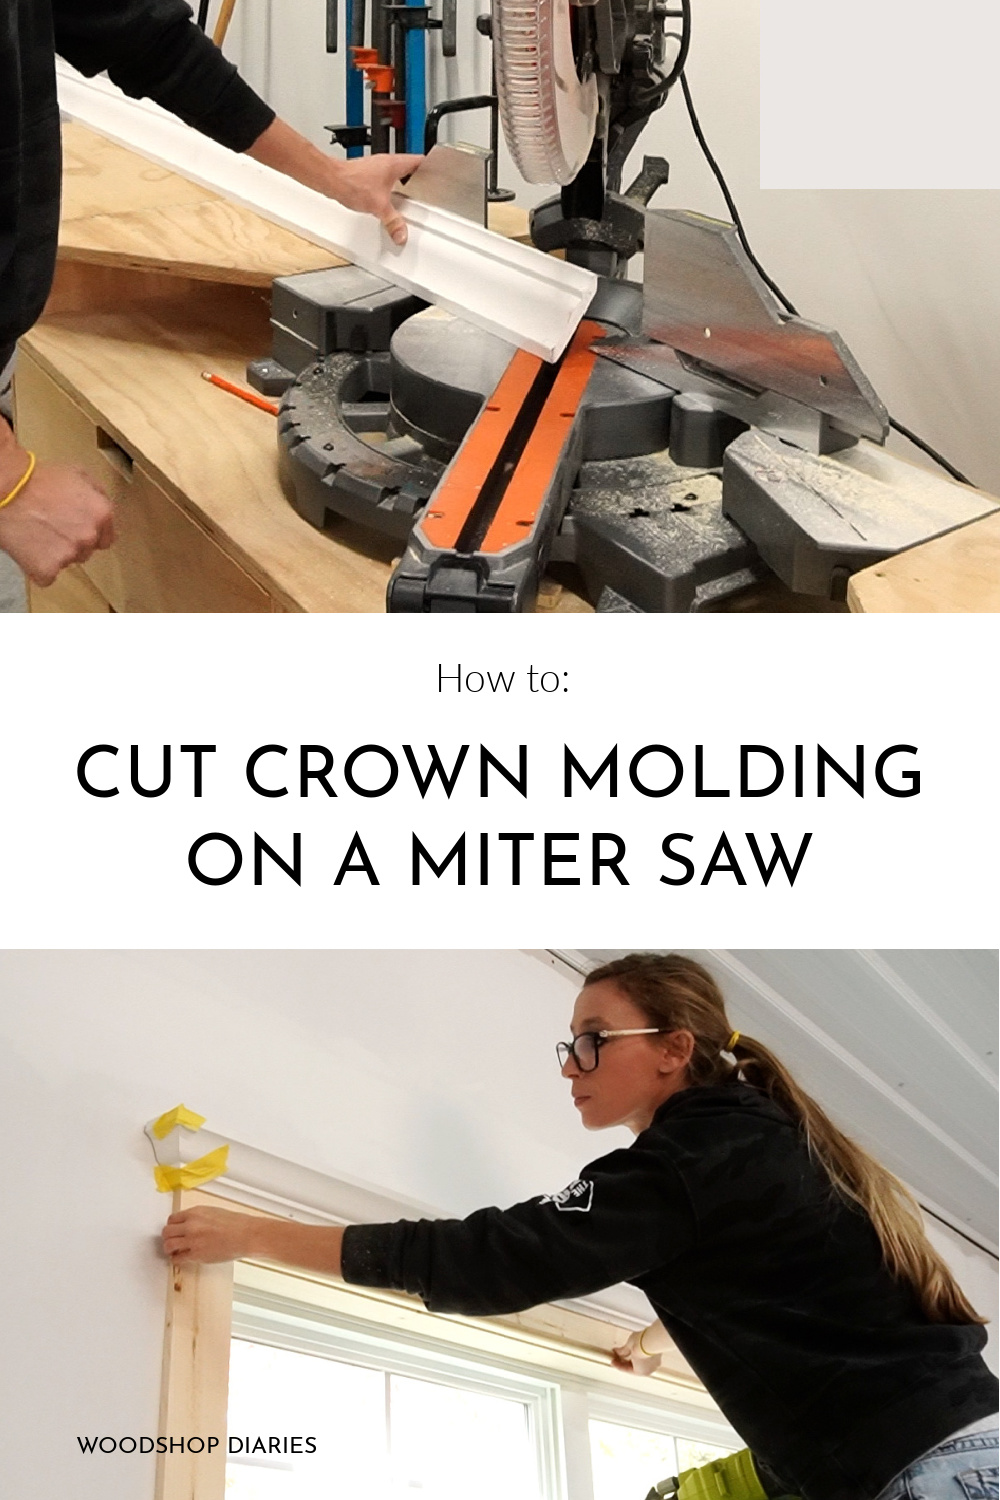
Credit: www.woodshopdiaries.com
Safety Tips
Cutting crown molding on a miter saw requires precision. Safety should be your top priority. Equip yourself with the right knowledge and tools. This ensures a smooth and secure operation.
Protective Gear
Always wear safety goggles to protect your eyes from dust and debris. Hearing protection is essential to guard against noise. Use gloves to protect your hands from accidental cuts. A dust mask will prevent inhalation of fine particles. Avoid loose clothing that might get caught in the saw.
Safe Saw Operation
Ensure the saw is stable on a flat surface. Check the blade for sharpness and damage before use. Keep your hands a safe distance from the blade. Use clamps to secure the molding in place. Always turn off the saw before adjusting or moving it. Double-check all settings before starting the cut. Maintain focus throughout the process to prevent accidents.
Expert Tips For Perfect Cuts
Cutting crown molding on a miter saw requires precision. Set the saw at 45 degrees for perfect angles. Use clamps to secure the molding for smooth, accurate cuts.
Cutting crown molding can be a daunting task, but with the right knowledge, you can achieve perfect cuts every time. The secret lies in understanding the nuances of your miter saw and avoiding common pitfalls. Let’s dive into some expert tips that will help you master the art of cutting crown molding with precision.Avoiding Common Mistakes
One frequent mistake is misjudging the angle. Ensure your miter saw is set correctly for the specific crown molding angle. A small error here can throw off the entire project. Another common error is not securing the molding properly. Always clamp your molding firmly to prevent any movement while cutting. This will save you from jagged edges and uneven cuts. You might be tempted to rush through the process. Don’t. Take your time to measure twice and cut once. Precision is key, and rushing can lead to wasted materials and frustration.Professional Finishing Touches
Once your cuts are perfect, consider the finishing touches. A light sanding can smooth out any rough edges, making your molding look polished and professional. Paint or stain the cut edges before installation. This prevents any exposed wood from showing and gives a seamless finish once the molding is in place. Finally, use a bit of caulk to fill in any small gaps or imperfections. This not only enhances the appearance but also adds a professional touch to your work. Have you ever noticed a beautifully finished crown molding and wondered what made it look so flawless? The answer often lies in these simple yet effective finishing techniques. By incorporating these steps into your process, you can elevate your work from good to extraordinary.Frequently Asked Questions
Can You Cut Crown Molding With A Regular Miter Saw?
Yes, you can cut crown molding with a regular miter saw. Use proper angles and settings for accurate cuts. Ensure the saw blade is sharp for clean edges. Follow safety precautions while operating the miter saw.
What Is The Trick To Cutting Crown Molding?
Use a miter saw set at 45 degrees for accurate cuts. Position molding upside down for best results. Always measure twice to ensure precision. Use coping techniques for inside corners to achieve a seamless fit. Practice on scrap pieces to perfect your technique.
How To Cut 45 Degree Corners On Crown Molding?
Use a miter saw set at 45 degrees. Position molding upside down against the fence. Cut each piece carefully for precise corners. Ensure angles match for a seamless fit. Always measure twice and cut once for accuracy.
Why 31.6 Degrees For Crown Molding?
31. 6 degrees is a common miter angle for crown molding to achieve precise joints. This angle fits typical wall-ceiling intersections, ensuring a snug fit and a professional finish. Properly cutting at this angle minimizes gaps and enhances the overall aesthetic of the molding.
Conclusion
Cutting crown molding on a miter saw can be simple. Follow the steps carefully. Practice makes perfect. Take your time with each cut. Measure twice, cut once. Ensure the molding fits snugly. Double-check angles and measurements. A clean cut gives a professional look.
Patience leads to great results. Use the right tools for precision. Enjoy creating beautiful crown moldings. Enhance your space with elegant details. Miter saws help achieve clean cuts. Safety first—always wear protective gear. Your DIY skills will improve. Cutting crown molding becomes easier with practice.


