
Ever found yourself struggling with a loose pipe wrench spring? You’re not alone.
A malfunctioning spring can turn even the simplest plumbing task into a frustrating ordeal. If you’re dealing with this issue, you’re probably searching for a quick, reliable fix. Imagine the satisfaction of restoring your wrench to perfect working condition. No more slipping or losing grip at the worst possible moment.
This guide will walk you through simple, effective steps to fix the spring on your pipe wrench, saving you time and hassle. Get ready to reclaim control over your tools and tackle your projects with confidence. Let’s dive into the process and get your pipe wrench back in top shape!
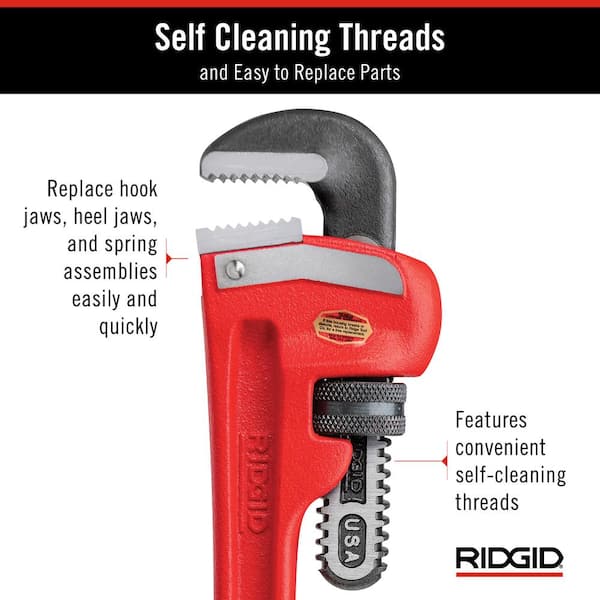
Credit: www.homedepot.com
Tools And Materials Needed
To fix a spring on a pipe wrench, gather essential tools like a screwdriver, pliers, and replacement spring. Ensure you also have lubricating oil to ease the process. Proper materials and tools make repair efficient and straightforward.
Fixing the spring on a pipe wrench may seem daunting, but with the right tools and materials, it’s a straightforward task. You might feel tempted to skip this step, but having everything you need beforehand can save you time and frustration. Let’s dive into what you’ll need to get started.Tools Needed
A successful repair begins with the right tools. You’ll need a screwdriver, ideally one that matches the screws on your pipe wrench. A pair of pliers is essential for gripping and removing stubborn components. Don’t forget a wrench set to handle any nuts or bolts you encounter. If you don’t have one, consider borrowing from a friend or neighbor. A lubricant spray will also be crucial, especially if your wrench has seen better days.Materials Required
Replacing the spring requires a few key materials. First, you’ll need a replacement spring. Make sure it matches the size and tension of the original to ensure smooth operation. A small container can be useful for holding screws and small parts as you disassemble the wrench. This will prevent them from getting lost, a lesson I learned the hard way when my dog ran off with a crucial screw!Optional Items
While not essential, a magnetic tray can be a game-changer for keeping metal parts secure. It’s a small investment that can save you from crawling around on the floor searching for lost pieces. A soft cloth is handy for cleaning the wrench parts before reassembly. It’s surprising how much grime can accumulate, affecting performance. Have you ever started a project only to realize you’re missing something crucial? Having these tools and materials at your disposal ensures you’re ready to tackle the repair without interruption. Thinking ahead and being prepared makes the process not just easier but also more enjoyable.Safety Precautions
Fixing a spring on a pipe wrench requires attention to safety. Wear gloves to protect your hands. Ensure the wrench is stable to avoid injury.
Safety should always be your top priority when fixing the spring on a pipe wrench. Before diving into the repair, it’s crucial to understand the potential hazards involved. A pipe wrench is a powerful tool, and mishandling it can lead to injuries. By taking appropriate safety measures, you can ensure a smooth and injury-free repair process.1. Wear Protective Gear
Wearing protective gear is a fundamental step in ensuring your safety. Always put on gloves to protect your hands from sharp edges or pinching parts. Safety goggles are equally important to shield your eyes from any flying debris. Have you ever accidentally dropped a wrench on your foot? If yes, you know the value of sturdy footwear.2. Secure Your Workspace
A cluttered workspace can lead to accidents. Make sure your area is clean and organized. Keep your tools within easy reach but ensure they’re not in a position to fall. Have you ever considered how a simple trip over a misplaced tool could derail your entire repair project?3. Disconnect Energy Sources
Before beginning any repair, it’s vital to disconnect energy sources. If your pipe wrench is connected to any power source, ensure it’s turned off. This step is critical to avoid electrical shocks or unintended wrench movements. What would you do if the wrench suddenly sprang to life while you were fixing it?4. Inspect The Wrench
Before you start the repair, inspect the wrench for any visible damage. Look for cracks or signs of wear. A damaged wrench can pose safety risks during the repair process. How confident are you in the condition of your tools before you begin using them?5. Follow Manufacturer Instructions
Refer to the manufacturer’s guidelines for repairing the spring. These instructions are designed to ensure safe and effective repairs. Neglecting them could lead to improper fixes or further damage. Have you ever skipped reading instructions only to realize it was a costly mistake?6. Stay Focused
Distractions can lead to accidents. Stay focused on the task at hand, and avoid multitasking. If you’re working in a busy environment, find a quiet corner where you can concentrate. How often do distractions affect your ability to complete tasks safely? By taking these precautions, you can ensure a safer repair experience and extend the life of your pipe wrench. It’s always better to invest time in safety than regret not doing so later.Identifying The Problem
Identifying the problem with a spring on a pipe wrench is crucial. A faulty spring can affect the tool’s functionality. Recognizing the signs of a spring issue helps in effective troubleshooting. This section will guide you through the key steps to identify the problem.
Understanding The Function Of The Spring
The spring in a pipe wrench ensures the jaws grip effectively. It maintains tension between the moving parts. When the spring fails, the wrench loses its grip. This makes tasks difficult and increases the risk of accidents.
Signs Of A Faulty Spring
A loose grip is a common sign of a faulty spring. You may notice the wrench slipping off the pipe. Unusual noises during use also indicate spring issues. Inspect the wrench for visible damage to the spring.
Visual Inspection Of The Wrench
Start by checking the wrench for rust or wear. Rust can weaken the spring, affecting performance. Look for any distortion or bending in the spring. A damaged spring may not function properly.
Testing The Wrench’s Grip
Test the wrench’s grip on a pipe. A secure grip means the spring is fine. If it slips, the spring might need fixing. Ensure the wrench adjusts smoothly. Difficulty in adjustment can point to spring problems.
Listening For Unusual Sounds
Use the wrench and listen for squeaks or clicks. These sounds suggest spring issues. A healthy spring operates quietly. Unusual sounds indicate the need for further inspection.

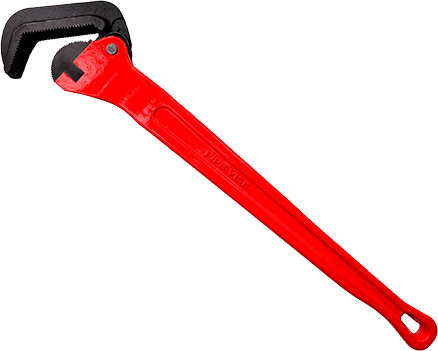
Credit: www.amazon.com
Disassembling The Pipe Wrench
Disassembling a pipe wrench can help fix a faulty spring. First, loosen the nut and remove the handle. Carefully take out the spring, check for damage, and replace if necessary. Reassemble the wrench to restore its functionality.
Disassembling a pipe wrench might seem daunting at first, but with the right guidance, it becomes an easy and rewarding task. Whether you’re a seasoned DIY enthusiast or just starting out, understanding how to take apart a pipe wrench can save you money and extend the life of your tool. This process allows you to fix common issues like a faulty spring, ensuring your wrench performs optimally. Imagine the satisfaction of knowing you can troubleshoot and maintain your tools with confidence. Let’s dive into the steps to disassemble your pipe wrench and fix that spring!Removing The Jaw
Begin by identifying the jaw of your pipe wrench. It’s the part that grips the pipe securely. To remove it, you’ll first need to loosen the adjustment nut. This nut controls the jaw’s tightness. Grab a screwdriver and gently turn it counterclockwise. Once loosened, you can slide the jaw out of its housing. This might require a bit of wiggling, but don’t force it. If it’s stuck, applying a small amount of lubricant can help. Have you ever thought about how much easier things are when you take the time to maintain them?Taking Out The Spring
With the jaw removed, you can now access the spring. The spring is crucial for the wrench’s functionality, providing tension and grip. Carefully locate it within the wrench’s body. Use pliers to gently pull the spring out. Be cautious not to stretch or damage it. If the spring is broken or worn out, it’s time for a replacement. Notice how a simple change can enhance your tool’s performance? Replacing the spring can breathe new life into your pipe wrench. It’s a simple fix that makes a big difference. Keep a spare spring handy for future repairs, ensuring you’re always prepared. What other small repairs can you tackle with newfound confidence?Inspecting The Spring
Inspecting the spring on a pipe wrench is crucial for functionality. A malfunctioning spring can impact the wrench’s grip. Regular checks ensure your tool remains reliable.
Checking For Damage
First, examine the spring for visible damage. Look for bends or breaks. These can affect the spring’s performance. Use a flashlight for a better view. Damaged springs need replacement to ensure proper operation.
Assessing Wear And Tear
Springs can wear down over time. Check for signs of wear. Look for rust or corrosion. These weaken the spring. A worn spring can cause slippage. Consider replacing worn springs to maintain grip strength.
Repairing The Spring
The spring in a pipe wrench plays a crucial role. It ensures smooth operation and proper grip. Over time, the spring can wear out or break. Repairing the spring can restore your pipe wrench’s efficiency. This guide will walk you through the steps of fixing the spring.
Straightening Bent Sections
A bent spring can affect the wrench’s performance. First, remove the spring from the wrench. Use pliers to gently straighten any bent sections. Work slowly to avoid breaking the spring. Check for any cracks or weak spots. If the spring is severely damaged, consider a replacement.
Replacing A Broken Spring
A broken spring needs replacement for the wrench to work. Start by acquiring a compatible spring. Remove the old spring from the wrench. Carefully install the new spring in the same position. Ensure it’s securely fixed to prevent slipping. Test the wrench to confirm smooth operation.
Reassembling The Pipe Wrench
Fixing the spring on a pipe wrench involves carefully placing it back into the groove. Make sure the spring is aligned correctly for smooth operation. Reassembling the wrench ensures it grips securely without slipping.
Reassembling a pipe wrench can feel daunting if you’re not familiar with its components. But understanding the basics can make the process straightforward and even enjoyable. Fixing the spring is a small yet crucial task that can breathe new life into your tool. Imagine the satisfaction of a perfectly functioning wrench, ready to tackle any plumbing challenge. Let’s dive into the specifics of getting your pipe wrench back into prime working condition.Positioning The Spring Correctly
The spring in your pipe wrench plays a vital role in adjusting the jaw’s grip. To position it correctly, start by locating the small cavity designed for the spring. This is usually near the base of the movable jaw. Ensure that the spring is clean and free from rust or debris before placing it. This simple step prevents further issues down the line. Once you’ve placed the spring in its cavity, gently press it down. You should feel a slight resistance. This resistance is a good sign that the spring is in the right place. Have you ever tried assembling something only to realize a part wasn’t seated correctly? Avoid this by ensuring the spring is snugly fit.Securing The Jaw
With the spring in place, the next step is to secure the jaw. Begin by aligning the movable jaw with its track. It should slide smoothly if everything is clean and well-lubricated. A snug fit here ensures that the wrench can easily adjust to different pipe sizes. Use a screwdriver to tighten any screws that hold the jaw in place. Ensure they are secure but not overly tight. You want the jaw to move freely without any wobble. Tightening too much can strip the screw or damage the track. Have you ever tightened something so much that it broke? It’s all about finding the balance. Reassembling a pipe wrench doesn’t require professional skills, just a little patience and attention to detail. By positioning the spring correctly and securing the jaw, you ensure your wrench functions smoothly. What challenges did you face when fixing your wrench? Share your experiences and tips below!Testing The Repaired Wrench
Once you’ve fixed the spring on your pipe wrench, it’s time to test your handiwork. Testing the repaired wrench is crucial to ensure it’s ready for action. A reliable wrench should grip firmly and operate smoothly. Let’s dive into how you can make sure your wrench is up to the task.
Ensuring Smooth Operation
Begin by opening and closing the wrench jaws several times. Does the movement feel fluid? A smooth operation indicates the spring is functioning well. Remember that the spring is like the heart of your wrench. If it struggles, the wrench will too.
Hold the wrench and adjust it to various sizes. Notice any resistance or stiffness? These could be signs the spring isn’t properly aligned. I once spent hours fixing a wrench only to realize the spring was slightly off. A small adjustment made all the difference.
Checking The Grip Strength
Test the wrench by gripping different pipe sizes. Does it hold firm without slipping? A strong grip is essential for safety and efficiency. Imagine being halfway through a task and the wrench slips! That’s why testing is vital.
Try applying pressure to the wrench’s jaws. Can it maintain its grip under stress? This step ensures your wrench won’t fail when you’re working on tough pipes. A wrench that releases grip under pressure is a wrench that needs more work.
Have you thought about the way you use your wrench daily? Testing reveals not only the tool’s readiness but also how you can use it better. Fixing the spring is just part of the story; understanding your wrench’s limits and capabilities will empower you in your tasks.
Maintenance Tips
Maintaining a pipe wrench ensures it works efficiently for a long time. Proper care prevents problems, such as a broken or stuck spring. Regular upkeep keeps your wrench in top condition and ready to tackle any task.
Regular Cleaning
Clean your pipe wrench after every use. Use a cloth to wipe away dirt. Focus on the spring area for any debris. Ensure all parts are free from grime. A clean wrench works more effectively. It also prevents rust and other damage.
Proper Storage
Store your wrench in a dry place. Moisture can lead to rust. Keep it away from direct sunlight. Extreme heat can damage the spring. Hanging the wrench helps maintain its shape. Avoid placing heavy items on it. This prevents bending or breaking.
Credit: www.ebay.com
Frequently Asked Questions
Why Won’t My Pipe Wrench Tighten?
A pipe wrench may not tighten due to worn jaws, incorrect size, or improper positioning on the pipe. Ensure the wrench’s teeth grip securely and the adjustment nut is set correctly. Consider replacing worn parts or choosing a wrench that matches the pipe size for effective tightening.
Why Does My Wrench Keep Slipping Off?
Your wrench might slip due to worn-out jaws or an incorrect size. Ensure a proper fit and check for damage. Clean the tool and the nut for better grip. Using a correctly sized wrench reduces slippage.
How To Keep An Adjustable Wrench From Slipping?
Ensure the wrench fits the nut snugly. Tighten the wrench jaw securely. Apply steady, even pressure. Keep the wrench perpendicular to the nut to prevent slipping. Regularly check and maintain the wrench for wear or damage.
How To Fix A Stuck Adjustable Wrench?
To fix a stuck adjustable wrench, apply penetrating oil to the moving parts. Gently tap the wrench with a hammer to loosen it. Try adjusting the wrench open and close repeatedly. If needed, use a wire brush to remove rust.
Regular maintenance prevents future sticking.
Conclusion
Fixing a spring on a pipe wrench is straightforward. Follow these steps, and your wrench will work smoothly again. Regular maintenance can prevent future issues. Always handle your tools with care. This ensures they last longer and perform well. Remember, a well-maintained tool saves time and effort.
Keep your workspace organized. This helps in finding tools easily. Practice these tips regularly. It will make your tasks easier and more efficient. Happy fixing, and enjoy using your pipe wrench.


