
Are you ready to tackle the task of flaring brake lines like a pro? You might be surprised to learn just how simple it can be with the right tool in your hands.
Imagine the satisfaction of knowing you’ve done a job well and safely, with your vehicle’s braking system in perfect condition. Whether you’re a seasoned mechanic or a DIY enthusiast, mastering this skill is within your reach. This guide will walk you through the steps, ensuring you feel confident and empowered at every stage.
Don’t let uncertainty hold you back—discover how to flare brake lines efficiently and effectively, and transform your vehicle maintenance skills today.
Credit: www.inlinetube.com
Essential Tools For Flaring Brake Lines
Flaring brake lines is an essential skill for car enthusiasts and DIY mechanics. It ensures a tight, leak-free seal in your vehicle’s brake system. Having the right tools is crucial for this task. Using the correct tools makes the process smoother and safer.
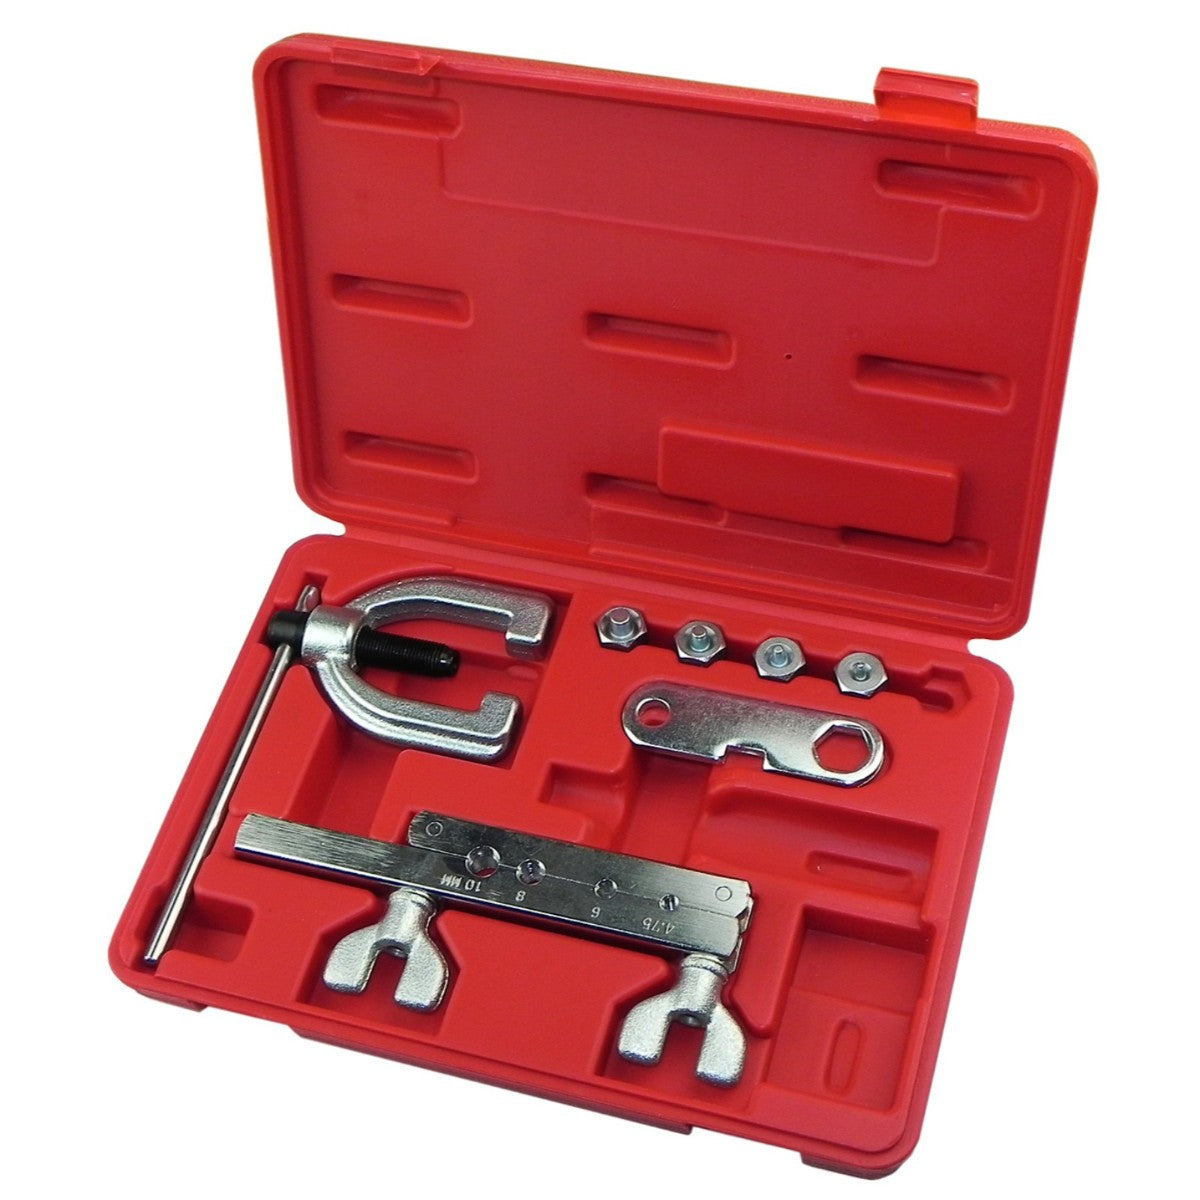
Flaring Tool Kit
A flaring tool kit is a must-have. It contains the necessary equipment for flaring. These kits typically include a yoke, die blocks, and a reamer. The yoke holds the brake line firmly. Die blocks come in different sizes for various flares. The reamer cleans the inside of the brake line.
Tubing Cutter
A tubing cutter is essential for clean cuts. Clean cuts ensure a proper flare. Choose a cutter that fits your brake line size. It should make precise cuts without crushing the line. A good tubing cutter improves the overall quality of the flare.
Brake Line Bender
A brake line bender helps you shape the line. It prevents kinks and maintains the line’s integrity. Bending by hand can damage the line. A bender ensures smooth curves, protecting the line. It also makes the installation easier.
Deburring Tool
A deburring tool is crucial after cutting the line. It removes sharp edges and burrs. Burrs can affect the flare quality. They may cause leaks in the brake system. A deburring tool ensures a smooth, clean line end.
Caliper
A caliper measures the brake line’s diameter. Accurate measurements are important for choosing the right die block. Using the wrong size can lead to improper flares. A caliper helps you make precise measurements, ensuring a perfect fit.

Credit: www.amazon.com
Step-by-step Brake Line Flaring Process
Flaring brake lines can seem daunting, but with the right tools and a clear process, it becomes a straightforward task. Whether you’re a seasoned mechanic or a DIY enthusiast, mastering this skill is essential for maintaining your vehicle’s braking system. Let’s dive into the step-by-step brake line flaring process and ensure your brake lines are in top shape.
Gather Your Tools
Before you start, make sure you have all the necessary tools. You’ll need a brake flaring tool kit, a tubing cutter, and a deburring tool. Having the right equipment will save you time and frustration.
Prepare The Brake Line
Cut the brake line to your desired length using the tubing cutter. Ensure the cut is clean and smooth. A rough cut can lead to an improper flare. Don’t rush this step; precision is key.
Deburr The Edges
Use the deburring tool to smooth out the edges of the brake line. This removes any sharp or uneven parts left by the cutter. A smooth edge allows the flare to form correctly and avoids leaks.
Secure The Brake Line In The Flaring Tool
Place the brake line in the flaring tool, ensuring it’s aligned properly. Tighten the tool’s clamp to hold the line securely. Double-check the alignment to prevent any mishaps.
Create The Flare
Follow the instructions of your flaring tool to create the flare. Typically, you’ll turn a screw or lever to press the flare into the line. The flare should be uniform and smooth. If it’s not, inspect for errors and try again.
Test The Flare
Once you’ve flared the line, test it for leaks. Connect it to your brake system and apply pressure. Check for any signs of fluid leakage. A successful flare will hold tight under pressure.
Have you ever flared a brake line and faced unexpected challenges? Maybe the flare wasn’t perfect, or the line leaked afterward. It’s all part of the learning process. Keep practicing, and soon, you’ll be flaring brake lines like a pro. Remember, precision and patience are your best allies in this task. What’s your biggest hurdle in brake line flaring?
Common Mistakes And Troubleshooting Tips
Flaring brake lines can be tricky. Avoid common mistakes like uneven cuts or improper tool alignment. Always ensure the line is clean and tightly secured in the tool to prevent leaks and ensure safety.
Flaring brake lines is an essential skill for anyone tackling automotive repairs. However, it’s easy to stumble upon common mistakes, even with the right tool in hand. Knowing how to troubleshoot these errors can save you time and frustration. Let’s dive into some practical tips that will help you avoid these pitfalls and ensure a smooth flaring process.Misjudging The Brake Line’s Length
You might think a slight miscalculation in the brake line length won’t matter much, but it can lead to serious issues. A short brake line won’t reach the fittings, while a long one might cause kinks. Measure twice and cut once to avoid these problems.Incorrect Tool Setup
Setting up your flaring tool incorrectly can lead to poor-quality flares. Double-check the instructions and ensure the tool components are securely aligned. This simple step can prevent faulty flares that could compromise your braking system.Over-tightening The Clamps
It’s tempting to tighten clamps as much as possible, thinking it will create a better flare. However, over-tightening can damage the brake line or the tool itself. Apply firm but gentle pressure, ensuring the line is held securely without distortion.Skipping The Deburring Step
Deburring might seem unnecessary, but it’s crucial for a smooth flare. Rough edges can prevent a proper seal, leading to leaks. Use a deburring tool to clean the edges before flaring.Ignoring Trial Flares
Are you rushing to finish the job without testing? Doing a trial flare on a scrap piece ensures your technique and tool settings are correct. It’s a small step that can save you from redoing the entire process.Not Checking For Leaks
After flaring, neglecting to check for leaks can lead to dangerous brake failures. Once installed, inspect the lines under pressure for any leaks. This precautionary measure confirms your flares are secure.Troubleshooting Tips
If your brake line flares aren’t sealing properly, it’s time to troubleshoot. Start by examining the flare’s angle and finish. Are they smooth and even? Sometimes, using a bit of brake fluid can help create a snug fit between the flare and fitting. Adjust and test until you achieve a leak-proof seal.Personal Experience Insight
I once skipped the deburring step, thinking it wouldn’t make a difference. My brake line leaked, forcing me to redo everything. That mistake taught me the importance of thorough preparation. Have you ever overlooked a step only to realize its significance later? Understanding these common mistakes and how to troubleshoot them will make your brake line flaring process more efficient. Each step you take ensures safety and reliability, so why not give it the attention it deserves?
Credit: riteacademy.com
Frequently Asked Questions
Can You Flare A Brake Line Without A Flare Tool?
Flaring a brake line without a flare tool isn’t recommended. It risks leaks and safety issues. Use the proper tool for reliable and safe connections. Always prioritize safety by using the right equipment for brake line repairs.
How Do You Use A Flaring Tool?
To use a flaring tool, cut the tube cleanly and place it in the flaring block. Tighten the clamp, ensuring the tube’s alignment. Insert the flaring cone and turn it to form a flare at the tube end. Remove the tool and inspect the flare for uniformity.
How Hard Is It To Flare Brake Lines?
Flaring brake lines can be moderately challenging. Proper tools and skills are essential for a successful flare. Beginners may find it tricky, but with practice, it becomes easier. Ensure you follow safety guidelines and take your time to achieve a secure and leak-free connection.
Do Brake Lines Need To Be Flared?
Yes, brake lines need to be flared for a secure, leak-free connection. Proper flaring prevents fluid leaks and ensures safety. Use quality tools for precise flaring. Always verify the flare matches the fitting type for optimal performance. Regular checks can help maintain brake line integrity and vehicle safety.
Conclusion
Completing a brake line flare isn’t too hard. With the right tools, anyone can do it. Follow the steps carefully. Practice makes perfect. Safety is always a priority. Check your work thoroughly. Ensure no leaks or loose connections. A well-flared brake line keeps you safe on the road.
Regular maintenance prolongs your vehicle’s life. Keep your tools clean and organized. This saves time and effort in the future. Remember, patience is key. Take your time for the best results. Happy flaring!


