Have you ever admired a beautifully crafted wooden bowl and wondered if you could make one yourself? Imagine the satisfaction of creating a stunning piece with your own hands.
With a lathe, you can turn this vision into reality. Whether you’re a seasoned woodworker or a curious beginner, learning to make a wooden bowl is both rewarding and achievable. Picture yourself shaping, smoothing, and perfecting each curve of the bowl as it spins on the lathe.
The process is mesmerizing, and the end result is a unique, handmade piece that you can proudly display or gift to someone special. You might think it’s complicated, but with the right guidance, you’ll discover it’s simpler than it seems. In this guide, you’ll find step-by-step instructions that make the process easy to follow. You’ll uncover tips and tricks to enhance your skills and avoid common mistakes. So, are you ready to transform a simple block of wood into a masterpiece? Keep reading to unlock the secrets of bowl-making with a lathe and begin your own creative journey.

Credit: turnawoodbowl.com
Tools And Materials Needed
Creating a wooden bowl with a lathe requires specific tools and materials. Essential items include a lathe, chisels, gouges, and sandpaper. Wood blanks are necessary to shape the bowl. Safety gear like goggles and gloves ensure protection during the process.
Creating a wooden bowl with a lathe is a satisfying endeavor that combines artistry with craftsmanship. Before you dive into this rewarding project, understanding the tools and materials needed is crucial. Whether you’re a novice or a seasoned woodworker, having the right equipment can make all the difference in your woodworking journey.Essential Tools
When crafting a wooden bowl, a lathe is your most important tool. Ensure it has variable speed settings to accommodate different types of wood. You’ll also need a set of turning tools, such as gouges and scrapers. These tools help shape and smooth your bowl. Don’t forget a sharpening system to maintain their sharp edges. A faceplate or a chuck is essential for holding the wood securely. Have you ever tried using a tool that wasn’t quite right for the job? It can be frustrating. Using the correct tools will enhance your experience and results.Wood Selection
Choosing the right type of wood impacts the final appearance and durability of your bowl. Hardwoods like cherry, walnut, and maple are excellent choices due to their strength and beautiful grain patterns. Consider the wood’s moisture content; dry wood is less likely to warp. Have you ever worked with wood that split unexpectedly? Selecting wood with consistent grain can prevent such surprises. Remember, the wood you choose will dictate not only the look but also the ease of turning.Safety Gear
Safety should never take a backseat in woodworking. Equip yourself with safety goggles to protect your eyes from flying wood chips. A dust mask or respirator is vital to shield your lungs from fine dust particles. Ear protection is also important, as lathes can be quite loud. Have you ever thought about how much easier it is to focus when you feel safe? Using the right safety gear allows you to concentrate on your craft without worry. Prioritize safety, and your woodworking sessions will be both enjoyable and secure. By understanding and preparing the tools and materials needed, you’re setting yourself up for a successful and enjoyable bowl-making experience. What are you most excited to create? Dive into the world of woodworking with confidence and creativity.Preparing The Wood
Preparing the wood is a crucial step in making a wooden bowl with a lathe. Choosing the right wood, cutting it to the correct size, and securely mounting it on the lathe sets the foundation for a successful project. Each step requires attention to detail to ensure the finished bowl is both beautiful and functional.
Choosing The Right Wood
The type of wood you choose affects the bowl’s appearance and durability. Hardwoods like cherry or walnut offer a rich color and strong structure. Softwoods like pine are easier to work with but less durable. Consider the grain and texture of the wood. A tight grain provides a smooth finish, while an open grain adds character. Ensure the wood is free from knots or defects.
Cutting To Size
Once the wood is selected, cut it to the appropriate size for your bowl. Measure carefully to ensure accuracy. The size of the wood blank should match the size of the lathe. Use a saw to cut the wood into a manageable piece. Keep safety in mind; wear protective gear when cutting.
Mounting On The Lathe
Securing the wood on the lathe is essential. Start by marking the center of the wood. Use a faceplate or chuck to hold the wood firmly. Tighten the screws to prevent movement during turning. Ensure the wood is balanced to avoid wobbling. Check the alignment before starting the lathe.
Setting Up The Lathe
Setting up the lathe is an essential step in creating a wooden bowl. A properly set-up lathe ensures safety and precision, making your crafting experience not only enjoyable but also successful. Whether you’re a novice or seasoned woodworker, attention to detail in this stage can make all the difference. Let’s dive into the key aspects of setting up your lathe effectively.
Adjusting The Speed
Speed control is crucial when you start using your lathe. Adjusting the speed allows you to handle different types of wood safely and efficiently. Begin with a lower speed for roughing out the shape of your bowl. As you gain confidence and the shape becomes clearer, you can increase the speed for smoother finishes.
Consider the wood you’re using—some require more cautious handling. For denser woods, slower speeds prevent overheating and maintain control. A friend once told me how adjusting the speed saved his project from chipping; a small tweak made all the difference. How will speed affect your work?
Positioning The Tool Rest
The tool rest is your guiding hand in crafting the bowl. Position it close to the wood for better control and precision. Adjust its height so your tool is comfortably at the center of the wood. This setup minimizes strain on your hands and ensures smoother cuts.
Imagine the tool rest as the bridge between your creative vision and the final product. Proper positioning can transform your experience, turning frustration into satisfaction. Have you ever felt the difference a small adjustment can make?
Securing The Wood
Securing the wood is non-negotiable. A well-fixed piece prevents accidents and maintains consistency in your work. Use a chuck or faceplate, depending on the bowl’s size. Double-check the tightness before turning on the lathe.
Once, I overlooked this step and my bowl almost flew across the room! That was a wake-up call about the importance of securing the wood. Always prioritize safety—how secure is your setup?
Setting up the lathe is a dance between precision and creativity. Each adjustment brings you closer to crafting a beautiful wooden bowl. By focusing on speed, positioning, and security, you lay the foundation for a successful woodworking journey. What insights have you gained from setting up your lathe?
Shaping The Bowl
Crafting a wooden bowl with a lathe involves shaping and smoothing the wood carefully. Start by securing the wood block on the lathe. Gradually carve the interior and exterior, adjusting the lathe speed for precision. Finally, sand the surface for a polished finish, ensuring the bowl’s elegance and functionality.
Shaping a wooden bowl is an art that combines precision, patience, and creativity. The moment the raw wood begins to take the form of a bowl, there’s an undeniable thrill. It’s like watching something come alive under your hands. Have you ever wondered how to transform a chunk of wood into a beautifully shaped bowl? Let’s dive into the key steps in shaping your masterpiece.Creating The Outside Shape
The outside shape of your bowl is where your vision first starts to materialize. Begin by securing the wood blank onto the lathe with a strong grip. It’s essential to ensure it’s firmly attached to avoid any mishaps. Start the lathe at a moderate speed. Use a bowl gouge to remove the outer layers of wood. Aim to create a smooth, rounded exterior. Don’t rush this process. Take your time to maintain balance and symmetry. What kind of outside shape do you envision? Let your creativity guide the gouge.Hollowing The Inside
Once you’re satisfied with the exterior, it’s time to hollow out the inside. This is where the magic happens. Switch to a curved gouge to start removing wood from the center. Keep the lathe speed consistent. Gradually work your way from the center towards the edges. Regularly check the depth to ensure you don’t go too far. Have you ever felt that blend of excitement and caution as you work on something delicate? Hollowing the bowl brings that feeling to the forefront.Achieving The Desired Thickness
Achieving the right thickness is crucial. Too thick, and the bowl loses its elegance. Too thin, and it risks breaking. Use calipers to measure the thickness as you work. Aim for a consistent thickness throughout for balance and stability. Take small, careful cuts to refine the inside. Adjust based on how the wood feels under your hands. You might need to make changes as you go. What do you feel is the perfect thickness for your bowl? Trust your instincts and adjust accordingly. Each step in shaping your wooden bowl is a chance to learn and refine your skills. As you stand over your lathe, remember that every bowl is a new opportunity to express your creativity. Dive in, and let the wood guide you.Finishing Touches
Crafting a wooden bowl with a lathe involves delicate final steps. Achieving a smooth finish requires precise sanding and polishing. Applying oil enhances the wood’s natural beauty, leaving a lustrous, durable surface.
The final steps in crafting a wooden bowl transform your creation. A smooth and polished surface enhances its beauty. It also ensures the bowl is ready for use. These finishing touches require attention to detail. They complete the piece, making it a joy to behold.Sanding The Surface
Sanding the bowl gives it a smooth texture. Start with coarse sandpaper to remove rough spots. Progress to finer grades for a silky finish. Sand evenly to avoid scratches. Rotate the bowl gently as you work. This ensures a consistent surface.Applying A Finish
Choosing a finish adds depth and protection. Oils penetrate the wood, highlighting grain patterns. Lacquers and varnishes offer a shiny surface. Apply the finish with a clean cloth or brush. Let each coat dry thoroughly. Multiple layers may be needed for durability.Polishing The Final Product
Polishing brings a shine to the wooden bowl. Use a soft cloth to buff the surface. Circular motions enhance the glossiness. Wax can add extra sheen and protection. The polished bowl reflects light beautifully. It’s now ready for display or use.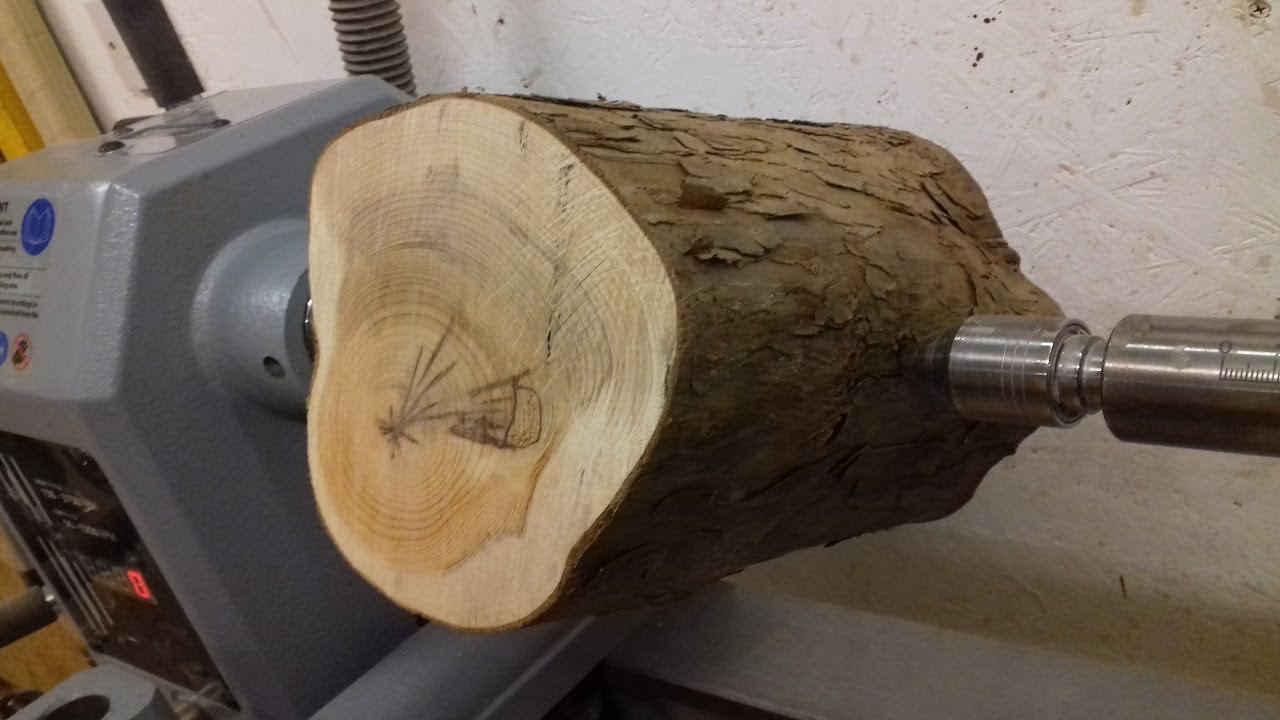
Credit: www.youtube.com
Troubleshooting Common Issues
Creating a wooden bowl with a lathe can present challenges like tool vibrations and uneven cuts. Understanding lathe settings and sharp tools helps overcome these issues. Ensuring wood is securely mounted prevents wobbling and enhances precision during turning.
Creating a wooden bowl with a lathe is an art that combines skill, patience, and precision. Yet, even seasoned woodturners encounter issues that can disrupt the process. Understanding how to troubleshoot these common problems can transform your project from frustration to satisfaction. Let’s delve into some typical challenges you might face and how to overcome them.Dealing With Cracks
Cracks can be a woodturner’s nemesis. They often appear due to drying issues or internal stresses in the wood. When you notice a crack, assess its depth and location. Minor surface cracks can often be resolved with wood glue or filler, allowing you to continue shaping without interruption. For deeper cracks, consider using a wooden inlay or epoxy resin to fill and stabilize the area. Have you ever thought about using a contrasting color for the inlay? It can turn a flaw into a unique feature.Correcting Uneven Shapes
Uneven shapes are a common hurdle, especially for beginners. This issue typically arises from inconsistent tool pressure or poor technique. Start by checking your tool position and ensure it’s steady against the rest. Practice makes perfect, so try making smaller, controlled cuts. If the shape is still off, you might need to retrace your design. Are you rushing the process? Slow down and focus on even, deliberate movements to achieve a smoother curve.Improving Surface Smoothness
A rough surface can detract from an otherwise beautiful bowl. This often stems from dull tools or improper sanding techniques. Keep your tools sharp and use progressively finer grits of sandpaper to achieve a smooth finish. Have you considered wet sanding? It can reduce dust and improve the final polish. Remember, patience is key. Take your time to achieve that silky touch that makes your bowl a joy to hold. Each of these challenges is an opportunity to refine your skills. By addressing these common issues, you’ll not only improve your craft but also enhance the joy of creating something beautiful with your own hands. So, next time you face a hurdle, embrace it as a learning experience. What techniques have you discovered that make the process more enjoyable?Safety Tips
Crafting a wooden bowl with a lathe requires careful attention to safety. Always wear protective gear, including goggles and gloves. Ensure the lathe is securely positioned and tools are sharp to prevent accidents.
Creating a wooden bowl with a lathe is a rewarding craft, but safety must always come first. As you embark on this woodworking journey, understanding and implementing safety measures can make all the difference. From protective gear to handling tools, each aspect plays a crucial role in ensuring your time at the lathe is both productive and safe.Protective Equipment
Always wear safety glasses or a face shield to protect your eyes from flying debris. Hearing protection is also essential, as lathes can be quite loud, especially during long sessions. Consider using a dust mask to prevent inhaling wood dust, which can be harmful over time. Dress appropriately by wearing snug-fitting clothes and tying back long hair. Loose clothing can get caught in the lathe, leading to serious injury. Invest in a pair of sturdy gloves, but remember, they should be used cautiously; gloves can sometimes pose a risk near rotating tools.Handling Tools Safely
Before you start, ensure all tools are sharp and well-maintained. Dull tools require more force and can slip, increasing the risk of injury. Always position your tools properly on the tool rest before engaging the lathe. Keep a firm grip on your tools, but don’t apply excessive pressure. Let the lathe do the work. Be mindful of your hand placement at all times to avoid accidental contact with moving parts. Do you have a clear workspace? Keeping your area tidy reduces the risk of tripping or knocking over tools.Emergency Procedures
Know the location of the emergency stop button or switch. In case of any mishap, being able to stop the lathe quickly is crucial. Have a first-aid kit nearby, and ensure you know basic first-aid techniques relevant to woodworking injuries. Consider keeping a fire extinguisher in your workshop. Wood dust and electrical tools can sometimes pose a fire risk. It’s also wise to have a phone nearby to call for help if needed. Have you thought about creating an emergency contact list visible in your workshop? Remember, safety isn’t just about having the right gear or knowing the procedures—it’s about cultivating a mindset. Each time you step up to the lathe, take a moment to assess your safety measures. This not only protects you but ensures you can enjoy the craft for years to come.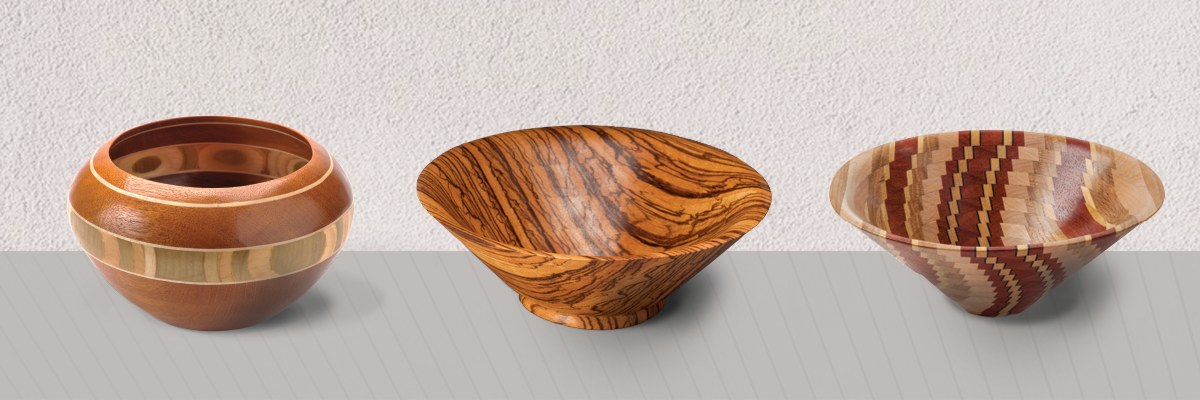
Credit: news.foxchapelpublishing.com
Frequently Asked Questions
Can You Make A Bowl On A Lathe?
Yes, you can make a bowl on a lathe. Use woodturning techniques to shape the wood. Choose the right tools and materials. Ensure safety precautions while operating the lathe. Beginners should practice with small projects first. Properly finish the bowl for durability and aesthetics.
What Tool To Use To Make A Bowl On A Lathe?
Use a bowl gouge for making bowls on a lathe. It offers precision and control. Choose a gouge with a long handle for better leverage. Consider a sharp skew chisel for fine detailing. Always ensure tools are sharp for optimal results.
How Big Of A Lathe Do I Need To Make Bowls?
Choose a lathe with at least a 12-inch swing for bowl making. This size allows for versatile projects. Larger bowls require a lathe with a 16-inch or greater swing. Ensure the lathe has a sturdy build for stability and precision.
Consider your space and budget when selecting the lathe size.
What Is The Best Wood For Beginner Bowl Turning?
Maple is ideal for beginner bowl turning. It is easy to work with and affordable. Maple’s uniform grain and smooth finish make it perfect for learning. It is also widely available, making it convenient for starters. This wood offers excellent practice for honing your skills in bowl turning.
Conclusion
Creating a wooden bowl with a lathe is truly rewarding. You start with a raw piece of wood. Then, shape it into something beautiful. The process builds skill and patience. Each step is an opportunity to learn and grow. Mistakes happen, but they teach valuable lessons.
Safety is key, so always wear protective gear. Soon, you’ll see your unique bowl take form. It’s a craft that connects you with nature and creativity. Enjoy the journey, and cherish the final piece. A wooden bowl made by your own hands.


