Are you struggling with electrical problems in your home or project? Understanding how to measure voltage drop with a multimeter can save you both time and money.
Voltage drop can lead to inefficient performance and even damage your electrical devices. Imagine confidently diagnosing these issues yourself, without having to call in an expensive professional. In this guide, you’ll discover simple steps to effectively measure voltage drop using a multimeter.
Whether you’re a DIY enthusiast or just someone eager to solve electrical mysteries, this knowledge is invaluable. Ready to take control of your electrical troubleshooting? Let’s dive in and empower you with skills that make a real difference.

Credit: gearsmagazine.com
What Is Voltage Drop
Voltage drop is a key concept in electrical circuits. It refers to the reduction in voltage as electricity flows through a circuit. Understanding voltage drop is crucial for diagnosing electrical problems. Excessive voltage drop can lead to poor performance and energy loss. Recognizing it helps in maintaining efficient electrical systems.
What Causes Voltage Drop?
Several factors contribute to voltage drop in a circuit. One main factor is the resistance in the circuit wires. Longer wires have higher resistance, leading to more voltage drop. The current flowing through the circuit also affects voltage drop. Higher current increases the voltage drop significantly. Additionally, poor connections can increase resistance, causing voltage drop.
Why Is Voltage Drop Important?
Voltage drop affects the efficiency of electrical devices. If the voltage drop is too high, devices may not work properly. It can lead to overheating and equipment failure. Monitoring voltage drop ensures that circuits function effectively. It also helps in reducing energy waste.
Common Symptoms Of Voltage Drop
Voltage drop can manifest through various symptoms. One common sign is dimming lights in a circuit. Devices may run slower or with reduced power. Unexpected shut-offs can also indicate a voltage drop. If you notice these symptoms, checking voltage drop is essential.
Tools Required
A digital multimeter is essential for measuring voltage drop accurately. Ensure it has test leads and is set to the correct voltage range. Proper tools help diagnose electrical issues efficiently.
To measure voltage drop effectively, having the right tools at your disposal is crucial. Accurate measurement ensures that electrical systems function efficiently and safely. Let’s dive into the essential tools you need for this task.Choosing The Right Multimeter
Selecting the correct multimeter is your first step. A digital multimeter is preferable for its accuracy and ease of use. Ensure it can measure voltage, current, and resistance. Look for features like auto-ranging, which simplifies the process by automatically selecting the correct measurement range. A multimeter with a backlit display is handy for working in dimly lit areas. Consider durability too. You want a multimeter that can withstand the occasional drop or rough handling. Check customer reviews for insights into a model’s reliability.Additional Equipment
Apart from a multimeter, you’ll need a few more items. Test leads are essential for connecting your multimeter to the circuit. Choose leads with insulated grips to protect against accidental shocks. Alligator clips can be helpful for hands-free measurements. They attach securely to wires and terminals, freeing up your hands to note readings or adjust settings. If you’re working in a circuit with live wires, consider using insulated gloves. Safety is paramount, and these gloves offer an added layer of protection against electric shock. You might also need a circuit diagram of the system you’re testing. This helps you understand the layout and locate points to measure voltage drop efficiently. Before you start, gather all your tools in one place. A well-organized workspace saves time and reduces the risk of errors. Have you ever tried measuring voltage drop without the right tools? It can be frustrating and even dangerous. With these tools, you’re well-equipped to tackle the task with confidence. Do you have any other essential tools you rely on for electrical measurements?Safety Precautions
Ensure safety by setting the multimeter to the correct voltage range. Avoid touching metal parts during measurement. Verify connections before proceeding to prevent inaccurate readings or electric shocks.
Safety should always come first when measuring voltage drop with a multimeter. Understanding the risks involved with electrical components is vital. Taking precautions will ensure a safe and effective process. Follow these guidelines to protect yourself from electrical hazards.Handling Electrical Components
Handle electrical components with care. Avoid touching metal parts directly. Use insulated tools to prevent electrical shocks. Keep your hands dry and free from moisture. Moisture increases the risk of electrical shock. Always disconnect power sources before working on circuits. This minimizes the risk of accidental shocks. Wear protective gear like gloves and goggles. These provide an added layer of safety.Multimeter Usage Tips
Use the multimeter correctly to ensure safety. Always check that the device is in good condition. Inspect for any visible damage before use. Select the correct setting on the multimeter. Incorrect settings can lead to inaccurate readings. Connect the probes properly to the device. Ensure they are securely attached to avoid loose connections. Read the user manual for specific instructions. Following guidelines ensures accurate and safe usage. Keep the multimeter away from water and extreme temperatures. Proper storage prolongs the device’s life and maintains safety.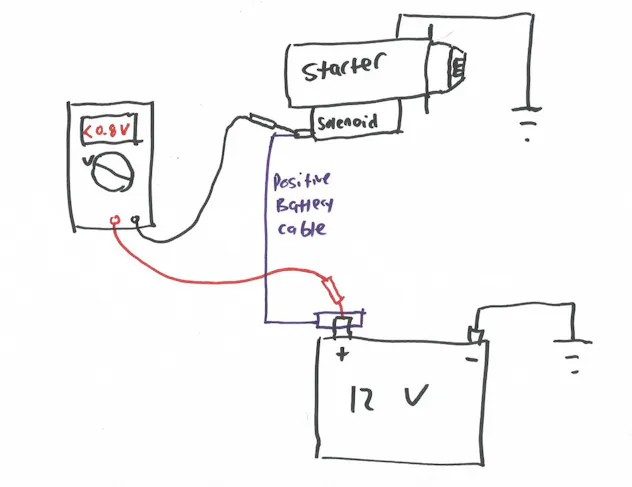
Credit: www.hagerty.com
Setting Up The Multimeter
Understanding how to measure voltage drop is crucial for many electrical tasks. A multimeter is a handy tool for this purpose. Setting up the multimeter correctly is the first step. This ensures accurate readings and avoids errors. In this section, we’ll guide you through the setup process.
Configuring Settings
First, turn the multimeter dial to the correct setting. Select the voltage setting. Make sure it is set to DC or AC. Choose DC for batteries and electronics. Choose AC for household outlets. Ensure the range is higher than expected voltage. This prevents damage to the multimeter.
Preparing Test Leads
Test leads connect the multimeter to the circuit. Insert the black lead into the COM port. Insert the red lead into the VΩmA port. This is the correct configuration for voltage measurement. Check that the leads are not damaged. Damaged leads can cause inaccurate readings. Properly prepared leads ensure safe and accurate measurements.
Locating Circuit For Testing
Locating the right circuit for testing is crucial when measuring voltage drop with a multimeter. Without pinpointing the correct spot, your readings might be inaccurate or misleading. Imagine spending hours troubleshooting only to realize you’ve been testing the wrong segment all along. How can you avoid this pitfall and ensure your readings are spot on?
Identifying Test Points
First, identify the key points in your circuit where you can test voltage drop. Look for connection points, junctions, or ends of the wires. These spots are typically ideal for placing your multimeter probes.
Think about the circuit layout. Are there any visible connectors that could be potential test points? Check wiring diagrams if available; they often provide a roadmap for finding these crucial spots.
Sometimes, test points are not immediately obvious. Have you ever had to dig through a tangled mess of wires to find that elusive spot? Don’t hesitate to trace the wires; patience can lead you to the right location for accurate measurements.
Ensuring Circuit Accessibility
Once you’ve identified your test points, ensure the circuit is accessible. Are there any barriers like panels or covers that need removal? Safety and accessibility go hand in hand, so make sure you can reach the circuit without risking injury.
Clear any obstructions carefully. Remember that forcing access could damage components, leading to more complicated repairs. Have you ever tried measuring a circuit only to realize you couldn’t reach it without disassembling half the setup?
Consider the tools you might need. A screwdriver or a wrench could be necessary to access certain parts. Ensuring accessibility might seem tedious, but it paves the way for accurate readings and saves time in the long run.
By thoroughly locating and accessing your circuit, you’re setting yourself up for success in measuring voltage drop. Are there any specific challenges you’ve faced when trying to access a circuit for testing? Sharing your experiences could help others avoid similar hurdles.
Measuring Voltage Drop
Use a multimeter to measure voltage drop easily. Connect the multimeter’s probes to the circuit’s two points. Read the voltage value displayed to understand the drop.
Measuring voltage drop is an essential skill for anyone working with electrical systems. Whether you’re troubleshooting a faulty circuit or ensuring your wiring is up to code, knowing how to measure voltage drop can save you time and prevent potential hazards. With a multimeter, you can quickly and accurately assess the voltage drop across different components. This task may seem daunting at first, but it’s straightforward with the right approach.Connecting Test Leads
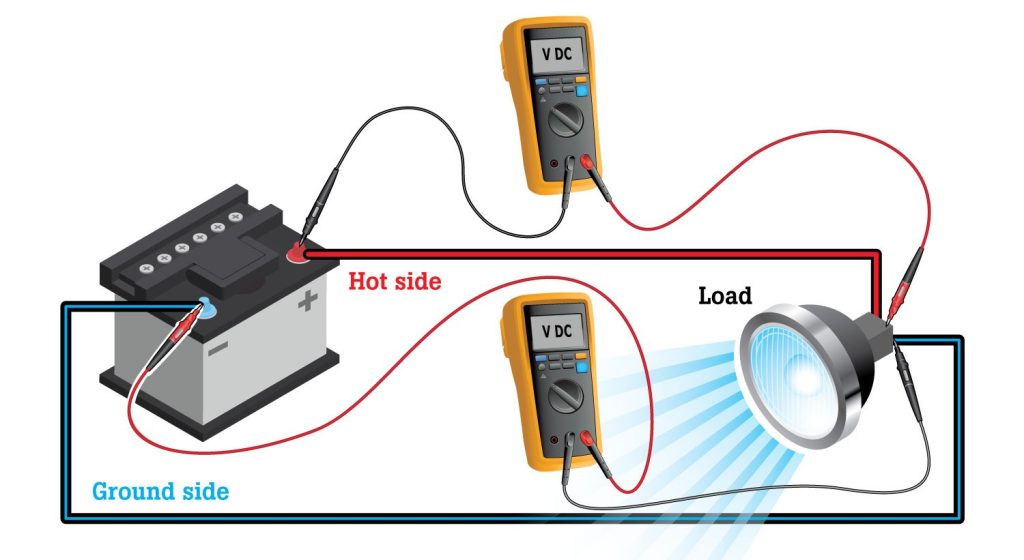
Start by turning off the power to the circuit you’re testing. Safety first! Plug the black test lead into the COM jack on your multimeter and the red test lead into the VΩ jack. Next, turn your multimeter dial to the appropriate voltage setting. If you’re unsure, start with the highest setting and work your way down. Always place the test leads parallel to the circuit component you’re testing. Imagine you’re checking a wire for voltage drop. Connect the black lead to the negative side and the red lead to the positive side of the wire. This setup ensures accurate readings.Reading Multimeter Display
Once the test leads are connected, power on the circuit. Watch the multimeter display carefully. The number you see represents the voltage drop across the component you’re testing. If the reading is higher than expected, it might indicate a problem like excessive resistance. This could be due to corrosion or a damaged wire. Remember, every component has a specific voltage drop range. Always compare your readings to these standards. If you’re unsure, consult a reference guide or the equipment manual. Have you ever faced unexpected voltage drops in your projects? Understanding these readings can help troubleshoot and fix issues efficiently. Your multimeter is a powerful tool—use it wisely to maintain safe and efficient circuits.Analyzing Results
Measuring voltage drop with a multimeter involves connecting the meter to the circuit and reading the voltage. Start by turning off the power and setting the multimeter to measure voltage. Connect the probes to the circuit and note the displayed voltage drop.
Analyzing the results of your voltage drop test with a multimeter is a crucial step in ensuring your electrical system runs efficiently. After gathering your voltage readings, the next step is to make sense of them. Understanding what these numbers mean can help you diagnose potential problems and prevent electrical issues. Let’s dive into how you can interpret these readings and identify common causes of voltage drop.Interpreting Voltage Readings
Once you have your voltage readings, it’s essential to know what they signify. A healthy electrical circuit should show a minimal voltage drop. Ideally, the voltage drop should not exceed 3% for most applications. If your readings are higher, it might indicate a problem. Consider whether the wires are too long or too thin for the electrical load. Are you noticing consistent voltage drops in a particular section of your circuit? This could highlight a specific area to investigate further.Common Causes Of Voltage Drop
Voltage drop can occur for several reasons, and identifying these can save you a lot of trouble. One common cause is the use of undersized wires. Wires that are too small can’t handle the current, leading to excessive voltage drop. Corrosion or loose connections are also frequent culprits. Imagine checking an old extension cord at home and finding rusted connectors. This can lead to poor conductivity and increased resistance. Overloaded circuits are another reason for voltage drop. If you’re plugging too many devices into a single outlet, the circuit can’t keep up. Have you ever noticed lights dimming when you turn on a high-power appliance? That’s a classic sign of an overloaded circuit. Identifying these causes can help you take corrective action. Whether it’s upgrading wire sizes, cleaning connections, or redistributing electrical loads, understanding the root of the problem is the first step. Are your voltage readings within an acceptable range, or do they hint at an underlying issue? Taking the time to analyze your results can prevent future headaches and ensure your electrical systems work reliably.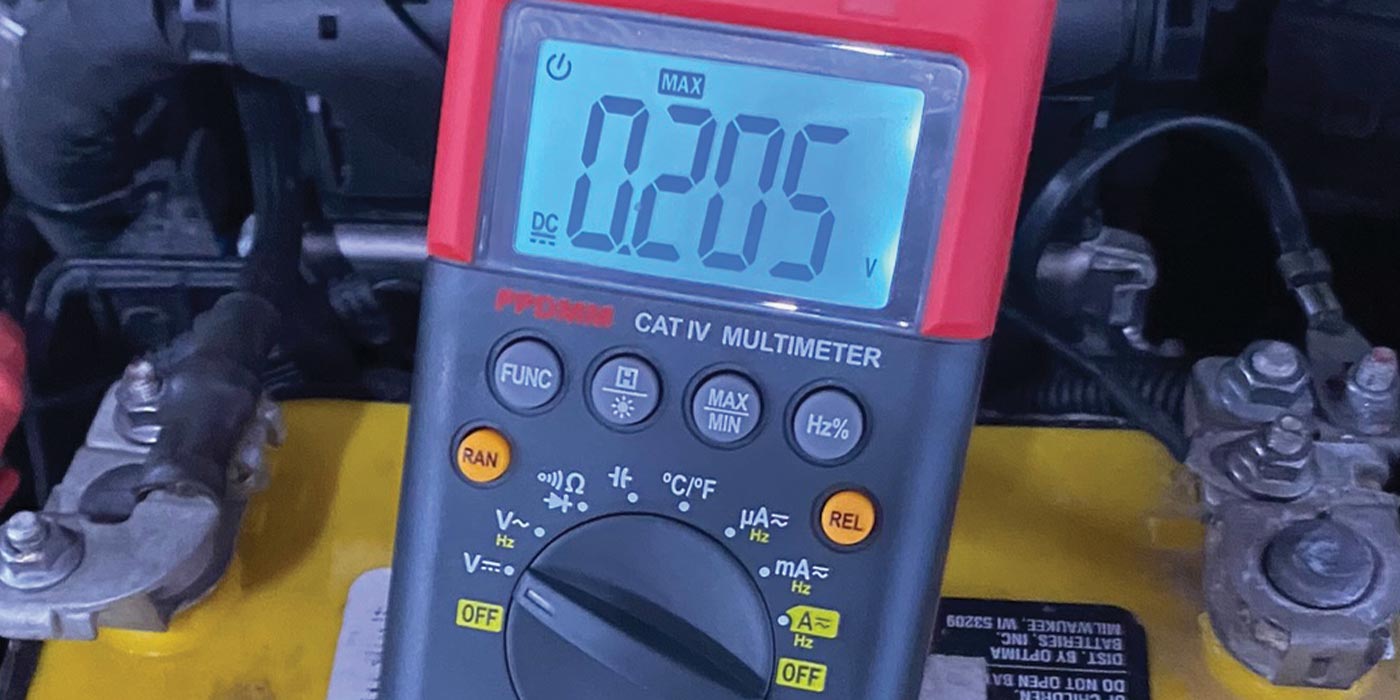
Credit: www.tomorrowstechnician.com
Troubleshooting Tips
Measuring voltage drop with a multimeter helps identify electrical issues. Sometimes, voltage drops can disrupt circuit performance. With the right troubleshooting tips, you can address these problems effectively. Let’s explore some key strategies to improve circuit efficiency.
Addressing High Voltage Drop
High voltage drop often indicates resistance in the circuit. First, check all connections for signs of corrosion or loose wires. Such issues can increase resistance and voltage drop. Replace damaged or worn-out wires promptly. Consider using thicker wires to reduce resistance further. Ensure that all components are rated correctly for the circuit. Incorrect ratings can lead to inefficiencies and higher voltage drops.
Improving Circuit Efficiency
Efficiency is crucial for optimal circuit performance. Start by checking the load on the circuit. Overloading can cause excessive voltage drop. Distribute the load evenly across the circuit. Use energy-efficient components to minimize power loss. Regular maintenance can prevent issues related to efficiency. Periodically inspect the circuit for signs of wear and tear. Replace components that show signs of aging or damage.
Frequently Asked Questions
Can You Test Voltage Drop With A Multimeter?
Yes, you can test voltage drop with a multimeter. Set it to DC voltage mode. Measure across the circuit component. Ensure the circuit is under load for an accurate reading. A large voltage drop indicates resistance or a faulty connection.
Regular testing helps maintain optimal circuit performance.
How Do I Calculate Voltage Drop?
To calculate voltage drop, use the formula: Voltage Drop (V) = Current (I) × Resistance (R). Measure current in amperes and resistance in ohms. Ensure wire length and gauge are considered for accurate results. Use online calculators for convenience.
How To Measure Drop Out Voltage?
Measure dropout voltage by subtracting output voltage from input voltage across a voltage regulator. Use a multimeter for accuracy. Ensure the circuit is powered and stable before measuring. Accurate measurement helps in selecting the right components for your project.
How To Use A Multimeter To Measure Low Voltage?
Set the multimeter to the DC voltage setting. Connect the red probe to the positive terminal and the black probe to the negative terminal. Ensure the probes contact the circuit points properly. Read the displayed voltage value on the screen.
Adjust the range setting if the reading is unstable.
Conclusion
Measuring voltage drop with a multimeter is simple and effective. Follow the steps carefully for accurate results. Ensure your multimeter is set correctly. Always prioritize safety while handling electrical equipment. Regular checks can prevent potential electrical issues. Understanding voltage drop helps maintain efficient electrical systems.
Practice makes you comfortable with the process. With time, you’ll identify problems quicker. A good grasp of these basics enhances your electrical skills. Keep your tools ready and knowledge updated. Happy measuring!


