
Picture this: you’re in the middle of a DIY project, tools spread across your workspace, and you need to measure something precisely. But there’s a catch—your tape measure is marked in metric units, and you’re not entirely sure how to read it.
Sound familiar? Don’t worry; you’re not alone. Understanding how to read a metric tape measure is a skill that can save you time, effort, and a lot of frustration. Imagine the satisfaction of confidently measuring anything with precision. Whether you’re a seasoned DIY enthusiast or a beginner looking to improve your skills, mastering this tool can make a world of difference.
By the end of this article, you’ll not only know how to read a metric tape measure, but you’ll also feel empowered to tackle any project with ease. Curious to find out how? Let’s dive in and unlock the secrets of metric measurements together.
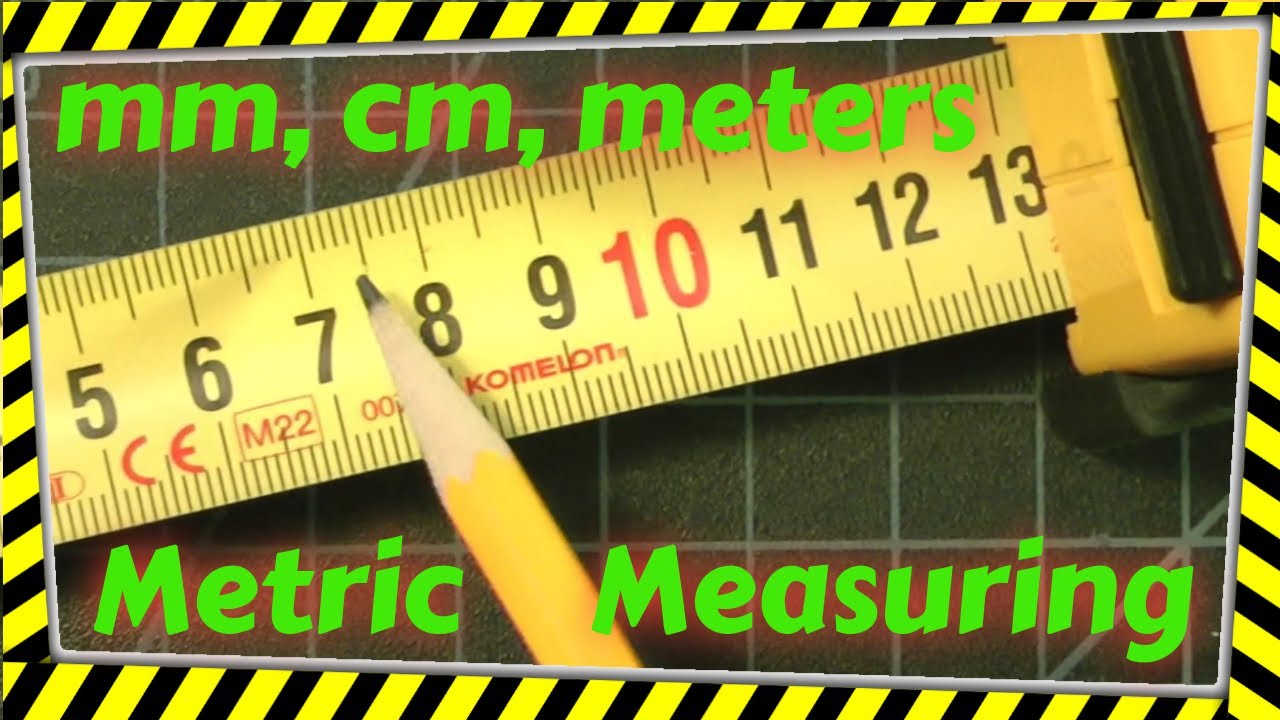
Credit: www.youtube.com
Basics Of Metric Tape Measure
Metric tape measures feature markings in centimeters and millimeters. Reading them involves identifying the large numbers as centimeters. The smaller lines between represent millimeters. Understanding these basics allows for accurate measurements in various projects.
Understanding how to read a metric tape measure is an essential skill for anyone working in construction, DIY projects, or even simple home repairs. The metric system, with its straightforward units, makes measuring and calculating distances easier and more precise. Whether you’re crafting a piece of furniture or hanging a picture, mastering the basics of a metric tape measure can save you time and effort.Understanding Metric Units
The metric tape measure is divided into millimeters, centimeters, and meters. Each centimeter consists of ten millimeters, making it simple to count and calculate measurements. Try this: next time you measure something, count the small lines between the numbers. Each line represents a millimeter, which means 10 lines equal one centimeter. This precision is what makes metric measurements so user-friendly.Differences From Imperial System
The metric system is based on multiples of ten, unlike the imperial system which uses inches and feet. This can be confusing if you’re used to inches, but it’s easy to adjust with a little practice. Consider this: instead of juggling fractions like 1/16 or 3/8, you’re simply counting whole numbers or decimals. This makes metric tape measures ideal for exact measurements, reducing the chance of errors. Have you ever struggled with converting inches to feet or vice versa? In the metric system, you simply move the decimal point. This simplicity can make a world of difference in ensuring your projects are accurate. Using a metric tape measure might feel unfamiliar at first. But with practice, you’ll appreciate its clarity and efficiency. Next time you measure, why not try both systems and see which one feels more intuitive for you?
Credit: www.pearllemon.com
Parts Of A Metric Tape Measure
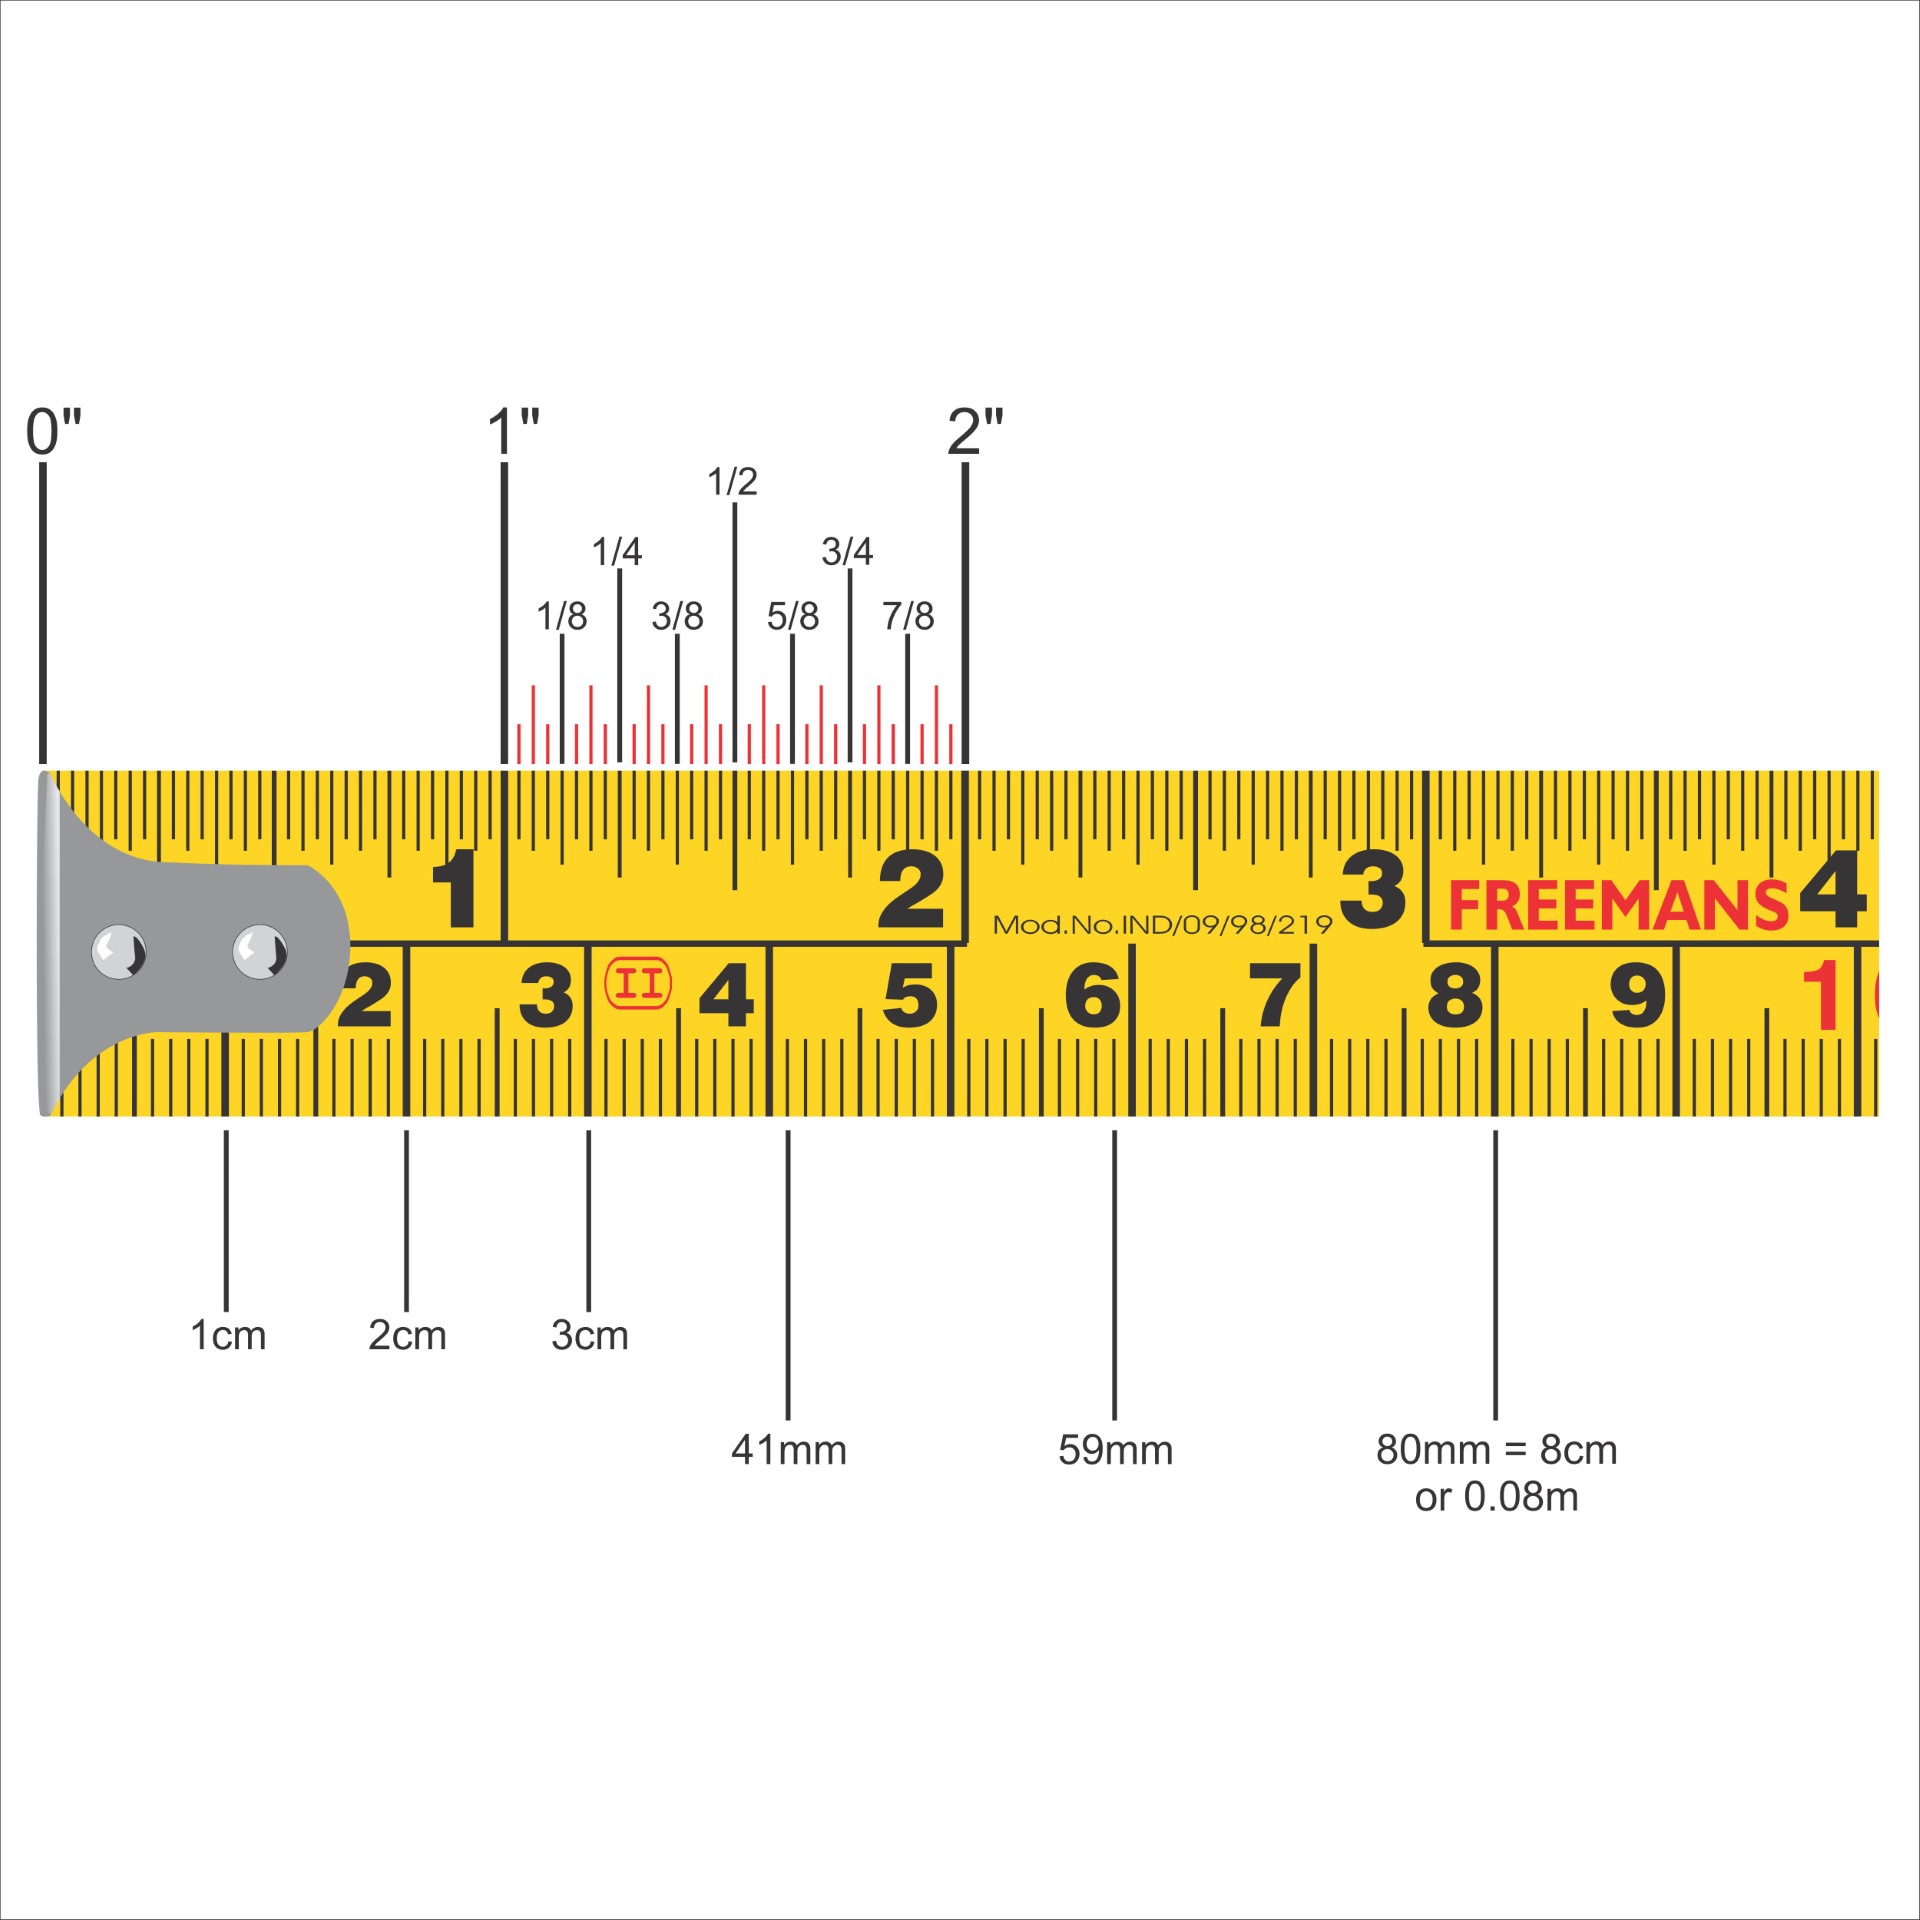
Reading a metric tape measure involves understanding its key parts. The tape’s markings show millimeters and centimeters for precise measurements. The metal hook at the end helps hold the tape in place while measuring.
Understanding the parts of a metric tape measure can make your DIY projects more precise and efficient. Whether you’re building a bookshelf or simply hanging a picture, knowing how to read and use each part effectively is key. Let’s break down the essential components of a metric tape measure to help you measure with confidence.Blade And Markings
The blade is the long strip of metal or fiberglass that extends to measure objects. It’s flexible yet sturdy, allowing you to measure both straight and curved surfaces. You’ll notice the blade is marked with metric units. These markings are usually in millimeters and centimeters. They help you get accurate measurements without the need for conversion. Have you ever found yourself squinting at tiny numbers? Larger markings make it easier to read at a glance, especially when you’re trying to hold the tape measure steady in one hand.Hook And Case
The hook is a small piece of metal at the end of the blade. It’s designed to latch onto edges, ensuring your measurements start from zero. This tiny feature can save you from guessing or estimating the beginning of your measurement. The case houses the blade when it’s not in use. It’s often made of durable plastic or metal to withstand drops and daily wear. A smooth retracting mechanism ensures the blade rolls back effortlessly, saving you time and frustration. Think about the last time you measured a wide surface. Did you struggle to keep the tape measure straight? The hook and case work together to stabilize your measurement, letting you focus on accuracy rather than wrestling with the tool. By familiarizing yourself with these parts, you can approach your next project with the confidence of a seasoned DIY expert. What will you measure next?Reading Metric Measurements
Reading metric measurements is crucial for precise work. Metric tape measures simplify this process. They use a system based on millimeters and centimeters. Understanding these units is key to accuracy.
Identifying Millimeters And Centimeters
Metric tape measures feature two main units. Millimeters are the smallest. They provide detailed measurements. Centimeters are larger. Ten millimeters make one centimeter. Each centimeter mark is bold and numbered. Between these are smaller lines for millimeters. This layout helps identify units quickly.
Using The Zero Point
Start measurements from the zero point. It’s where the tape measure begins. Ensure it’s aligned properly. This prevents errors. Move the tape to the object. Read the measurement at the end of the object. Millimeter lines offer precise readings. They’re ideal for small adjustments. Centimeters give a broader view. Use both for best results.
Techniques For Accurate Measurement
Reading a metric tape measure involves identifying centimeters and millimeters. Each large number represents a centimeter. Smaller lines indicate millimeters between each centimeter. Understanding these divisions helps achieve precise measurements for various tasks.
Reading a metric tape measure accurately is a skill that can save you from costly mistakes and wasted material. Whether you’re a DIY enthusiast or a professional, honing this skill is crucial. The techniques for accurate measurement are simple but require attention to detail. Let’s dive into the essentials that will ensure precision every time you measure.Maintaining Steady Hands
A steady hand is key to achieving accurate measurements. Imagine trying to measure a piece of wood for a shelf, only to find it doesn’t fit because your hand was shaky. Practice keeping your hands steady by resting your elbow on a solid surface. This minimizes movement and gives you control. If you find your hands shaking, take a deep breath and relax. Sometimes, it’s just about calming your nerves.Ensuring Proper Tape Alignment
Proper tape alignment is crucial for precision. Have you ever wondered why your measurements often seem off? It might be because the tape wasn’t aligned correctly. Always ensure the tape measure is flush against the edge of the object. This avoids the tape bending or slanting, which can distort the measurement. Remember, a slight tilt can lead to a significant error. Double-check the alignment before noting down the measurement. Precision is all about the small details. What small adjustments can you make to improve your measuring skills today?Common Mistakes And How To Avoid Them
Using a metric tape measure might seem straightforward, but common mistakes can lead to errors in your measurements. Understanding these pitfalls is crucial for precision, especially if you’re working on a DIY project or professional task. Let’s dive into some typical errors people make and how you can avoid them to ensure accurate results every time.
Incorrect Hook Placement
One mistake often made is placing the hook incorrectly. The hook at the end of the tape measure is designed to account for its own thickness, ensuring accurate measurements whether the hook is inside or outside the object. If you pull the tape tight without considering the hook’s placement, your measurement might be off.
To avoid this, always check that the hook is securely in place and readjust if necessary. Practice using the tape measure with the hook both inside and outside different surfaces to understand the difference in measurement. This small detail can drastically improve your accuracy.
Misreading The Scale
Misreading the scale is another common error. Metric tape measures are marked in centimeters and millimeters, and it’s easy to confuse the two if you’re not paying close attention. A personal tip from my woodworking days: always double-check the scale before noting down your measurement.
One practical way to avoid misreading is to familiarize yourself with the tape measure’s markings. Spend a few minutes examining the scale and understanding the increments. Try measuring different objects and verify your results. This simple practice will boost your confidence and precision.
Have you ever found yourself frustrated with inaccurate measurements? By focusing on these common mistakes and actively working to avoid them, you’ll enhance your skills and achieve more reliable outcomes. Accurate measurements are just a few mindful steps away.
Practical Applications
Understanding how to read a metric tape measure is essential. It offers practical applications in various fields. From home improvement to crafts, it proves useful. Let’s explore how it can benefit your projects.
Home Improvement Projects
Metric tape measures are crucial in home improvements. They ensure precise measurements for renovations. For example, measuring windows for blinds. Or determining the space for new furniture. Accurate measurements prevent costly mistakes. They help achieve professional-looking results. Whether hanging pictures or installing cabinets, they are indispensable.
Crafts And Diy
Craft enthusiasts rely on metric tape measures. They provide accuracy in creating projects. Whether sewing, knitting, or woodworking. Precision ensures perfect cuts and fits. It enhances the quality of finished items. DIY projects benefit from accurate measurements too. Building birdhouses or crafting gifts requires precision. Metric tape measures make projects successful.
Choosing The Right Tape Measure
Choosing the right tape measure might seem simple, but a few thoughtful considerations can save you time and hassle. The right tool can make your projects smooth and accurate. Whether you’re measuring for home improvements or crafting, selecting the best tape measure is crucial for precise results.
Length And Material Considerations
When picking a tape measure, think about the length you need. A 5-meter tape is handy for smaller tasks, while a 10-meter might be better for larger projects. Consider what you typically measure to decide.
The material of the tape is also important. Metal tapes are durable and great for outdoor work. Plastic tapes are lightweight and ideal for indoor projects. Choose a material that suits your environment and task.
Special Features To Look For
Modern tape measures come with features that make measuring easier and more efficient. Look for a tape with a locking mechanism. This keeps the tape in place, so you don’t have to hold it steady.
Consider a tape with metric markings. If you work on projects that require precise measurements, these can be invaluable. Some tapes even have a magnetic tip, making it easy to measure alone by sticking to metal surfaces.
Think about how often you use a tape measure. If it’s a daily tool, features like an ergonomic grip or a belt clip can make a big difference. These features might seem small, but they can enhance your measuring experience.
Have you ever struggled with a flimsy tape or found yourself measuring in an awkward position? Choosing the right tape measure with the right features can solve these common frustrations and make your projects much more enjoyable.
Credit: www.freemansgroup.com
Frequently Asked Questions
How Do You Read Metric Tape Measure?
To read a metric tape measure, start by identifying the nearest centimeter mark. Each small line represents a millimeter. Count the millimeters past the centimeter mark for precision. For instance, if it’s 15 cm and 7 mm, you’ll record it as 157 mm.
What Do Numbers On Metric Tape Mean?
Numbers on a metric tape measure indicate centimeters and millimeters. Larger numbers represent centimeters, while smaller lines between them are millimeters. This system allows for precise measurement. Metric tape measures are widely used in countries that follow the metric system for accuracy.
How Do Metric And Imperial Tapes Differ?
Metric tapes measure in centimeters and millimeters, while imperial tapes use inches and feet. Metric tapes offer greater precision with smaller increments. Imperial tapes are common in the United States, while metric tapes are preferred in most other countries.
Why Use A Metric Tape Measure?
A metric tape measure is preferred for its accuracy and ease of use. It provides measurements in centimeters and millimeters, ideal for precise work. The metric system is standardized globally, making it convenient for international projects and collaborations.
Conclusion
Reading a metric tape measure is simple with practice. Start by identifying the different markings. Understand millimeters and centimeters clearly. Remember, the tape measure works in increments. Each line has a purpose. Consistent use builds confidence. Keep practicing for accuracy.
Measure objects regularly. This strengthens your skills. Use a tape measure often. Familiarity grows with repetition. Soon, measurements become second nature. Stay patient and focused. Enjoy the process. Precision improves with time. Now, measuring with a metric tape is easier.
You’re ready to tackle projects confidently.


