
Are you tired of dealing with a leaky or malfunctioning pull-out kitchen faucet hose? You’re not alone.
Many homeowners find themselves frustrated with the performance of their faucet, and the good news is that you can fix it yourself. Imagine saving money on plumbers and getting the satisfaction of doing it on your own. The process is simpler than you might think, and with the right guidance, you’ll have your faucet working like new in no time.
In this guide, we’ll walk you through each step of replacing your pull-out kitchen faucet hose. You’ll learn how to identify the right tools, safely remove the old hose, and install the new one without any hassle. By the end of this article, you’ll not only have a fully functional faucet but also a boost in your DIY confidence. So, are you ready to tackle this task and enjoy a smoothly running kitchen once again? Let’s dive in and get started!
Tools And Materials Needed
Replacing a pull-out kitchen faucet hose requires basic tools and materials. Gather an adjustable wrench, pliers, and a new hose. Ensure you have plumber’s tape and a bucket for catching water spills.
Replacing a pull-out kitchen faucet hose might sound daunting, but with the right tools and materials, it becomes a manageable DIY task. You don’t need to be a professional plumber to tackle this job. With a bit of patience and preparation, you can save both time and money. Before diving into the task, it’s crucial to gather all necessary tools and materials. This ensures the process goes smoothly without unnecessary interruptions.Essential Tools For The Job
To get started, you’ll need a few basic tools. A wrench is vital for loosening the nuts that hold the hose in place. An adjustable wrench works well for most sizes, but having a set of wrenches can be helpful in case of tight spots. A screwdriver is another essential tool. It helps with removing any screws that secure the faucet components. A Phillips head screwdriver is most common, but a flat-head might be needed depending on your faucet model. A bucket or a bowl is useful to catch any water that might spill when you disconnect the hose. This prevents mess and keeps your workspace dry.Materials Required
When replacing the hose, having the right materials at hand is just as important as the tools. You will need a replacement pull-out hose. Ensure it’s compatible with your faucet model by checking the manufacturer’s specifications. Plumber’s tape is useful to wrap around the threads of the connectors. This ensures a watertight seal and prevents leaks once you attach the new hose. Cleaning supplies, like a cloth or sponge, are handy for wiping down the area and ensuring a clean working environment. It’s surprising how much grime can accumulate under the sink over time.Safety And Preparation
Before starting, ensure your workspace is safe. Turn off the water supply to avoid unexpected sprays or flooding. This simple step can save a lot of hassle later on. Consider wearing gloves to protect your hands from sharp edges or any grime. If you’re working in a confined space under the sink, knee pads can also make the task more comfortable.Pro Tips For A Smooth Replacement
Keep your tools organized. Lay them out within reach so you don’t waste time searching for them mid-task. If possible, have a friend or family member assist you. They can hand you tools or hold components in place, making the job quicker and easier. Reflecting on my own experience, I once embarked on replacing a hose without proper preparation. I ended up with a soaked kitchen floor because I forgot to turn off the water supply. It was a valuable lesson in preparation and the importance of having a bucket nearby. Are you ready to take on the challenge? With these tools and materials, you’re well-equipped to replace your pull-out kitchen faucet hose efficiently.Preparing The Workspace
Replacing a pull out kitchen faucet hose can be straightforward. Preparing the workspace is crucial for a smooth process. A well-organized area prevents accidents and saves time. Start with clearing the space and gathering necessary tools. This ensures you have everything within reach during the replacement.
Clear The Area
Remove all items around the sink. This includes dish soap, sponges, and any clutter. A clean area minimizes distractions and helps focus on the task. It also prevents items from falling or getting wet during the replacement.
Gather Your Tools
Collect all tools needed for the job. You might need a wrench, pliers, and a towel. Having tools ready avoids pauses and keeps the workflow smooth. Check if you need any special tools for your specific faucet model.
Turn Off Water Supply
Locate the water supply valves under the sink. Turn them off to prevent leaks or spills. This step is vital to avoid water damage and ensure safety. Double-check to confirm water is completely off before proceeding.
Protect The Area
Place towels or mats around the workspace. This protects surfaces from scratches and water. It also keeps tools from slipping or rolling away. Ensuring a safe workspace is essential for a successful replacement.
Lighting
Ensure the area has enough light. Use a lamp or flashlight if needed. Proper lighting helps see small parts clearly. This prevents mistakes and makes the task easier.
Turning Off The Water Supply
To replace a pull-out kitchen faucet hose, first turn off the water supply. This step prevents water from spilling. Locate the valve under the sink and rotate it clockwise to stop the flow. Disconnect the old hose carefully to avoid damage.
Replacing a pull-out kitchen faucet hose might seem daunting, but it’s a straightforward process when broken down into steps. One crucial step is turning off the water supply. This ensures that you won’t have a water mess on your hands, allowing you to focus on the task itself. Have you ever thought about how critical it is to ensure the water is off before you start? Let’s dive into the details.Identify The Shut-off Valves
The first step is to locate the shut-off valves under your sink. These are usually found towards the back of the cabinet. If you haven’t looked for them before, this might be a good time to familiarize yourself. It’s a simple task that can save you from unexpected flooding.Turn Off The Cold And Hot Water Valves
Once you’ve found the valves, it’s time to turn them off. Twist the handle clockwise to stop the water flow. You might need to use a bit of force if they haven’t been turned in a while. Have you ever noticed how a small action like this can prevent a big problem?Test The Faucet
After turning off the valves, test the faucet to ensure the water is completely off. Turn on both the hot and cold water to check if any water comes out. If there’s still a trickle, you may need to tighten the valves a bit more. Isn’t it better to double-check now than to face a wet surprise later?Consider The Main Water Supply
In some cases, you might need to shut off the main water supply, especially if the under-sink valves are faulty. This is typically located near your water meter. Knowing how to do this can be a lifesaver in emergencies. Do you know where your main water supply is? Turning off the water supply is a simple yet essential step in replacing your kitchen faucet hose. It might seem small, but it ensures a smooth and dry repair process. Plus, knowing how to handle these valves can be handy for future plumbing projects.
Credit: www.amazon.com
Removing The Old Hose
Replacing the pull-out kitchen faucet hose might seem daunting at first. However, removing the old hose is simpler than you think. With a few steps, you can have your faucet functioning smoothly again. Follow the instructions below to remove the old hose efficiently.
Detaching The Spray Head
Begin by locating the spray head at the end of the faucet hose. Hold the spray head firmly with one hand. Twist the connector counterclockwise to loosen it. You may need to use a wrench for added grip. Once loose, pull the spray head off gently. This reveals the hose attachment point.
Disconnecting The Hose From The Faucet
Next, find the hose connection beneath the sink. It connects the hose to the faucet base. Use a wrench to loosen the nut securing the hose. Turn the wrench counterclockwise to loosen it completely. Once loose, gently pull the hose from the faucet. Dispose of the old hose properly. Now, you’re ready to install the new one.
Installing The New Hose
Replacing a pull-out kitchen faucet hose might seem daunting, but the installation process can be straightforward with the right guidance. After removing the old hose, you’re ready to install the new one, ensuring your kitchen faucet functions seamlessly once again. Whether you’re a DIY enthusiast or simply trying to save on handyman costs, understanding how to properly install the new hose can make all the difference.
Connecting The Hose To The Faucet
First, examine the connector on the new hose. It’s usually a threaded end designed to fit snugly onto the faucet base. Make sure it’s compatible with your faucet model.
To connect the hose, simply screw the threaded end onto the faucet’s base. Tighten it securely using a wrench, but be cautious not to over-tighten, as this can lead to damage.
Think about how satisfying it will be to have a leak-free faucet. It’s empowering to fix something yourself, isn’t it?
Reattaching The Spray Head
Now that the hose is connected, it’s time to reattach the spray head. Check the spray head for any debris or wear that might affect performance.
Align the spray head with the end of the hose and screw it on until it’s snug. Test the connection by pulling lightly to ensure it’s secure.
Have you ever wondered why the spray head sometimes doesn’t fit perfectly? Often, it’s because of misalignment—double-check your work.
Once installed, test the faucet to ensure water flows smoothly. Relish in the accomplishment of fixing it yourself! You’ve not only saved money but also enhanced your DIY skills.

Credit: www.amazon.com
Testing The New Hose
Replacing a pull-out kitchen faucet hose involves removing the old hose carefully and attaching the new one securely. Ensure the connections are tight to prevent leaks and test the hose for smooth operation. Follow the manufacturer’s instructions for a hassle-free experience.
Testing the new hose is essential after replacing your kitchen faucet hose. It ensures everything is functioning well without any issues. This step will help you identify any problems early. Let’s focus on two key areas: checking for leaks and ensuring smooth operation.Checking For Leaks
Turn on the water supply gently. Observe the connections for any drips or wet spots. Pay close attention to the joints. If you see water, tighten the connections slightly. Use a cloth to dry any water to see new leaks easily. Repeat this process until no leaks appear. Ensuring a watertight connection prevents future problems.Ensuring Smooth Operation
Pull the hose out and retract it a few times. Check if the hose moves without resistance. The movement should feel smooth and easy. Listen for any unusual sounds. Squeaks or groans mean something is wrong. Adjust the hose if needed for better alignment. A smooth operation ensures a hassle-free experience. Testing your new hose is simple yet crucial. It guarantees a leak-free and smooth kitchen faucet. Enjoy the peace of mind from a well-done installation.Tips For Maintenance
Replacing a pull-out kitchen faucet hose involves turning off the water supply. Remove the old hose by unscrewing it from the faucet. Attach the new hose by threading it into the faucet and securing it tightly.
Maintaining your pull-out kitchen faucet hose is key for a long life. Regular care prevents leaks and keeps your faucet working smoothly. Here are some simple maintenance tips to follow.Check For Leaks Regularly
Inspect your hose for leaks every few weeks. Look for water spots under the sink. A small leak can become a big problem quickly. Catching it early saves you time and money.Clean The Hose Gently
Wipe the hose with a damp cloth to remove dirt. Avoid using harsh chemicals that can damage the material. A mild soap solution works best.Inspect The Connections
Check the connections at both ends of the hose. Ensure they are tight but not overly so. Loose connections can cause leaks.Replace Worn Parts
Look for signs of wear on the hose and fittings. Cracks or frays indicate it’s time for a replacement. Using a worn hose can lead to water damage.Lubricate The Hose
Apply a silicone-based lubricant to the hose occasionally. It helps the hose slide smoothly and prevents kinks. Avoid petroleum-based products as they can degrade the material.Avoid Overstretching
Pull the hose gently during use. Overstretching can damage the internal components. Always let the hose retract smoothly after use.Store Properly
Keep the hose coiled neatly under the sink. This prevents tangling and potential damage. A well-stored hose lasts longer. Following these maintenance tips will help your pull-out kitchen faucet hose last. Regular checks and gentle care keep your kitchen running smoothly.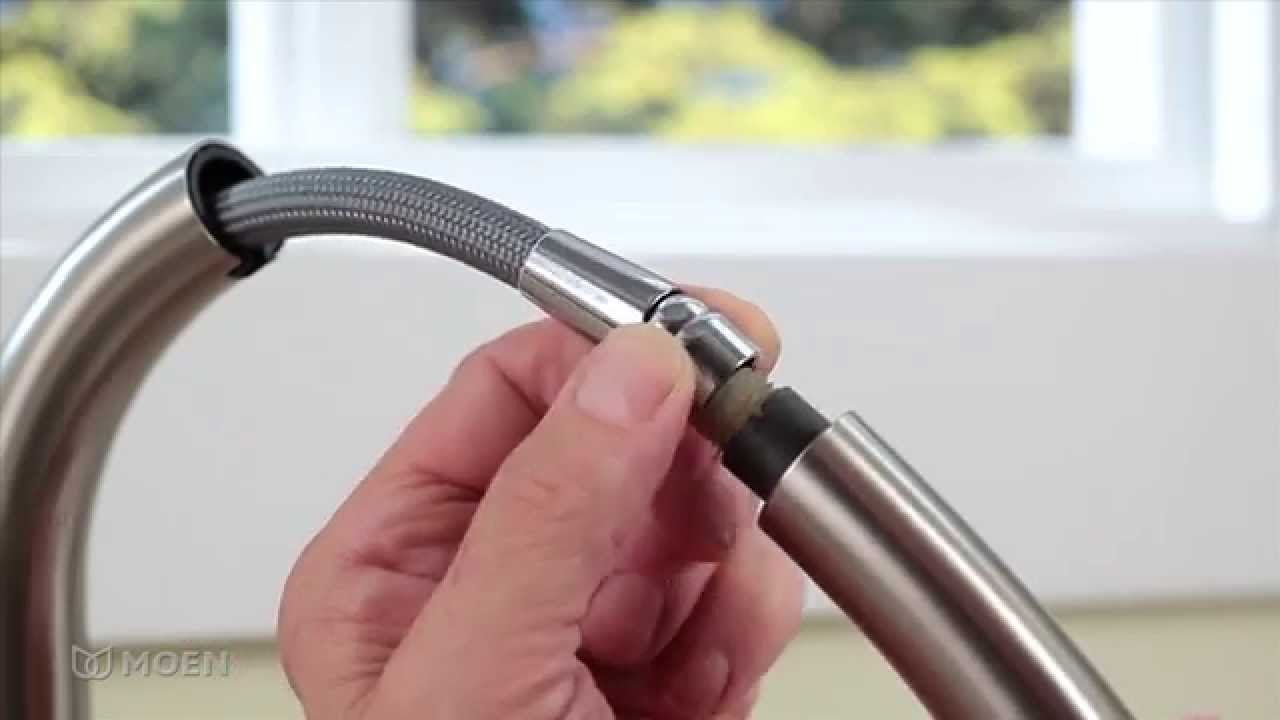
Credit: www.youtube.com
Frequently Asked Questions
Can You Replace The Hose In A Pull-out Faucet?
Yes, you can replace the hose in a pull-out faucet. Turn off the water supply first. Detach the hose, and install the new one by following the manufacturer’s instructions. Ensure all connections are secure before restoring the water supply. Regular maintenance can help extend the faucet’s lifespan.
How To Replace A Pull Out Kitchen Faucet Sprayer?
Turn off the water supply. Unscrew the old sprayer hose. Attach the new sprayer hose to the faucet. Secure it tightly. Turn on the water supply to check for leaks.
How To Remove Moen Pull Out Kitchen Faucet Hose?
Turn off the water supply. Unscrew the hose from the spray head. Press the quick connect button under the sink. Pull the hose free from the faucet. Ensure all parts are properly stored. Test the faucet for leaks after reassembly.
This process ensures a smooth removal of Moen pull-out kitchen faucet hose.
How To Change The Aerator On A Pull-out Kitchen Faucet?
Unscrew the pull-out faucet spray head to access the aerator. Remove the old aerator and replace it with a new one. Reattach the spray head securely. Ensure no leaks by testing the faucet.
Conclusion
Replacing a pull-out kitchen faucet hose is simple. Just follow the steps. Gather necessary tools and parts first. Turn off the water supply to avoid mess. Carefully remove the old hose. Attach the new hose securely. Test for leaks by turning the water back on.
Make sure everything works properly. Fix any issues if needed. Regular maintenance can extend hose life. With practice, it gets easier each time. Enjoy a smoothly functioning kitchen faucet. Happy fixing!


