
Imagine transforming a rough piece of wood into a smooth, polished masterpiece with just a few strokes of a hand plane. If you’ve ever felt the thrill of working with wood, you know how satisfying this can be.
But maybe you’ve struggled to set up your hand plane correctly, or perhaps you’re curious about how to get started. You’re in the right place. You’ll discover how to set up a hand plane so it works seamlessly, making your woodworking projects not only easier but also more enjoyable.
We’ll guide you through each step, ensuring that by the end, you’ll have the confidence to start planing like a pro. Get ready to unlock your woodworking potential and let your creativity flow!
Choosing The Right Hand Plane
Setting up a hand plane involves adjusting the blade for smooth cuts. Ensure the blade is sharp for precision. Check the angle and depth for the desired finish on wood surfaces.
Setting up a hand plane can elevate your woodworking skills and give your projects a professional finish. However, choosing the right hand plane is crucial for achieving those perfect results. Selecting one that fits your needs and experience level can be a game-changer. Have you ever wondered why some woodworkers swear by their favorite hand plane?Types Of Hand Planes
Understanding the different types of hand planes is the first step. There are several varieties, each designed for specific tasks. Block planes are compact and perfect for smoothing end grain and working on small pieces. Bench planes come in various sizes; they are versatile tools used for flattening and shaping wood surfaces. Joinery planes are specialized for tasks like creating grooves or smoothing edges. Knowing what each type does helps you choose one that matches your project’s requirements.Factors To Consider
When selecting a hand plane, consider the size and weight. A lighter plane is easier to handle, especially for beginners, while a heavier one provides more stability for larger tasks. Blade quality is another critical factor. High-carbon steel blades stay sharp longer and ensure smoother cuts. Adjustability is key; look for planes with easy blade adjustments to fine-tune your work. Finally, consider your budget. Quality hand planes can be an investment, but they often pay off with durability and better results. Choosing the right hand plane requires careful thought about your specific needs and preferences. Have you considered what projects you’ll tackle with it? Imagine the satisfaction of a perfectly planed surface, knowing you chose the right tool for the job. It’s not just about the tool, but how it transforms your woodworking experience.Essential Tools And Materials
Setting up a hand plane can be a rewarding task, opening doors to smoother woodworking projects. It begins with gathering the right tools and materials. Having what you need at your fingertips can make the process seamless and efficient. Let’s dive into the essentials that will help you in setting up your hand plane.
Basic Tools Needed
Before you start, ensure you have the basic tools ready. A flat workbench is essential to provide stability while you work. You’ll also need a screwdriver to adjust screws and secure parts. Don’t underestimate the importance of a sharpening stone; a sharp blade is crucial for clean cuts. Consider having a small mallet on hand, which can assist in adjusting the blade depth with precision. Together, these tools form the foundation of your setup process.
Additional Accessories
Once you have the basics, some additional accessories can elevate your hand plane setup. A honing guide will help maintain the correct angle while sharpening the blade. This ensures consistent results every time you use your plane. You might also want to invest in a bench vise, providing extra support and freeing up your hands. Wax can be a surprising ally; applying it to the sole of the plane reduces friction and makes the plane glide smoother over the wood surface.
Have you ever wondered why some setups feel more comfortable than others? Often, it’s the small additions that make all the difference. These accessories enhance your setup, bringing efficiency and satisfaction to your woodworking.
Gathering these tools and materials can transform your hand plane setup into a streamlined process. Do you have everything you need to make your next project a success?
Preparing The Blade
Setting up a hand plane involves careful blade preparation. First, ensure the blade is sharp for smooth cuts. Adjust the depth by loosening the screws and setting the blade to the desired position.
Preparing the blade of your hand plane is a crucial step in ensuring smooth and precise woodworking results. A well-prepared blade not only makes your work easier but also enhances the finish of your project. Let’s dive into the essential techniques for getting your blade ready for action.Sharpening Techniques
Sharpening the blade is the first step in preparation. A sharp blade cuts cleaner and requires less effort. Use a sharpening stone or a honing guide to achieve a fine edge. Consider using a combination of coarse, medium, and fine-grit stones. This progression refines the edge, making it razor-sharp. Keep a consistent angle when sharpening to avoid uneven wear. Have you ever noticed how a dull blade can tear the wood fibers instead of slicing them? This can ruin your project. Regular sharpening prevents this and keeps your work neat.Setting The Blade Angle
The angle at which the blade is set is vital for optimal performance. Most hand plane blades are set at an angle between 25 to 30 degrees. This angle helps in achieving a smoother cut. Use a protractor or an angle gauge to set the blade accurately. Adjusting the blade’s angle allows you to control the depth of the cut. A steeper angle can tackle harder woods with ease. Experiment with different angles on scrap wood. Notice how the plane behaves with each adjustment. This hands-on approach will teach you more about your tools and how to use them effectively.Adjusting The Plane
Setting up a hand plane requires precision and care. Adjusting the plane is a crucial step. It ensures smooth operation and precise cutting. Proper adjustment enhances the tool’s effectiveness. Follow these steps to fine-tune your hand plane.
Tuning The Sole
The sole is the base of the plane. A flat sole is essential for smooth cuts. Check the sole for any irregularities. Use a file or sandpaper to flatten it. Ensure it’s even across its entire surface. This will help the plane glide effortlessly.
Aligning The Frog
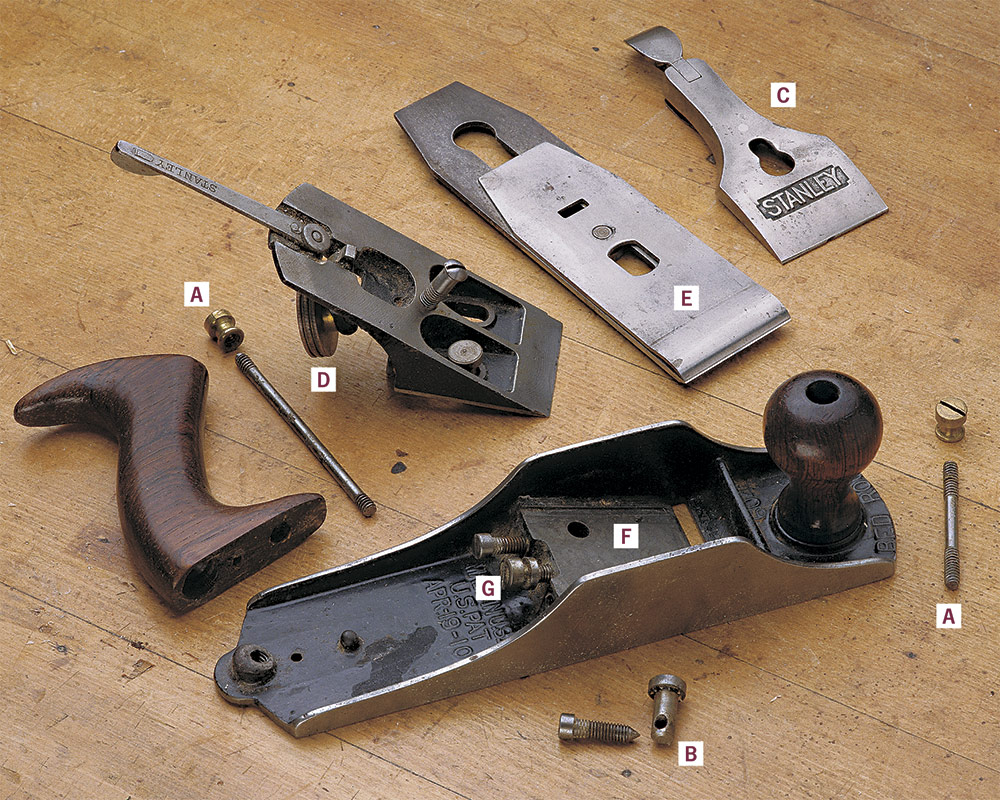
The frog supports the blade. Its alignment affects the cut depth. Loosen the screws holding the frog. Adjust its position until the blade is parallel to the sole. Tighten the screws once aligned. This step is crucial for precise cuts.
Setting The Cap Iron
The cap iron is a metal piece. It sits on top of the blade. Its position affects chip removal. Place the cap iron close to the blade edge. This helps in reducing tear-out. Tighten it securely to maintain its position. Proper cap iron setting enhances cutting performance.
Testing The Hand Plane
Testing a hand plane is crucial for smooth woodworking. It ensures the tool performs efficiently and delivers precise results. Proper testing identifies any adjustments needed for optimal performance. Here’s how to effectively test your hand plane.
Checking For Smooth Cuts
Start by selecting a piece of scrap wood. The wood should be flat and clean. Adjust the hand plane blade for a fine cut. Push the plane evenly across the wood surface. Examine the shaved wood curl. It should be thin and uniform. Listen for consistent sound during the cut. This indicates a smooth operation. Feel the wood surface after cutting. A smooth finish confirms a proper setup.
Troubleshooting Common Issues
Sometimes the hand plane doesn’t cut well. Check if the blade is dull. Sharpen it for better performance. Inspect the blade angle. It should be correctly aligned. If the plane chatters, tighten all screws. Ensure the sole is flat and clean. A dirty sole affects performance. Check for wood grain direction. Planing against the grain causes tear-out. Adjust the blade depth if needed. Too deep cuts can cause resistance. Ensure your grip on the plane is firm. A loose grip affects control and precision.
Credit: www.finewoodworking.com
Maintenance And Care
Setting up a hand plane involves adjusting the blade for smooth wood shaving. Ensure the blade is sharp and aligned correctly. Regular oiling prevents rust, maintaining the tool’s effectiveness for woodworking tasks.
Maintaining and caring for your hand plane is crucial to ensure its longevity and performance. Proper upkeep not only enhances your tool’s efficiency but also saves you time and money on repairs. Let’s dive into practical steps you can take to keep your hand plane in top shape.Cleaning After Use
After each use, make it a habit to clean your hand plane thoroughly. Use a soft brush or cloth to remove shavings and dust from the blade and body. A quick wipe with a lightly oiled rag can prevent rust from forming on metal surfaces. Avoid soaking the tool in water. Moisture can lead to rust and degrade the wood. If you notice stubborn grime, a few drops of mineral spirits can help break it down without damaging the metal.Regular Inspections
Set aside time for regular inspections. Check the blade for sharpness and the sole for flatness. A dull blade can tear the wood, while an uneven sole can cause chatter and affect the smoothness of your work. Look out for any loose screws or parts. A small issue now can turn into a bigger problem later. Tighten screws and adjust components to ensure everything is secure. Are there any unusual noises or resistance when using your plane? These could be signs that something needs attention. Addressing small issues promptly can prevent bigger headaches down the road. By dedicating a little time to maintenance and care, you ensure your hand plane remains a reliable tool in your woodworking arsenal. What maintenance habits do you swear by? Share your tips in the comments!Safety Tips
Setting up a hand plane safely involves securing the blade tightly. Use protective gloves to avoid cuts. Ensure the work area is clean and free of clutter for smooth operation.
Setting up a hand plane can be a rewarding task, but safety should be your top priority. Understanding how to handle this tool correctly not only ensures your protection but also improves the quality of your work. Let’s dive into some essential safety tips that will help you use your hand plane confidently and effectively.Proper Handling Techniques
Always maintain a firm grip on your hand plane. This prevents slips that can lead to accidents. Use both hands for better control—one on the handle and the other guiding the front knob. Keep your work area clean and free from distractions. An organized space allows you to focus entirely on your task. Have you ever noticed how a cluttered environment can make you feel uneasy? Adjust the blade depth carefully. A blade set too deep can catch unexpectedly. This not only damages your workpiece but also risks injury. Start with a shallow depth and gradually adjust as needed.Avoiding Common Injuries
Be mindful of your fingers when adjusting the blade. It’s easy to forget how sharp the blade is until it’s too late. Use a screwdriver or a knob to make adjustments safely. Wear protective gear like safety goggles to shield your eyes from wood shavings. You might think it’s unnecessary, but even small particles can cause irritation or injury. Maintain a proper stance while working. Keep your feet shoulder-width apart for stability. This simple shift in posture can prevent back strain and improve your control over the plane. These safety tips are not just about avoiding harm; they’re about enhancing your woodworking experience. Have you considered how a small change in your approach could lead to better results? By adopting these practices, you can enjoy the art of woodworking with peace of mind and a sense of accomplishment.:max_bytes(150000):strip_icc()/WD315499-2-8100467425474373acb2af7b745f330e.jpg)
Credit: www.woodmagazine.com

Credit: www.woodcraft.com
Frequently Asked Questions
How To Properly Set Up A Hand Plane?
Set the blade angle and secure it firmly. Adjust the depth for desired shaving thickness. Align the blade parallel to the sole. Check for even blade exposure. Test on scrap wood to ensure smoothness.
How Should The Blade Of A Hand Plane Be Set?
Set the hand plane blade parallel to the sole. Adjust depth for fine shavings. Ensure the blade is sharp and secure. Test on scrap wood for smooth results. Regularly check alignment and sharpness for optimal performance.
What Angle Do You Grind A Hand Plane?
Grind a hand plane blade at a 25-degree angle for optimal performance. Hone it to 30 degrees for a sharper edge. This ensures efficient wood cutting and smoother finishes. Regular maintenance and sharpening enhance tool longevity and effectiveness.
Does The Bevel Go Up Or Down On A Hand Plane?
The bevel on a hand plane typically goes down. This setup ensures smoother and more controlled cuts. Placing the bevel down also provides better support and reduces tear-out, enhancing the overall performance and efficiency of the hand plane.
Conclusion
Setting up a hand plane can seem tricky. But, it’s manageable with practice. Start with the basics. Adjust the blade carefully. Ensure it’s sharp for best results. Check the sole for flatness. Secure all parts tightly. Test on scrap wood.
Learn to feel the wood’s response. Each step improves your skill. Patience and practice are key. Over time, you’ll gain confidence. Hand planes offer precision and control. Enjoy the satisfaction of a well-planed surface. Happy woodworking!




