
Are you tired of struggling with a dull knife in your kitchen or toolbox? A sharp knife is not just a pleasure to use, but also a safer tool.
One handy solution you might not have considered is using a Dremel tool. This versatile device is not just for crafting or carving; it can bring your knives back to life with precision and ease. Imagine the satisfaction of slicing through ingredients effortlessly or tackling a DIY project with confidence.
In this guide, you’ll discover how to effectively sharpen your knives using a Dremel, transforming your cutting experience. Stay with us, and you’ll soon have the sharpest tools in the drawer, ready to make every task smoother and more enjoyable.
Choosing The Right Dremel Tools
Sharpening a knife with a Dremel requires selecting the right tool and attachment. Use a sharpening stone or a grinding wheel. Always move the blade steadily along the edge, maintaining a consistent angle for a sharper finish.
Sharpening a knife with a Dremel tool is an efficient way to restore its edge. But, choosing the right Dremel tools can make all the difference. Selecting the proper attachments and understanding grit levels are crucial steps in achieving a sharp and precise blade. Imagine you have a set of dull kitchen knives, and you’re ready to transform them back into efficient culinary tools. The key lies in knowing which Dremel accessories will get the job done.Selecting Appropriate Attachments
Choosing the right attachment for your Dremel tool is essential for effective knife sharpening. Look for attachments specifically designed for sharpening tasks. A grinding stone is a popular choice. It works well to remove material and shape the blade edge. Alternatively, a sanding drum can offer more control and precision. Consider the size and shape of your knife. Would a small attachment be more suitable, allowing you to maneuver easily?Understanding Grit Levels
Grit levels play a crucial role in the sharpening process. The grit determines the coarseness of your attachment. Lower grit levels remove more material, ideal for repairing chips and dents. Higher grit levels are perfect for honing and refining the edge. Start with a lower grit to shape the blade. Gradually move to a higher grit for polishing and smoothness. Have you ever sharpened a knife and felt the difference in cutting performance? That’s the power of mastering grit levels. Choosing the right tools can make your sharpening process more efficient and enjoyable. With a well-sharpened knife, you’re ready to tackle any kitchen task with ease. So, what’s stopping you from sharpening your knives today?Safety Precautions
Ensure safety by wearing gloves and goggles when using a Dremel to sharpen knives. Keep the tool stable and maintain a safe distance from the blade. Following these precautions can prevent accidents and enhance your sharpening experience.
Sharpening a knife with a Dremel can be effective. Safety is crucial in this process. Proper precautions prevent accidents and ensure a smooth task. Let’s explore essential safety measures.Protective Gear
Wearing protective gear is vital. Safety goggles shield your eyes from flying debris. Gloves protect your hands from sharp edges. Ear protection can reduce noise exposure. A dust mask prevents inhalation of particles. These items are essential for safe sharpening.Safe Work Environment
A safe work environment is necessary. Ensure your workspace is clean. Remove any clutter or distractions. Adequate lighting is important for visibility. A stable surface prevents tool slipping. Keep children and pets away from the area. Safety starts with a well-organized environment.Preparing The Knife
Preparing your knife before sharpening is a crucial step. It ensures the best results and maintains the knife’s longevity. The process involves cleaning the blade and securing the knife properly. Let’s dive into these essential preparatory steps for sharpening a knife with a Dremel.
Cleaning The Blade
Begin with a clean blade. Dirt and grime affect sharpening quality. Use warm water and mild soap. Gently scrub the blade with a soft cloth. Avoid abrasive materials that may scratch. Rinse thoroughly to remove soap residue. Dry the blade with a clean towel. Ensure there’s no moisture left. A dry blade prevents rust and damage.
Securing The Knife
Secure the knife for stability. A moving knife risks injury and poor sharpening. Use a non-slip mat or a clamp. Place the knife handle firmly on the surface. Ensure the blade is easily accessible. Double-check the knife’s position for safety. A stable knife ensures precision and safety during sharpening.

Credit: toolguyd.com
Sharpening Technique
Sharpening a knife with a Dremel requires a steady hand. The process enhances the blade’s cutting ability. Mastering this technique involves precision and care. A Dremel tool offers an efficient way to sharpen knives. It is crucial to follow the right method for the best results.
Setting The Right Angle
Find the correct angle for your knife. Most kitchen knives require a 20-degree angle. Hold the blade steady at this angle. Consistency is key for a sharp edge. The correct angle ensures uniform sharpening. It avoids damaging the blade.
Using The Dremel Efficiently
Attach the grinding stone to your Dremel. Set the Dremel to a low speed. High speeds may overheat the blade. Apply gentle pressure to the knife’s edge. Move the Dremel evenly along the blade. Repeat the process on both sides. Check sharpness after a few passes. A sharp knife cuts effortlessly.
Maintaining Consistency
Maintaining consistency when sharpening a knife with a Dremel is crucial. Consistency ensures a uniform edge. It also prevents damage to the knife. A well-sharpened knife enhances performance in the kitchen or outdoors. Focusing on consistent technique helps achieve the best results. Below are key elements to focus on.
Even Pressure Application
Ensure even pressure when using the Dremel. Uneven pressure can lead to an uneven edge. Keep your grip steady. This helps maintain control over the tool. Use gentle, consistent strokes. This prevents unnecessary wear on the knife. Adjust your hand position if needed. This avoids applying excessive force.
Regular Interval Checks
Check the knife regularly during sharpening. Look for a uniform edge. Inspect both sides for balance. This helps prevent over-sharpening. Regular checks ensure the blade stays even. It also allows you to adjust technique if needed. Use a magnifying glass for a closer look. This helps spot any inconsistencies.
Finishing Touches
Sharpen your knife effortlessly using a Dremel tool. Attach a sharpening stone, then gently glide along the blade edge. Achieve precision and restore cutting performance in minutes with this simple technique.
After successfully sharpening your knife with a Dremel, it’s time to focus on the finishing touches. These final steps will ensure your knife not only looks great but performs exceptionally well. A well-polished edge and a sharp blade are crucial for any kitchen or outdoor task. Let’s dive into the details of how to perfect your knife’s edge.Polishing The Edge
Polishing the edge of your knife is essential for a smooth and clean cut. Use a Dremel polishing wheel with a bit of polishing compound. This will remove any micro-burrs left from sharpening. Move the polishing wheel along the edge of the blade gently. Maintain a consistent angle to prevent uneven surfaces. Pay attention to the shine as you polish; a mirror-like finish indicates a well-polished edge. Many people overlook the importance of polishing, but this step can make a noticeable difference. A polished edge reduces friction during use. This can enhance your cutting experience significantly.Testing Sharpness
Testing your knife’s sharpness is the final step. It’s satisfying to see how well your efforts have paid off. You can use simple tests to ensure your knife is ready for action. One popular method is the paper test. Hold a piece of paper vertically and attempt to slice through it. A sharp knife will glide through effortlessly without tearing the paper. Another test is the tomato test. Try slicing a ripe tomato and notice if the blade cuts smoothly. A sharp knife should cut through the skin with minimal pressure. Remember, a truly sharp knife can improve your cooking skills. It makes preparation tasks quicker and safer. So, how sharp is your knife now? These finishing touches not only enhance the knife’s performance but also extend its lifespan. Taking the time to polish and test ensures you’re ready for any culinary challenge.Common Mistakes
Sharpening a knife with a Dremel can be tricky. Many people make common mistakes during this process. These errors can damage the knife or reduce its lifespan. Learning about these mistakes helps you avoid them. The result? A sharper, more durable knife.
Avoiding Overheating
Overheating is a common mistake while using a Dremel. The tool rotates at high speeds, which can generate heat. Excessive heat can damage the knife’s edge. It may cause the metal to lose its hardness. This makes the knife dull quickly.
To avoid overheating, take short breaks. Let the knife cool before continuing. You can also use a damp cloth to cool the blade. Keep checking the temperature with your fingers. If it feels too hot, stop immediately.
Preventing Uneven Edges
Uneven edges can occur if you apply uneven pressure. This can make the knife less effective. Focus on keeping the angle consistent. Use steady hands and a firm grip.
Marking the edge with a marker can help. It shows where material is being removed. This helps in keeping the sharpening even. Practice makes perfect. Start slowly and increase your speed as you get comfortable.

Credit: www.dremel.com
Knife Maintenance Post-sharpening
Sharpening a knife with a Dremel requires careful maintenance afterward. Wipe the blade with a damp cloth to remove metal shavings. Apply a thin layer of oil to prevent rust. Store the knife in a dry place to keep it in top condition.
Maintaining your knife after sharpening is crucial for preserving its edge and ensuring it remains a trusty tool in your kitchen or workshop. You’ve spent time honing that blade with your Dremel, and now it’s time to keep it in tip-top shape. This post-sharpening maintenance can make all the difference in your knife’s performance and longevity. Let’s delve into some straightforward strategies to help you maintain that newly sharpened edge.Proper Storage
Storing your knife correctly is a simple step that can prevent dullness and damage. Do you toss your knives into a drawer with other utensils? This can lead to unnecessary nicks and dulling. Consider using a knife block or magnetic strip. These options keep your blades away from other items and reduce the risk of damage. If you’ve ever reached for a knife only to find it less than sharp, you’ll appreciate how a little storage care goes a long way.Regular Upkeep
Think of your knife as a living tool. It needs regular attention to stay in prime condition. Regular upkeep doesn’t mean sharpening it every day. Instead, focus on simple actions like wiping the blade clean after use and drying it immediately. You might wonder, how often should you sharpen it again? While there’s no one-size-fits-all answer, a monthly check-up is a good start. This helps catch any dullness before it affects your cutting performance. Taking a few minutes for maintenance can save hours of frustration later. Knife maintenance doesn’t have to be a chore. With a little care post-sharpening, you can ensure your knife remains a sharp, reliable companion in your culinary adventures. What strategies will you adopt to keep your knife in peak condition?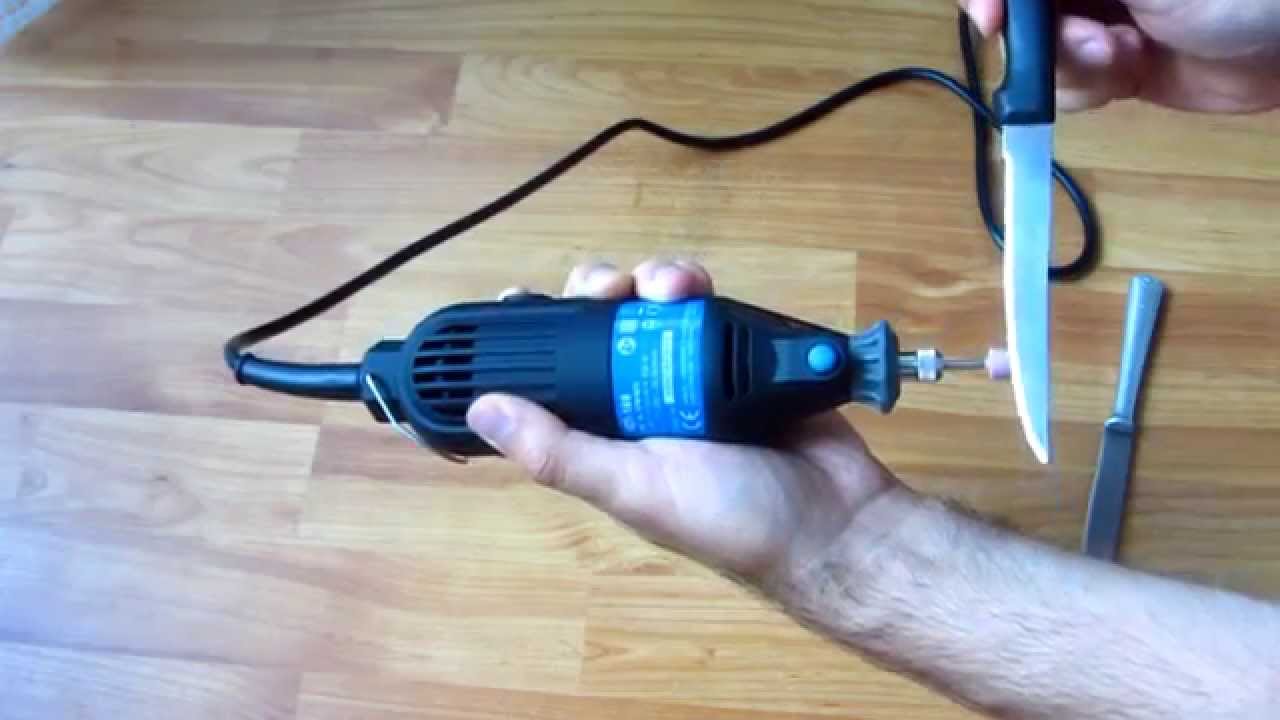
Credit: www.youtube.com
Frequently Asked Questions
Which Dremel Bit Is For Sharpening?
Use the Dremel Chainsaw Sharpening Attachment or the Dremel 932 Aluminum Oxide Grinding Stone for sharpening tools. These bits efficiently sharpen chainsaws, blades, and other cutting tools. Ensure compatibility with your Dremel model for optimal performance.
Is It Better To Push Or Pull When Sharpening A Knife?
Pulling is generally better when sharpening a knife. It offers more control and a consistent angle. This method reduces the risk of damaging the blade. Always maintain a steady motion for optimal sharpness.
What Is A Common Mistake When Sharpening Knives?
A common knife sharpening mistake is using the wrong angle. This leads to dull edges and reduced effectiveness. Ensure you maintain consistent pressure and angle throughout the process for optimal sharpness. Proper technique prevents damage and extends the knife’s lifespan, ensuring safe and efficient use in the kitchen.
Can You Sharpen A Serrated Knife With A Dremel Tool?
Yes, you can sharpen a serrated knife with a Dremel tool. Use a fine grinding stone attachment carefully. Focus on each serration individually to maintain the blade’s edge. Ensure you work slowly to avoid damaging the knife. Always follow safety precautions when using power tools.
Conclusion
Sharpening a knife with a Dremel is easy and efficient. Follow the steps carefully to ensure safety and precision. Always wear protective gear to avoid injuries. Use the right attachment for your Dremel. Keep the blade at the correct angle while sharpening.
This method saves time and gives sharp results. Remember to clean the knife after sharpening. Practice makes perfect. Over time, you will get better at this skill. Enjoy the satisfaction of a perfectly sharpened knife. Use it carefully in your kitchen tasks.
Happy sharpening!


