
Imagine you’re about to hit the golf course, ready for a day of leisure and sport. But just as you’re about to set off, your golf cart battery fails you.
Frustrating, right? Ensuring your golf cart battery is in tip-top shape is crucial for a smooth ride. That’s where a multimeter comes in handy. It’s a simple tool that can save you from unexpected breakdowns and costly repairs. You might be thinking, “How do I even begin to test my golf cart battery with a multimeter?
” Don’t worry! This guide is here to show you exactly how to do it, step-by-step. By the end, you’ll feel confident checking your battery’s health anytime. Ready to make sure your golf cart never lets you down? Let’s dive in!
Essential Tools
Testing a golf cart battery with a multimeter is straightforward. First, ensure the battery is fully charged. Then, connect the multimeter probes to the battery terminals. Check the voltage reading to assess battery health.
Testing your golf cart battery doesn’t have to be a daunting task. With the right tools, you can easily assess its health and ensure your cart runs smoothly. Let’s dive into the essential tools you’ll need to get the job done efficiently.Multimeter Basics
A multimeter is your go-to device for testing a golf cart battery. This versatile tool measures voltage, current, and resistance. Look for a digital multimeter, as it’s easier to read and more accurate. Before you start, familiarize yourself with the settings. The voltage setting is crucial for battery testing. Set it to DC voltage, as golf cart batteries are direct current. Think of the multimeter as your battery’s fitness tracker. It tells you if the battery is in peak condition or needs some attention.Safety Gear
Safety should always be your top priority. Before you begin testing, gather your safety gear. This includes gloves and safety glasses. Batteries contain corrosive acids, and a simple splash can cause harm. Wearing gloves protects your skin from potential leaks. Safety glasses shield your eyes from accidental splashes or sparks. Imagine testing a battery without protection and accidentally getting acid on your skin. Not a pleasant thought, right? Protect yourself and avoid unnecessary risks. As you gather your tools and gear, remember: preparation is key. A well-prepared toolkit not only makes the task easier but also ensures your safety. Are you ready to test your golf cart battery with confidence?Safety Precautions
Testing a golf cart battery with a multimeter requires careful attention. Avoid contact with battery acid by wearing gloves and goggles. Ensure the cart is off and disconnected before starting the test for safety.
Testing a golf cart battery with a multimeter requires careful handling. Safety precautions are essential to ensure your well-being. Batteries can be hazardous if not managed properly. This section will guide you on safe practices to follow.Handling Batteries Safely
Wear protective gear like gloves and goggles. These items protect you from acid spills. Avoid touching battery terminals directly. Use insulated tools for all connections. Check for cracks or leaks in the battery. Leaking acid can cause burns. Ensure the battery is off before testing. This prevents accidental shocks.Environment Considerations
Conduct tests in a well-ventilated area. Battery fumes can be harmful. Keep flammable materials away from the testing site. Sparks may ignite nearby substances. Ensure the testing surface is dry. Water can cause short circuits. Use a stable surface for the battery. A stable surface prevents accidental falls. Store batteries in a cool, dry place. Extreme temperatures affect battery performance. Safety is crucial when testing batteries. Follow these precautions for a secure experience.Preparing The Battery
Before testing your golf cart battery with a multimeter, prepare the battery. This step ensures accurate readings. A clean and damage-free battery is crucial. Follow these simple steps to get your battery ready.
Cleaning The Terminals
Start by cleaning the battery terminals. Dirt and corrosion can affect performance. Use a mixture of baking soda and water. Apply with a brush. Scrub gently around the terminals. Rinse with water. Dry with a clean cloth.
Inspecting For Damage
Look for any visible damage on the battery. Check for cracks or leaks. These can lead to poor battery performance. If damage is found, it might be time for a replacement. A healthy battery is important for accurate testing.
Credit: www.golfcarttiresupply.com
Setting Up The Multimeter
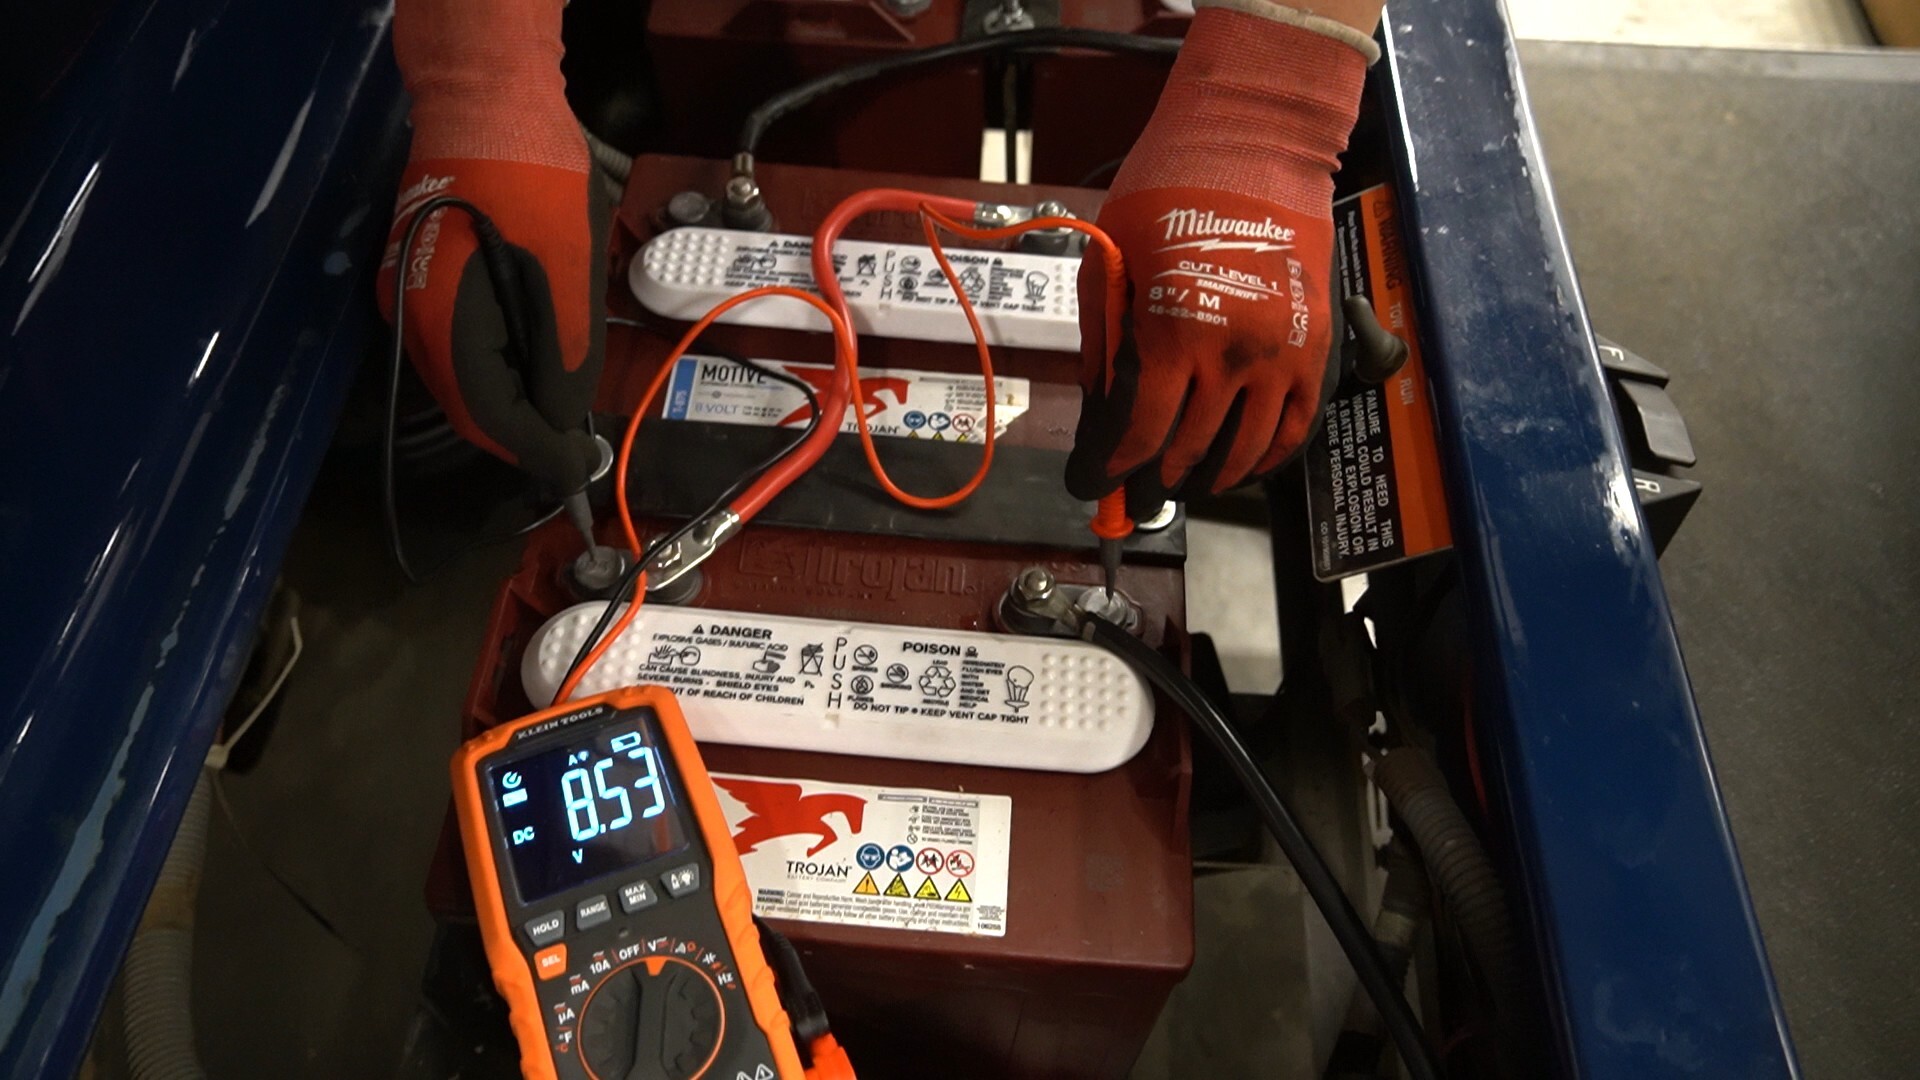
Begin by adjusting the multimeter to measure voltage. Ensure the multimeter is set to 20V DC. This setting helps accurately test a golf cart battery’s voltage levels.
Testing a golf cart battery with a multimeter is essential for maintenance. Proper setup ensures accurate readings. Start by understanding the multimeter’s settings. This guide will walk you through setting up your multimeter. Let’s make sure you get reliable results.Choosing The Correct Mode
Select the right mode on your multimeter. Use the DC voltage setting. Golf cart batteries are direct current. Look for a symbol with a V and straight lines. This indicates DC voltage. Avoid AC settings. They won’t work for battery testing.Adjusting Settings
Adjust the multimeter’s range if needed. Some multimeters have auto-range features. If yours doesn’t, set the range manually. Choose a range slightly higher than the battery’s voltage. This prevents overload. Check the battery’s voltage rating first. Ensure your multimeter can handle it. Proper setup of the multimeter is crucial. It influences the accuracy of your readings. Follow these steps for a successful battery test.Testing Battery Voltage
Testing the voltage of a golf cart battery is crucial for maintenance. A multimeter helps you measure battery voltage accurately. This process ensures your golf cart runs smoothly. Let’s explore how to test battery voltage using a multimeter.
Connecting The Multimeter
Start by turning off the golf cart. Locate the battery terminals. Set the multimeter to DC voltage. Use the black probe for the negative terminal. The red probe connects to the positive terminal. Ensure both probes make firm contact. This setup will give you accurate readings.
Reading The Results
Observe the multimeter display. A fully charged battery shows around 12.6 volts. If it reads below 12 volts, the battery may need charging. Consistent low readings indicate battery problems. It’s wise to check readings multiple times. This confirms the battery’s condition. Understanding these numbers helps maintain your golf cart’s performance.

Credit: www.wikihow.com
Interpreting The Results
Understanding multimeter readings is crucial after testing a golf cart battery. Identify voltage levels to assess battery health. Below 12. 4 volts indicates a weak or discharged battery.
Interpreting the results of your golf cart battery test can seem daunting, but it doesn’t have to be. Understanding the numbers on your multimeter is key to ensuring your battery is in good shape. Let’s break it down together, so you can confidently assess your battery’s health.Voltage Levels Explained
When you test your golf cart battery with a multimeter, you’re primarily looking at voltage levels. A healthy 6-volt battery should show readings between 6.1 to 6.3 volts. For an 8-volt battery, aim for 8.1 to 8.3 volts, and for a 12-volt battery, you should see 12.4 to 12.6 volts. If your battery reads lower than these numbers, it could indicate a problem. Consistently low readings might mean your battery isn’t holding a charge well. On the other hand, readings too high could suggest an overcharging issue.Identifying Issues
Once you’ve noted your battery’s voltage, it’s time to identify any potential issues. If your battery’s voltage is significantly lower than expected, it might be time to consider a replacement. Low voltage can signal a dead cell or sulfation, both of which reduce battery efficiency. If your golf cart isn’t running as smoothly as it should, think about the last time you fully charged the battery. Was it charged overnight or just for a few hours? This small detail can greatly impact performance. Have you ever noticed your cart slowing down on the course? It could be a sign of a weak battery. By testing regularly, you can catch issues before they become bigger problems. Remember, a multimeter is a powerful tool in your maintenance arsenal. Use it to keep your golf cart running smoothly and efficiently. What have your experiences with battery testing been like? Share your insights in the comments!Troubleshooting Common Problems
Testing a golf cart battery with a multimeter helps identify issues early. Connect the multimeter to the battery terminals. Check the voltage reading to assess the battery’s health.
When it comes to ensuring your golf cart operates smoothly, understanding how to troubleshoot battery issues is crucial. A multimeter is your trusty sidekick in diagnosing these problems. But what do you do when the readings aren’t what you expected? Let’s dive into some common problems and how to tackle them effectively.Low Voltage Solutions
Experiencing low voltage in your golf cart battery can be frustrating. Often, this issue arises from insufficient charging or an aging battery. Start by checking the voltage with your multimeter. If the reading is below 12 volts, consider charging the battery fully and testing again. If the voltage remains low, it might be time to replace the battery. Be sure to check the warranty first; you might be eligible for a replacement. Sometimes, a simple charge or replacement can get your golf cart back on the course quickly.Addressing Corrosion
Corrosion on battery terminals is a common issue that can affect performance. It’s often caused by acid leaks and can lead to poor connections. Regularly inspect your battery terminals for any signs of corrosion. If you spot corrosion, don’t panic. Use a mixture of baking soda and water to clean the terminals. A wire brush can help scrub away the buildup. Once clean, apply a thin layer of petroleum jelly to prevent future corrosion. Have you ever neglected a little rust on your battery terminal, only to find your cart struggling mid-game? Learning to address these minor issues can save you from unexpected interruptions. It’s all about proactive maintenance. By tackling low voltage and corrosion, you’re not just maintaining your golf cart; you’re ensuring it performs at its best. What other maintenance tips have saved your game day?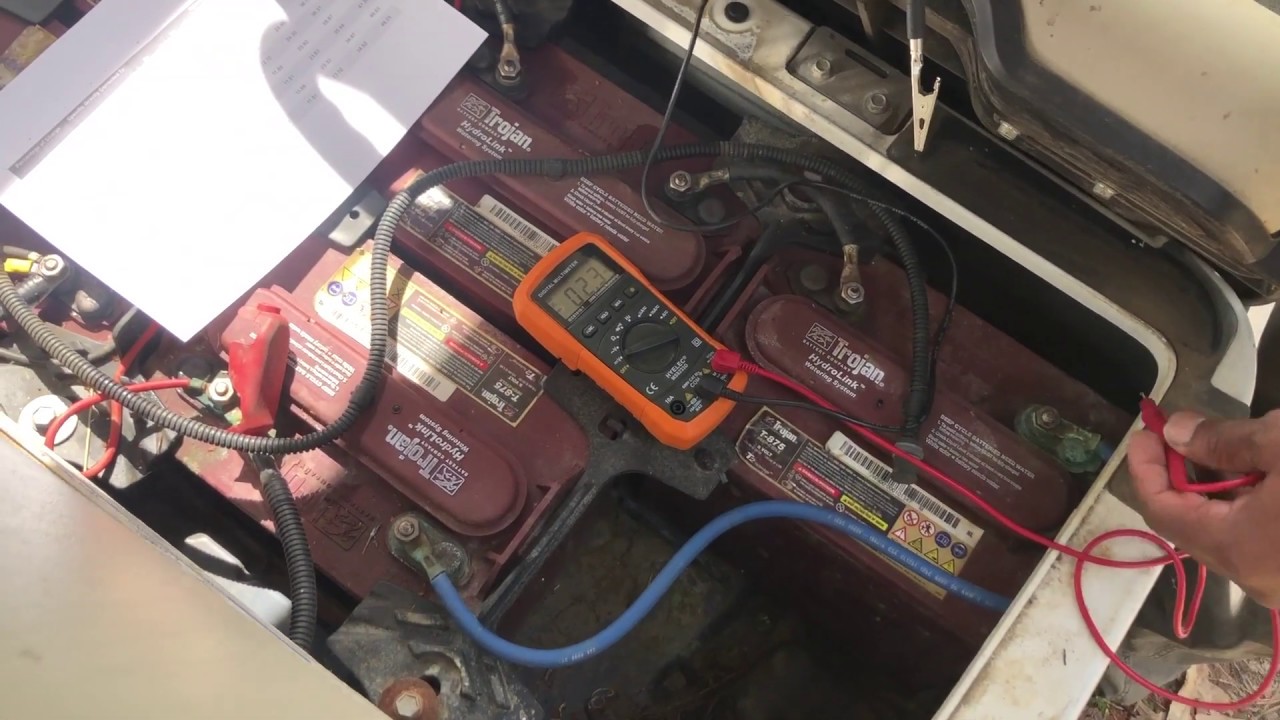
Credit: www.youtube.com
Maintaining Battery Health
Testing a golf cart battery with a multimeter ensures proper function and extends battery life. Start by setting the multimeter to DC voltage. Connect the probes to the battery terminals, checking for voltage levels within the manufacturer’s recommended range. Regular tests prevent unexpected battery issues.
Maintaining battery health in your golf cart is crucial for ensuring longevity and optimal performance. Imagine the frustration of planning a perfect day on the golf course only to find your cart powerless due to a neglected battery. A healthy battery not only saves you from unexpected breakdowns but also enhances your golf cart’s efficiency.Regular Testing Schedule
Establishing a regular testing schedule can significantly extend the life of your golf cart battery. Use a multimeter to check the voltage at least once a month. This proactive approach helps in identifying potential issues early. A battery showing a voltage of less than 12.4 volts needs attention. Regular testing allows you to address minor problems before they become major headaches.Storage Tips
Proper storage can prevent battery degradation when your golf cart is not in use. Store your golf cart in a cool, dry place to avoid extreme temperatures that can damage the battery. Disconnect the battery if you’re not using the cart for an extended period. This simple step can prevent unnecessary power drain. Maintaining battery health is not just about regular checks; it’s about understanding how your actions impact the battery’s longevity. Are you giving your battery the care it deserves?Frequently Asked Questions
How To Tell If A Golf Cart Battery Is Bad With A Multimeter?
Use a multimeter to check the voltage of the golf cart battery. A healthy 6V battery reads around 6. 3V, an 8V battery shows about 8. 4V, and a 12V battery displays close to 12. 6V. Anything significantly lower indicates a bad battery.
How To Know If Golf Cart Batteries Are Bad?
Check for reduced performance, slow charging, or a rotten egg smell. Inspect for leaks or swollen cases. Test voltage with a multimeter; low readings indicate issues. If the cart struggles to hold a charge or has shorter run times, batteries might be bad.
What Setting On Multimeter To Test Battery?
Set the multimeter to DC voltage mode. Choose a voltage range slightly higher than the battery’s rating. Connect the red probe to the positive terminal and the black probe to the negative terminal. Read the displayed voltage to determine the battery condition.
How Many Volts Should A Golf Cart Battery Read?
A fully charged 6-volt golf cart battery should read about 6. 3 to 6. 4 volts. A 8-volt battery should read approximately 8. 4 to 8. 5 volts. A 12-volt battery should read about 12. 6 to 12. 8 volts.
Regularly check voltages for optimal performance.
Conclusion
Testing a golf cart battery is simple with a multimeter. Just follow the steps outlined. Regular checks ensure your battery lasts longer. A well-maintained battery boosts performance on the golf course. Don’t overlook the importance of proper testing. It saves time and money.
Plus, it keeps your golf cart running smoothly. Practice these steps regularly. Your battery will thank you. Enjoy more uninterrupted rides with a reliable battery. Happy golfing!


