
Ever heard that annoying engine knock and wondered what’s wrong under the hood? If you’re nodding yes, your knock sensor might be the culprit.
This small yet crucial component helps maintain your engine’s performance by detecting vibrations caused by engine knock. Over time, it may fail, leading to bigger engine issues. So how do you check if your knock sensor is still working? The answer is simpler than you think: using a multimeter.
In this guide, we’ll walk you through the step-by-step process to test your knock sensor with a multimeter. Whether you’re a seasoned DIY mechanic or just someone who loves taking charge of car maintenance, this article is for you. Imagine the satisfaction of diagnosing and resolving an engine issue yourself, saving both time and money. So grab your tools, and let’s uncover the secrets your knock sensor holds. Keep reading to ensure your engine runs smoothly and efficiently.
Basics Of Knock Sensors
Knock sensors play a crucial role in engine performance. These small devices detect engine knocking, a sound caused by improper combustion. When the sensor picks up knocking, it sends signals to the engine control unit (ECU). The ECU adjusts the engine timing to prevent damage. Understanding knock sensors helps maintain your vehicle’s health.
A malfunctioning sensor can affect engine efficiency. It is essential to regularly check your knock sensor. This ensures your vehicle runs smoothly and efficiently.
What Is A Knock Sensor?
A knock sensor is an electronic device. It listens for unusual noises in the engine. Knocking noises indicate a problem with the fuel combustion. The sensor alerts the ECU to modify the engine’s timing. This adjustment prevents engine damage and improves performance.
Where Is It Located?
Usually, the knock sensor is found on the engine block. Some sensors are located on the intake manifold. The exact location depends on the vehicle model. It is important to know the location for testing purposes.
How Does It Work?
The knock sensor uses piezoelectric elements. These elements generate voltage when they detect vibrations. The sensor picks up the vibration signals from the engine. It then sends these signals to the ECU. The ECU uses this information to adjust the engine’s timing.
Why Is It Important?
Knock sensors prevent engine damage. They ensure the engine runs smoothly. Without a functioning sensor, the engine can suffer severe damage. Regular testing of the sensor is crucial for vehicle maintenance.
Tools Needed For Testing
Testing a knock sensor with a multimeter requires precision and basic tools. A reliable multimeter is essential to measure voltage and resistance accurately. Ensure the sensor and wires are clean to prevent false readings.
Testing a knock sensor with a multimeter isn’t as daunting as it might first appear. The right tools can simplify the process significantly. Having the correct equipment ensures accuracy and efficiency, saving you from unnecessary headaches. Whether you’re a seasoned mechanic or a curious DIY enthusiast, knowing which tools to use is the first step to success.Essential Multimeter
A reliable multimeter is your primary tool. Choose one that measures both AC and DC voltage. A digital multimeter is preferable because it provides clear readings, reducing the chance for errors.Socket Set
You’ll need a socket set to remove the knock sensor. A ratchet with various socket sizes is ideal. Make sure you have the right size to avoid stripping the bolt.Wiring Diagram
A wiring diagram specific to your vehicle model is crucial. It helps you identify the correct wires associated with the knock sensor. This diagram acts as your roadmap, guiding you through the testing process.Safety Equipment
Don’t underestimate the importance of safety gear. Wear gloves to protect your hands. Safety goggles shield your eyes from debris or unexpected sparks.Cleaning Supplies
A clean working environment prevents mishaps. Use a cloth and some cleaning solution to wipe down the sensor area. This ensures a clear connection and accurate readings.Notebook And Pen
Keep track of your readings. Jot down voltage levels and any anomalies. This documentation can be valuable if you need to seek further assistance or compare results. Have you ever found yourself in a situation where you lacked the right tools? It’s frustrating, isn’t it? These tools are not just items on a checklist; they are your allies in diagnosing and ensuring your vehicle runs smoothly. So, are you ready to gather your tools and get started?Safety Precautions
Testing a knock sensor with a multimeter requires careful safety precautions. Disconnect the vehicle’s battery to avoid electric shock. Ensure the multimeter is set correctly to measure resistance.
When you’re testing a knock sensor with a multimeter, safety should be your top priority. Handling car components can be risky, especially when dealing with electrical parts. Taking the right precautions ensures that you stay safe and get accurate results.Turn Off The Engine
Before you even think about reaching for your multimeter, make sure the engine is off. An active engine poses multiple hazards such as moving parts and electrical currents. Always ensure the keys are out of the ignition and the car is in park.Disconnect The Battery
To prevent any electrical accidents, disconnect the battery. This simple step can save you from potential shocks or short circuits. Remove the negative cable first to ensure a safe disconnection.Wear Protective Gear
Never underestimate the importance of protective gear. Wearing gloves and safety glasses can protect you from unexpected sparks or debris. It might seem unnecessary, but these items can make a big difference.Use Insulated Tools
Always choose insulated tools when working with electrical parts. This provides an extra layer of protection against electric shocks. If your tools don’t have insulation, consider wrapping them with electrical tape.Stay Grounded
Make sure you have a solid grounding point when working on your car. This prevents static electricity from building up and causing a shock or damaging the sensor. Ground yourself by touching a metal part away from the battery before starting.Avoid Wet Conditions
Moisture and electricity are a dangerous mix. Ensure your working area is dry and clean. If it’s raining or damp outside, consider postponing the task or moving to a covered area.Be Aware Of Surroundings
Keep your working area organized and free from unnecessary clutter. Tripping over a tool or wire while handling a multimeter can lead to accidents. A tidy workspace also helps you focus better on the task at hand.Double-check Connections
Before testing, double-check all connections. Ensure everything is properly secured and connected to the right terminals. This step prevents damage to the sensor or multimeter from incorrect readings. Have you ever thought about how a small oversight can lead to bigger problems? By following these safety precautions, you safeguard not only yourself but also your vehicle components. Keep these tips in mind and proceed with confidence.Locating The Knock Sensor
The knock sensor is typically located on the engine block, near the cylinder head. Testing it with a multimeter involves checking its resistance. Ensure the engine is off and the sensor is disconnected before testing.
Locating the knock sensor in your vehicle might seem like a daunting task, but it’s more straightforward than you think. If you’re ready to roll up your sleeves and dive under the hood, understanding the exact location of the knock sensor is crucial for accurate testing and troubleshooting. Imagine the satisfaction of knowing precisely where to find this small yet vital component. Let’s take a closer look at how you can pinpoint its location with ease.Understanding The Importance Of Locating The Knock Sensor
Knowing the location of the knock sensor is the first step in testing its functionality. This sensor plays a crucial role in detecting engine vibrations and preventing knock, which can damage your engine over time. Finding it means you can test it accurately and ensure your engine runs smoothly. Have you ever wondered why your car might be hesitating or pinging? The knock sensor might be the culprit, and knowing its location could save you a trip to the mechanic.Identifying The General Area
Typically, the knock sensor is located on the engine block or cylinder head. It can be positioned near the intake manifold, making it accessible once you lift the hood. While its exact placement can vary depending on your car’s make and model, most manufacturers place it where it can effectively monitor engine vibrations. Have you noticed any patterns in engine performance? Spotting these can guide you to the sensor’s vicinity.Consulting Your Vehicle’s Manual
Your vehicle’s manual can be a gold mine of information. It often contains diagrams and specific instructions that point you to the knock sensor’s exact location. If you’re unsure, flipping through the manual can provide clarity and prevent unnecessary searching. Have you ever experienced the frustration of looking for something without a map? The manual serves as your navigation tool.Using Online Resources
The internet is a treasure trove of car maintenance tips. Many forums and websites offer detailed guides and illustrations that can help you locate the knock sensor. YouTube videos can also visually demonstrate the process, making it easier to identify the sensor’s location. Have you tried exploring online communities for car enthusiasts? They often share personal tips and tricks that can simplify the task.Seeking Professional Advice
Sometimes, consulting a mechanic can be the most efficient way to find the knock sensor. A professional can offer insights based on experience and ensure you’re looking in the right area. If you’re unsure and prefer not to risk tinkering with your vehicle, a quick consultation can clear up any confusion. Have you considered the peace of mind a professional’s expertise can bring when you’re unsure? By locating the knock sensor with precision, you set the stage for effective testing and maintenance, ensuring your car’s performance stays at its best. Are you ready to take the next step in your car care journey?Preparing The Vehicle
Testing a knock sensor with a multimeter starts with vehicle preparation. This step ensures accuracy in testing and safety while working. Proper preparation helps identify sensor problems effectively.
To begin, gather necessary tools and equipment. A multimeter is essential for accurate testing. Ensure it is in good working condition. Check for fresh batteries and correct settings.
Park the vehicle in a safe, stable location. Flat ground is preferred for stability. Turn off the engine and let it cool. This prevents any risk of burns or injuries.
Next, locate the knock sensor. Refer to the vehicle’s manual for exact location. It is usually on the engine block or cylinder head. Ensure easy access by removing any obstructive components.
Disconnect The Battery
Safety first. Disconnect the vehicle battery. This prevents electrical shocks. It also avoids accidental short circuits during testing.
Use a wrench to remove the negative cable first. This is the black cable. Ensure it does not touch any metal parts. Doing so avoids sparks or shocks.
Gather Necessary Tools
Prepare tools needed for testing. A multimeter is crucial. Have it ready with fresh batteries. Set it to the ohm reading mode.
Other tools may include a wrench, screwdrivers, and the vehicle manual. These assist in accessing the knock sensor.
Locate The Knock Sensor
Find the knock sensor on the engine. It is usually near the intake manifold. The manual provides the exact location. Remove any parts blocking access.
Ensure a clear view of the sensor. It must be easy to reach. This helps in connecting the multimeter leads securely.
Credit: premierautotrade.com.au
Setting Up The Multimeter
Testing a knock sensor with a multimeter is essential for vehicle maintenance. A knock sensor detects engine vibrations and helps optimize performance. Before beginning the test, properly set up your multimeter. This ensures accurate readings and effective results. Follow these steps to prepare your multimeter.
1. Gathering Necessary Tools
Ensure you have a digital multimeter. It should be in good working condition. Gather the vehicle’s manual for reference. A clean workspace is also important.
2. Setting The Multimeter To The Correct Mode
Turn the multimeter on. Set it to measure resistance. This is often marked as Ω on the device. This mode allows you to check the knock sensor’s resistance.
3. Adjusting The Multimeter’s Range
Set the multimeter to a suitable range. Choose a range that covers expected resistance levels. This ensures precise measurements.
4. Ensuring Multimeter Battery Is Sufficient
Check the multimeter’s battery level. A low battery can affect accuracy. Replace it if necessary before testing.
5. Testing Multimeter Functionality
Verify the multimeter’s functionality. Test it on a known resistor. Confirm it provides consistent readings.
By following these steps, your multimeter is ready for testing. Ensuring these settings will help you test the knock sensor accurately.
Testing For Resistance
Testing the resistance of a knock sensor is vital. It ensures your engine runs smoothly. A multimeter helps check this resistance. Before starting, make sure the engine is off. This keeps you safe. You will measure the resistance in ohms. This tells you if the sensor works well.
Interpreting Resistance Readings
Set your multimeter to the ohms setting. Connect its leads to the sensor terminals. Read the value on the multimeter. A low reading might indicate a short circuit. A high reading can mean the sensor is open. Both suggest a faulty sensor. Correct readings are key for engine health.
Common Resistance Values
Most knock sensors have standard resistance values. These typically range from 500 to 1,000 ohms. Check your vehicle’s manual for exact numbers. If your readings fall outside this range, the sensor might be bad. Consistent values indicate a good sensor. Keep these numbers in mind. They help diagnose sensor issues effectively.

Credit: www.youtube.com
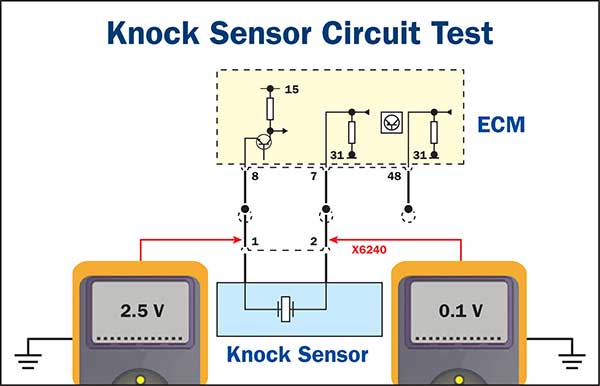
Checking For Voltage Output
Testing a knock sensor with a multimeter involves checking for voltage output. Connect the multimeter to the sensor’s terminals. Observe the readings as the engine runs to ensure proper functionality.
Testing a knock sensor with a multimeter can seem like a daunting task, but understanding how to check for voltage output will make it manageable. Voltage output is a crucial indicator of your knock sensor’s health. If the sensor isn’t generating the expected voltage, it might be time to replace it. With a multimeter, you can easily measure this voltage and ensure your engine is running smoothly.Understanding Voltage Fluctuations
Voltage fluctuations occur naturally as your engine runs and the knock sensor detects vibrations. These fluctuations are vital because they signal the sensor’s responsiveness. If your multimeter shows no voltage change, your knock sensor might be faulty. A steady reading could indicate the sensor isn’t responding to engine knocks. Have you ever noticed your engine hesitating or producing unusual noises? That might be your sensor failing to do its job.Normal Voltage Ranges
Knowing the normal voltage range for your knock sensor can save you time and frustration. Typically, these sensors produce a voltage between 0.1 to 1.5 volts. A reading outside this range suggests an issue. Imagine running a marathon with a sprained ankle; your engine feels the same way with a faulty knock sensor. Regular checks with a multimeter can prevent engine damage and costly repairs. You might wonder why this is important. Proper voltage ensures your engine adjusts timing accurately, preventing damage. Would you trust your car’s performance without knowing these details?Analyzing Results
Analyzing the results after testing a knock sensor with a multimeter can feel like solving a mystery. You’ve done the legwork, and now it’s time to interpret what those numbers mean. This is where your understanding of the sensor’s role in your vehicle comes in handy. Are you ready to decipher the clues?
Understanding Voltage Readings
When you check the voltage, you’re looking for consistency. A stable reading suggests the sensor is functioning well. However, fluctuating numbers could indicate a problem. It’s like listening to a song where the melody keeps changing unexpectedly.
Consider your vehicle’s manual for voltage specifications. This ensures your comparisons are accurate. Remember, a reading outside the range isn’t just a number; it could mean trouble.
Interpreting Resistance Values
Resistance tells you how much the sensor is resisting electrical flow. Think of it like a gatekeeper controlling traffic. If the resistance is too high or too low, your sensor might not be doing its job.
Compare your readings with the manufacturer’s specs. This is crucial for deciding the sensor’s health. An unusual resistance could mean a faulty sensor that’s affecting your engine’s performance.
Identifying Patterns
Patterns in your readings could reveal more than isolated numbers. Are the readings steadily increasing, or do they drop suddenly? These changes can be telling.
Use a notebook to track readings over time. This helps in spotting trends that might otherwise go unnoticed. Such insights can save you from unexpected repairs.
Knowing When To Replace
At what point do you decide it’s time for a new sensor? If your readings consistently stray from the norm, replacement might be necessary. Trust your instincts and knowledge.
Consider how your car is running. If you’re noticing performance issues alongside odd readings, it’s time to take action. After all, your car’s health depends on timely decisions.
So, what have your readings revealed? Are you prepared to act based on these insights? Share your experiences and learn from others who have faced similar challenges. Remember, the road to vehicle maintenance is paved with knowledge and timely action.
Troubleshooting Common Issues
Testing a knock sensor with a multimeter can reveal several issues. Identifying these problems early helps maintain engine performance. This section focuses on common issues and how to troubleshoot them.
Dealing With False Readings
False readings can occur due to electrical interference. Ensure all connections are tight and secure. Loose wires can lead to inaccurate measurements. Check for corrosion on connectors. Corrosion disrupts signal flow.
Use a clean multimeter. Dirt can affect reading accuracy. Keep the multimeter away from strong magnetic fields. These fields can distort the readings. Always test in a stable environment. Rapid temperature changes can impact readings.
Handling Sensor Malfunctions
Sensor malfunctions can cause erratic engine behavior. First, inspect the sensor for physical damage. Cracks or breaks can impair function. Check the wiring harness for damage. Frayed wires can lead to sensor failure.
Test the sensor’s voltage output. A steady output indicates proper function. An inconsistent output may suggest a malfunction. Use the multimeter to confirm these readings. Consider replacing the sensor if problems persist.
Regular maintenance helps prevent sensor issues. Clean the sensor and connections periodically. Keep the engine area free of debris. Proper care ensures reliable sensor performance.
When To Replace The Knock Sensor
Testing a knock sensor with a multimeter helps identify issues. Replace it when readings are outside normal range, indicating malfunction. Proper functioning ensures engine efficiency and prevents damage.
Understanding when to replace the knock sensor in your vehicle is crucial for maintaining optimal engine performance. A malfunctioning knock sensor can lead to poor fuel efficiency and even engine damage over time. Knowing the signs of a failing knock sensor can save you from costly repairs and ensure your vehicle runs smoothly.What Is A Knock Sensor?
A knock sensor detects engine vibrations caused by abnormal combustion, known as knocking or pinging. These vibrations can damage the engine if not addressed. The sensor sends signals to the engine control unit (ECU) to adjust the timing, preventing damage.Signs Your Knock Sensor Needs Replacement
One clear sign of a failing knock sensor is a check engine light on your dashboard. If this light appears, it’s wise to check the sensor. You might also notice a decrease in engine performance or unusual noises, indicating that the sensor isn’t functioning properly.Impact On Fuel Efficiency
A defective knock sensor can negatively affect fuel efficiency. Without accurate readings, your engine may run inefficiently, leading to increased fuel consumption. Monitoring your fuel usage can help you identify if the knock sensor is failing.Personal Experience With Knock Sensor Replacement
I once ignored the check engine light, thinking it was a minor issue. However, this led to a significant drop in fuel efficiency and engine power. Replacing the knock sensor resolved these issues, proving the importance of addressing the warning signs early.When Should You Replace The Knock Sensor?
Consider replacing the sensor if you experience poor engine performance, decreased fuel efficiency, or unusual engine sounds. Don’t wait for complete sensor failure. Regular maintenance checks can help catch issues early.Consequences Of Ignoring A Faulty Knock Sensor
Ignoring a faulty sensor can result in severe engine damage over time. The engine may suffer from prolonged knocking, leading to expensive repairs. Addressing the problem early can prevent further complications and save you money.Diy Replacement Vs. Professional Help
Replacing a knock sensor can be a DIY project if you’re comfortable working on your vehicle. However, if you’re unsure, seeking professional help ensures the job is done correctly. A professional can also check for other related issues. Recognizing when to replace your knock sensor is a key part of vehicle maintenance. Pay attention to the signs and take action to keep your engine running efficiently. Have you ever experienced issues with a knock sensor? How did you resolve it? Your experiences can offer valuable insights to fellow readers.
Credit: www.facebook.com
Frequently Asked Questions
How Many Ohms Should A Knock Sensor Have?
A knock sensor typically measures between 1,000 to 4,000 ohms. Check your vehicle’s manual for specific details. Ensure proper functioning by testing with a multimeter. Regular maintenance can prevent engine issues and enhance performance. Always consult a professional mechanic for accurate diagnostics and repairs.
How Do You Diagnose A Bad Knock Sensor?
Diagnose a bad knock sensor by scanning for error codes using an OBD-II scanner. Listen for unusual engine noises. Check for poor acceleration or decreased fuel efficiency. Inspect the sensor and wiring for damage. Replace the sensor if necessary to restore optimal engine performance.
How To Check If A Sensor Is Bad With A Multimeter?
To check a sensor with a multimeter, set it to the resistance or voltage mode. Connect the probes to the sensor terminals. Compare the reading to the sensor’s specified range. A reading outside this range indicates a faulty sensor. Always ensure the multimeter and sensor specifications match.
What Is The Voltage Signal Of A Knock Sensor?
A knock sensor typically produces a voltage signal ranging from 0. 5 to 5 volts. This signal varies based on engine vibrations and helps the engine control module detect knocking. Proper functioning is crucial for optimal engine performance and efficiency.
Conclusion
Testing a knock sensor with a multimeter is straightforward. Follow the steps carefully. Ensure safety first by disconnecting the battery. Use your multimeter to check resistance. Compare your readings with the manufacturer’s specifications. A faulty sensor affects engine performance. Regular checks help maintain engine health.
Address issues early to avoid costly repairs. Keep your vehicle running smoothly with routine maintenance. Remember, a little effort saves time and money. Happy testing and safe driving!


