
Are you experiencing issues with your vehicle’s ABS system? If your dashboard is lighting up with warnings, a faulty wheel speed sensor could be the culprit.
But don’t worry, diagnosing this problem doesn’t require a mechanic or expensive tools. With a simple multimeter, you can test your wheel speed sensor right at home. Imagine the satisfaction of solving the problem yourself and saving money in the process.
In this guide, we’ll walk you through the steps to easily and accurately test your wheel speed sensor using a multimeter. Ready to put your DIY skills to the test and get your vehicle back in top shape? Let’s dive in!
Credit: parts.olathetoyota.com
Tools Required
Testing a wheel speed sensor with a multimeter is essential. It helps ensure your vehicle’s safety and performance. Before you start, gather the right tools. This ensures an accurate and smooth testing process. The tools required are simple yet crucial.
1. Multimeter
A multimeter is the primary tool for this task. It measures voltage, resistance, and continuity. Choose a digital multimeter for accurate readings. Ensure it’s in good working condition.
2. Jack And Jack Stands
You’ll need a jack to lift your vehicle. Jack stands provide stability and safety. Always use them to prevent accidents. Place them under solid parts of the vehicle frame.
3. Wheel Chocks
Wheel chocks are essential for safety. They prevent the vehicle from moving. Use them on the wheels opposite to the ones you’re lifting. Safety first!
4. Safety Gloves
Protect your hands with safety gloves. They provide grip and prevent injuries. Choose a pair that fits well and offers good dexterity.
5. Screwdriver Set
A screwdriver set helps in removing the wheel. It’s essential for accessing the sensor. Choose a set with various sizes for versatility.
6. User Manual
Keep your vehicle’s user manual handy. It provides specific details about the wheel speed sensor. Use it to locate and identify the sensor correctly.
With these tools, you’re ready to test the wheel speed sensor. Proceed with caution and follow instructions carefully.
Safety Precautions
Testing a wheel speed sensor with a multimeter requires careful attention to safety. It’s important to follow specific precautions to prevent harm. Incorrect handling can lead to accidents or equipment damage. Always prepare and follow guidelines for a secure experience.
Ensure A Stable Work Area
Find a flat surface to work on. Stability prevents falls and equipment accidents. Avoid working in crowded or cluttered spaces. A clear area reduces tripping hazards.
Wear Protective Gear
Always wear safety goggles. Protect your eyes from debris or sparks. Use gloves for hand safety. Rubber gloves minimize electric shock risks.
Disconnect The Battery
Turn off the vehicle’s ignition. Disconnect the battery to avoid electrical accidents. Removing the negative terminal is crucial. This step prevents electrical currents from flowing.
Use Insulated Tools
Choose tools with insulated handles. They prevent electrical shock. Insulation provides a barrier between you and live wires. Check tools for damage before use.
Follow Multimeter Instructions
Read the multimeter manual. Understand its functions and settings. Misuse can lead to incorrect readings or equipment damage. Set the multimeter correctly before testing.
Check For Loose Clothing
Avoid wearing loose clothes. They can catch in machinery. Ensure sleeves and ties are secure. This reduces the risk of getting tangled.
Maintain A Safe Distance
Stand away from moving parts. Keep a safe distance from the wheels. This prevents injuries from sudden movements. Always be aware of your surroundings.
Locating The Wheel Speed Sensor
Discovering the location of the wheel speed sensor is crucial before testing it. Typically, these sensors are mounted on the wheel hub or near the brake rotor. Identifying the sensor aids in ensuring accurate readings with a multimeter.
Locating the wheel speed sensor in your vehicle is a crucial first step before testing it with a multimeter. The wheel speed sensor, often part of the ABS system, helps monitor the speed of your wheels to ensure safe braking. Knowing where to find this component can save you time and effort, ensuring a more efficient testing process.Understanding Your Vehicle’s Layout
Begin by consulting your vehicle’s manual. It provides specific information about your car model and can guide you in locating the wheel speed sensor. Typically, these sensors are positioned near the brake rotors or wheel hubs.Front Vs. Rear Wheel Sensors
Different vehicles may have sensors on both front and rear wheels. In many models, the front wheel sensors are easily accessible through the wheel well. Rear wheel sensors might require a bit more work, possibly involving lifting the vehicle.Visual Identification
Look for a small cylindrical component connected by a wire harness near each wheel. The sensor might be covered with dirt or brake dust, so a flashlight and a little cleaning might be necessary to clearly see it.Using Personal Experience For Identification
I recall the first time I tried locating a wheel speed sensor, I was puzzled by the array of components near the wheel. After a bit of research and a peek at my manual, I found it right behind the brake rotor. The sense of accomplishment was quite rewarding!Common Tools Required
Ensure you have a jack, jack stands, and basic hand tools. These will help you safely lift the vehicle and remove the wheel if needed. A clean rag can also be handy to wipe off any grime obscuring the sensor.Ensuring Safety First
Before you start, ensure your vehicle is parked on a flat surface. Use the parking brake and wheel chocks for added stability. Safety should always be your top priority when working on your vehicle. Understanding how to locate the wheel speed sensor can make the testing process smoother and more effective. Have you had any surprises when looking for car components? Share your stories and tips in the comments!Preparing The Multimeter
Ensure your multimeter is ready by selecting the correct setting. Check the battery power. Attach the leads securely.
Testing a wheel speed sensor with a multimeter might sound daunting, but it’s simpler than you think. The first step is preparing the multimeter. This is crucial because an inaccurate setup can lead to faulty readings, which might have you second-guessing your sensor’s health. It’s like setting the stage for a play; you want everything in place before the performance begins. I once spent an hour troubleshooting a sensor, only to find my multimeter was incorrectly set. Let’s make sure you don’t fall into the same trap.Setting The Multimeter
Start by ensuring your multimeter is in good working condition. Check the battery, as a low battery can give inaccurate results. Set the multimeter to the appropriate measurement type, which is usually resistance (Ω) for a wheel speed sensor. Use the selector knob to choose the resistance setting. If your multimeter is digital, it might automatically set to the right range. Always ensure the multimeter probes are clean and in good condition, as dirty probes can skew your readings.Understanding Multimeter Readings
Reading a multimeter doesn’t require a degree in electrical engineering. It’s all about knowing what numbers you should expect. Typically, a functioning wheel speed sensor will show a resistance reading between 1,000 and 2,500 ohms. If your reading is outside this range, your sensor might be faulty. But what if the reading fluctuates wildly? That could indicate a problem with the wiring or the sensor itself. Ask yourself, what do your readings tell you about your sensor’s health? If you’re unsure, compare them with your car’s service manual. This small step can save you from unnecessary replacements. Remember, understanding your multimeter’s readings is like reading the pulse of your car’s wheel speed sensor. Get it right, and you can prevent bigger issues down the road.Testing The Sensor
When your car’s ABS light flickers on, it might be time to test your wheel speed sensor. This small yet crucial component helps your car’s system monitor wheel speed, ensuring smooth and safe braking. Testing the sensor with a multimeter can seem daunting, but it’s a skill every car owner should have. Knowing how to do this not only saves you money but also empowers you with a deeper understanding of your vehicle. Imagine being able to pinpoint issues without immediately rushing to a mechanic. Wouldn’t that give you a sense of control and confidence?
Performing A Voltage Test
The first step in testing your wheel speed sensor is performing a voltage test. Start by turning on your multimeter and setting it to DC voltage mode. Connect the multimeter probes to the sensor’s terminals. When you spin the wheel, you should see a voltage reading. This reading indicates the sensor is transmitting signals to the ABS system.
If there’s no voltage, it might be a sign of a faulty sensor. Make sure your connections are secure and try again. A voltage reading verifies the sensor’s ability to generate signals, crucial for the ABS system to function. It’s like checking if your phone has enough battery to make a call.
Conducting A Resistance Test
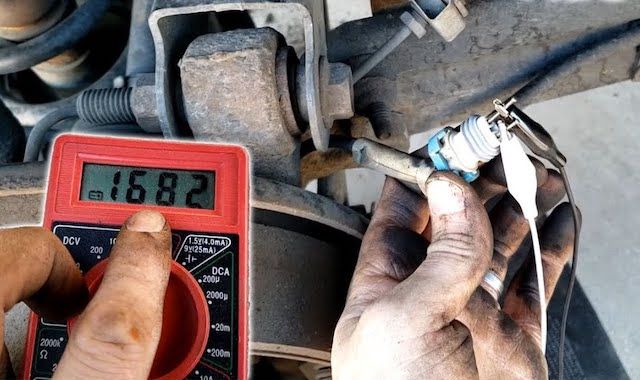
Next, you will conduct a resistance test to ensure the sensor’s coil is intact. Set your multimeter to the ohm setting. Disconnect the sensor from the vehicle and attach the multimeter probes to the sensor terminals. A typical reading should fall within the manufacturer’s specified range, often between 1,000 to 2,000 ohms.
If the reading is significantly higher or lower, the sensor might be damaged. Think of it as checking if a wire is broken internally. A proper resistance test confirms the sensor’s internal integrity. It’s a simple yet effective method to detect hidden issues.
Testing your wheel speed sensor with a multimeter isn’t rocket science. It’s a straightforward process that can give you peace of mind. What other simple car checks can you do yourself to save time and money?
Analyzing Test Results
Testing a wheel speed sensor with a multimeter involves checking for resistance and voltage. Start by setting the multimeter to measure resistance, then connect it to the sensor’s terminals. Observe readings to identify any faults or irregularities in sensor performance.
Testing a wheel speed sensor with a multimeter is a practical skill every car owner should know. Once you’ve completed your tests, the next crucial step is to analyze the results. Knowing what your multimeter is telling you can make all the difference in diagnosing and fixing potential issues. Let’s dive into how you can interpret those readings effectively.Interpreting Voltage Readings
Voltage readings can reveal a lot about your wheel speed sensor’s health. A typical sensor should produce a voltage of around 0.5 to 1.2 volts when the wheel is rotating. If your reading falls outside this range, there might be an issue. Think of voltage as the sensor’s voice. If it’s whispering or yelling, something’s off. When I first tested my car’s sensor, a low voltage reading hinted at a dirty sensor. A quick clean solved the problem instantly. Do your readings fluctuate wildly? This could indicate a wiring issue. Make sure to check all connections for corrosion or loose wires. A consistent reading is your goal.Evaluating Resistance Values
Resistance values can point you to hidden problems. Most wheel speed sensors should have a resistance of about 1,000 to 2,500 ohms. A reading far from this range could signal a faulty sensor. Your multimeter’s resistance setting can unearth clues about the sensor’s internal state. High resistance might indicate a broken wire within the sensor. In my experience, a resistance reading that was too low led me to discover a short circuit. Has your sensor stopped responding entirely? No reading at all could mean the sensor is dead. Before replacing it, double-check your multimeter settings and connections. You wouldn’t want to replace a perfectly good sensor due to a simple oversight. Analyzing these results is like detective work. Each reading tells a story. Your job is to piece together these clues to ensure your vehicle runs smoothly. Can you think of a time when understanding your car’s quirks saved you from a costly repair? Share your thoughts in the comments!Troubleshooting Common Issues
Testing a wheel speed sensor with a multimeter can reveal many issues. Sometimes, the process doesn’t go as planned. Understanding common problems helps avoid frustration. This section covers frequent challenges users face during testing. Follow these insights to troubleshoot effectively.
Sensor Malfunction
Wheel speed sensors can fail or give incorrect readings. Dirt or debris often blocks the sensor. Check the sensor for visible damage or wear. A faulty connection might also cause issues. Ensure all wires and connectors are secure. If problems persist, the sensor might need replacement.
Multimeter Errors
Incorrect multimeter settings lead to inaccurate results. Set your multimeter to the correct range. Ensure the probes are in the right ports. Sometimes, the multimeter itself might be faulty. Test another known working sensor to confirm your multimeter’s accuracy. Always use a multimeter with fresh batteries.
Credit: www.brakeandfrontend.com
Replacing A Faulty Sensor
Replacing a faulty wheel speed sensor can restore your vehicle’s performance. A faulty sensor affects the anti-lock braking system and traction control. Testing with a multimeter helps identify the issue. Once diagnosed, replacing the sensor ensures safety and smooth operation.
Gathering Necessary Tools
You need a new sensor and basic tools for replacement. A socket wrench and screwdriver are essential. Ensure you have the right sensor model for your vehicle.
Locating The Sensor
Wheel speed sensors are near the wheel hub. Check your vehicle manual for exact locations. Front and rear sensors may differ.
Removing The Faulty Sensor
Loosen the wheel lug nuts before jacking up the car. Remove the wheel to access the sensor. Disconnect the sensor’s electrical connector.
Installing The New Sensor
Place the new sensor in the old one’s position. Secure it with screws or bolts. Reconnect the electrical connector firmly.
Testing The New Sensor
Lower the car and reattach the wheel. Test drive the vehicle to ensure proper sensor function. Check for error lights on the dashboard.
Maintenance Tips
Regular maintenance of your wheel speed sensor can prevent costly repairs. Testing it with a multimeter is essential for car safety and efficiency. Knowing how to maintain this sensor ensures your vehicle performs optimally.
Understanding The Wheel Speed Sensor
The wheel speed sensor monitors the speed of your vehicle’s wheels. It sends information to the car’s computer system. If it malfunctions, you may experience erratic braking or ABS light alerts.
Inspecting The Sensor
Check for physical damage or dirt on the sensor. Clean it using a soft cloth. A clean sensor operates more efficiently and provides accurate readings.
Using The Multimeter
Set the multimeter to the resistance setting. Connect the multimeter probes to the sensor wires. The reading should be within the manufacturer’s specified range.
Checking Connections
Ensure the sensor wires are securely connected. Loose connections can cause inaccurate readings or sensor failure. Tighten any loose connections to maintain sensor functionality.
Regular Testing
Test the sensor at least once a month. Regular testing helps identify issues early. Early detection prevents larger problems and saves on repair costs.

Credit: www.youtube.com
Frequently Asked Questions
How Many Ohms Should A Wheel Speed Sensor Read?
A wheel speed sensor typically reads between 1,000 to 1,500 ohms. Always consult your vehicle’s manual for specifics.
How Do You Test A Wheel Speed Sensor With A Multimeter?
Set the multimeter to the resistance (ohms) setting. Disconnect the wheel speed sensor. Connect the multimeter probes to the sensor terminals. A typical reading ranges from 1,000 to 2,500 ohms. Check the vehicle manual for specific values. Replace the sensor if the reading is outside the range.
How Can I Tell If A Wheel Speed Sensor Is Bad?
A bad wheel speed sensor often triggers the ABS light on your dashboard. You may notice erratic braking or loss of traction control. A diagnostic scan can confirm sensor issues. Check for physical damage or corrosion on the sensor and wiring.
Regular inspections help prevent sensor failure.
How To Check Rpm Sensor With Multimeter?
Set the multimeter to AC voltage. Connect the probes to the sensor terminals. Spin the wheel or shaft. A fluctuating reading indicates a functioning RPM sensor.
Conclusion
Testing a wheel speed sensor with a multimeter is straightforward. Just follow the steps carefully. Ensure your multimeter is set correctly. Check the sensor’s resistance and voltage. Compare the readings to your vehicle’s specifications. Replace the sensor if readings are off.
Regular checks can prevent bigger issues. Don’t ignore warning signs from your ABS system. Understanding these basics helps maintain your car’s safety. Always handle your tools with care. Stay safe and informed. Your vehicle relies on good maintenance. Keep learning and practicing.
Your efforts will pay off in the long run.


