
Are you experiencing engine problems and suspect your crankshaft sensor might be the culprit? Before you rush to a mechanic or spend money on a new sensor, there’s a simple way to diagnose the issue yourself.
With just a multimeter and a bit of guidance, you can determine whether your crankshaft sensor is working properly or needs replacing. In this guide, you’ll learn step-by-step how to test a crankshaft sensor with a multimeter. This easy-to-follow process not only saves you time and money but also empowers you with valuable DIY skills.
Ready to get started? Let’s dive into the details and put your car trouble worries to rest.

Credit: m.youtube.com
Understanding The Crankshaft Sensor
Understanding the crankshaft sensor is crucial for those interested in engine diagnostics. This small device plays a vital role in the functionality of a vehicle’s engine. It provides essential data about the crankshaft’s position and speed. Without it, the engine may struggle to run smoothly.
Role In Engine Performance
The crankshaft sensor is key to engine performance. It helps the engine control unit (ECU) determine the position of the crankshaft. Knowing this position allows the ECU to adjust fuel injection and ignition timing. Accurate timing ensures efficient engine operation and optimal power output.
If the sensor fails, the engine may misfire or stall. This can lead to poor fuel efficiency and increased emissions. Regular testing of the sensor can prevent these issues and maintain engine health.
Types Of Crankshaft Sensors
Crankshaft sensors come in various types. The most common are inductive, Hall effect, and magneto resistive sensors. Each type has unique features and functions.
Inductive sensors use magnetic fields to detect crankshaft position. They are reliable but may require precise alignment. Hall effect sensors use a magnetic field and a Hall element to sense position changes. They provide accurate readings and are less sensitive to misalignment.
Magneto resistive sensors use changes in resistance to measure position. They offer high precision and are suitable for harsh conditions. Understanding these types helps in selecting the right sensor for your vehicle.
Credit: rfidunion.com
Signs Of A Faulty Crankshaft Sensor
The crankshaft sensor is a critical component in your vehicle. It monitors the position and speed of the crankshaft. A faulty sensor can affect engine performance and efficiency. Recognizing the signs of a failing crankshaft sensor can save time and money.
Engine Misfires
A faulty crankshaft sensor may cause engine misfires. Misfires occur when the fuel-air mixture is not ignited correctly. This can lead to rough idling or stalling. Check if your engine misfires frequently. This could be a sign of sensor issues.
Poor Fuel Economy
Notice a drop in fuel efficiency? A malfunctioning sensor can send incorrect data to the ECU. This leads to improper fuel injection timing. As a result, your engine burns more fuel than necessary. Keep an eye on your vehicle’s fuel consumption.
Starting Problems
Having trouble starting your car? A defective crankshaft sensor might be the cause. The sensor helps the engine start by providing essential data. Without accurate data, your engine may struggle to start. Frequent starting problems should not be ignored.
Tools Required For Testing
Testing a crankshaft sensor is crucial for vehicle maintenance. The sensor affects engine performance. A multimeter helps to check it efficiently. Using the right tools ensures safety and accuracy. Below, find essential tools for the task.
Choosing The Right Multimeter
Select a digital multimeter for precise readings. It measures voltage, resistance, and current. Ensure it can read AC and DC voltages. A manual ranging multimeter works well. Auto-ranging ones are easier for beginners. Check for a continuity test feature too.
Safety Gear And Precautions
Safety first. Wear insulated gloves to prevent electric shocks. Use protective eyewear. Ensure the car is off before testing. Work in a well-lit area for visibility. Avoid loose clothing near engine parts.
Always follow safety instructions on the multimeter. Double-check connections before testing. Keep a fire extinguisher nearby for emergencies. Stay alert and focused during testing.
Preparing For The Test
Testing the crankshaft sensor with a multimeter requires precision. First, gather your multimeter and ensure it’s calibrated correctly. Next, locate the sensor on your vehicle and measure its resistance according to the vehicle’s manual.
Testing your crankshaft sensor with a multimeter might sound technical, but with the right preparation, it’s a straightforward task. Before you begin, ensuring everything is set up correctly is crucial for both safety and accuracy. This preparation phase is not just a step; it’s a foundation for success. Let’s dive into the essentials you need to address before testing.Locating The Sensor
First things first—find the crankshaft sensor. This might take a bit of detective work, depending on your vehicle model. Generally, it’s located near the engine’s bottom or around the transmission bell housing. Check your vehicle’s manual for a detailed diagram. It can save you time and frustration. Once you spot it, ensure you have easy access for testing.Disconnecting The Battery
Safety should always be your top priority. Disconnecting the battery prevents any accidental shorts or electrical shocks. Locate the battery and use a wrench to loosen the negative terminal. Remove the terminal and set it aside, ensuring it doesn’t accidentally touch the battery again. This simple step can protect you and your car’s electronics. Have you ever skipped a step in a process only to regret it later? Taking the time to prepare thoroughly will make the rest of the task much smoother. Plus, knowing you’ve done everything safely adds peace of mind. Preparation might seem tedious, but it’s the backbone of a successful test. Are you ready to move on to the actual testing now that your groundwork is solid?Testing The Sensor With A Multimeter
Testing a crankshaft sensor with a multimeter is a straightforward process, but a few key steps will ensure you get accurate results. Understanding how to properly set up your multimeter and interpret its readings can save you time and money on unnecessary repairs. Whether you’re a seasoned mechanic or a DIY enthusiast, knowing how to test your crankshaft sensor can help you troubleshoot engine problems effectively. Let’s dive into how you can perform this test with confidence.
Setting Up The Multimeter
First, make sure your multimeter is set to the correct mode. You should set it to measure resistance, denoted by the ohm symbol (Ω). Adjust the range if your multimeter has a manual setting, aiming for a range that covers the expected resistance of the sensor.
Next, ensure the multimeter probes are securely attached. You don’t want loose connections as they can lead to inaccurate readings. Check if your multimeter has fresh batteries to avoid power issues mid-test.
Have you ever found yourself frustrated by a failing sensor, only to realize the issue was with the multimeter setup? Double-check your settings to avoid this common pitfall.
Conducting The Resistance Test
With the multimeter set up, it’s time to test the sensor. Disconnect the crankshaft sensor from the engine to isolate it. This prevents interference from other components.
Place one probe on the sensor’s terminal and the other on the sensor’s ground. You should get a steady reading. If the multimeter shows infinite resistance, this indicates a problem with the sensor.
Think about this: a simple probe placement can distinguish between a sensor replacement and a minor engine tweak. Precision is key.
Interpreting The Readings
Now, it’s about understanding what your multimeter is telling you. A typical crankshaft sensor should show a specific resistance range, often stated in your vehicle’s manual.
If the resistance is outside this range, it suggests the sensor is faulty. However, a reading within the expected range doesn’t always mean the sensor is perfect—it might still require a check under different conditions.
Have you ever wondered why some sensors fail under specific conditions? Consider testing under varying temperatures to see if readings change. Your multimeter is more than just a tool; it’s a window into your engine’s health.
By following these steps, you can pinpoint issues quickly and efficiently. This empowers you to make informed decisions about repairs and maintenance. So, what’s stopping you from testing your crankshaft sensor today?
Troubleshooting And Next Steps
Testing a crankshaft sensor with a multimeter helps diagnose engine issues. If problems persist after testing, follow specific troubleshooting steps. Knowing the next steps ensures your vehicle runs smoothly.
Repair Or Replace The Sensor
If the sensor shows faulty readings, it might need repair. Some sensors have simple issues like loose connections. Tighten the connections and test again. If the sensor still fails, replacement is often necessary. New sensors ensure accurate engine performance. Always choose high-quality parts for replacements.
Consulting A Professional
Sometimes, the sensor issue might be complex. In such cases, consulting a mechanic is wise. Professionals have tools to diagnose issues accurately. They can also advise if other engine parts need attention. Their expertise saves time and prevents further damage. Seek professional help if unsure about the sensor’s condition.
Preventive Measures
Testing the crankshaft sensor with a multimeter helps prevent engine troubles. Start by locating the sensor and disconnecting it. Use the multimeter to measure the sensor’s resistance, ensuring it falls within the specified range for optimal performance.
Testing a crankshaft sensor with a multimeter can seem like a daunting task, but taking preventive measures can simplify the process and prolong the life of your vehicle’s components. You wouldn’t want to be stranded on the side of the road due to a faulty sensor, would you? By adopting a few simple habits, you can ensure your crankshaft sensor remains in top condition, reducing the risk of unexpected failures and costly repairs.Regular Maintenance Checks
Regular maintenance checks are the backbone of any effective preventive strategy. Performing these checks allows you to catch potential issues before they escalate into major problems. For instance, routinely inspecting the sensor’s wiring can reveal signs of wear or corrosion. Make it a habit to visually inspect the sensor during your regular vehicle maintenance. Look for loose connections or any visible damage. You might not be a professional mechanic, but a quick glance can sometimes tell you more than you think. Engaging in regular maintenance can also help you become more familiar with your vehicle. This familiarity can empower you to recognize when something isn’t right, long before it becomes a serious issue.Ensuring Proper Installation
Proper installation of the crankshaft sensor is crucial in preventing future malfunctions. If the sensor is installed incorrectly, it may lead to inaccurate readings or even damage the sensor itself. This could create more trouble than you bargained for, especially if you’re not aware of it. Ensure that the sensor is secured tightly in its position and that the wiring harness is properly connected. A loose connection can lead to erratic performance, which might be challenging to diagnose later on. Have you ever installed something and later realized a small misstep caused bigger issues? Double-check your work. Taking a few extra minutes to confirm everything is in place can save you hours of troubleshooting down the road. Incorporating these preventive measures into your routine can make a world of difference. It’s not just about keeping your car running smoothly, but also about giving you peace of mind. So, what steps will you take today to ensure your crankshaft sensor is in the best possible condition?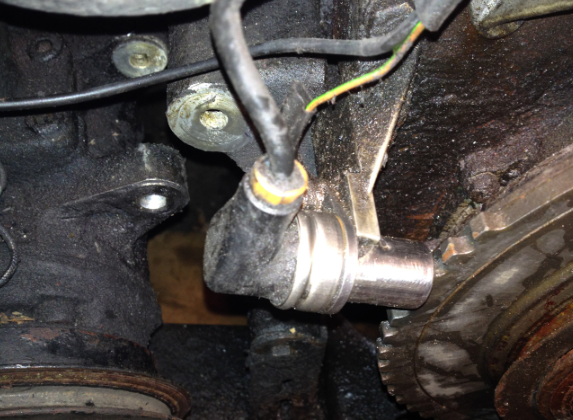
Credit: www.nevsemi.com
Frequently Asked Questions
How Do You Test A Crank Sensor With A Multimeter?
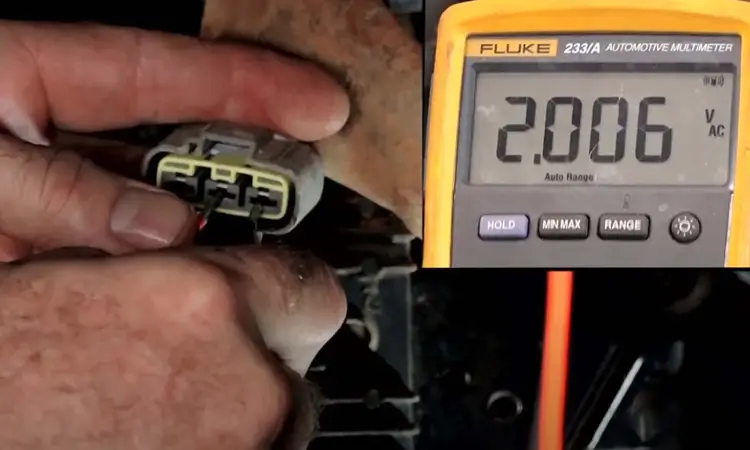
Set the multimeter to AC voltage. Connect the probes to the sensor terminals. Start the engine and check for voltage fluctuations. A reading between 0. 2 to 2 volts AC indicates a functioning crank sensor. Replace the sensor if there’s no voltage or inconsistent readings.
How Many Ohms Should A Crank Sensor Have?
A crank sensor typically measures between 200 to 1,200 ohms. Check your vehicle’s manual for specifics. Regular maintenance ensures accurate readings.
How To Check If A Crankshaft Position Sensor Is Bad?
Check for engine misfires, stalling, or difficulty starting. Inspect for faulty wiring or poor connections. Use an OBD scanner to detect error codes. Listen for unusual noises. Replace the sensor if issues persist.
How To Test A Sensor With A Multimeter?
Set your multimeter to the appropriate setting (usually Ohms). Connect the probes to the sensor’s terminals. Check the resistance value against the sensor’s specifications. Ensure it matches the expected range. This indicates the sensor is functioning correctly. If not, the sensor might be faulty.
Conclusion
Testing a crankshaft sensor with a multimeter is straightforward. Start with safety. Disconnect the battery first. Then, check the sensor’s resistance. Compare readings to the manufacturer’s specifications. If the readings differ, the sensor might be faulty. Ensure all connections are clean and secure.
Proper testing helps diagnose engine issues early. Avoid unnecessary replacements. Save time and money. With these steps, you can confidently check the sensor. Maintain your vehicle’s performance. Keep your engine running smoothly. Regular checks can prevent future problems. Always follow your vehicle’s manual for best practices.
Happy testing!


