
Are you curious about the health of your deep cycle battery? It’s essential to know how well your battery is performing, whether you’re powering up your RV, boat, or solar energy system.
Testing your battery with a multimeter is a straightforward process that can save you time and money. By understanding how to do it yourself, you can prevent unexpected breakdowns and extend the lifespan of your battery. Imagine the peace of mind that comes with knowing your battery is reliable and ready for your next adventure.
In this guide, you’ll learn step-by-step how to use a multimeter to test your deep cycle battery, ensuring you get accurate results every time. Dive in to discover how easy it is to become a battery testing pro!

Credit: goldenmateenergy.com
Tools Needed
Testing a deep cycle battery with a multimeter requires a few essential tools. A reliable multimeter, safety gloves, and protective eyewear ensure accurate and safe measurements. These tools help in checking the battery’s voltage and health efficiently.
Testing a deep cycle battery with a multimeter is a straightforward task, but having the right tools at your disposal is crucial. The tools you choose can make the difference between a successful test and an afternoon of frustration. Imagine finally getting ready to test only to realize you’re missing something essential. Let’s break down exactly what you need to ensure your testing goes smoothly.1. Multimeter
The star of the show is undoubtedly the multimeter. This device measures voltage, current, and resistance, helping you understand your battery’s health. Make sure your multimeter is digital for more accurate readings. It’s also wise to check that it can measure up to at least 20 volts to cover the typical range of deep cycle batteries.2. Safety Gear
Safety should never be an afterthought. Ensure you have a good pair of rubber gloves and safety goggles. Batteries contain acids that can be dangerous if they leak. Protecting yourself while working with them is non-negotiable. It’s easy to overlook this until you experience a minor mishap.3. Battery Terminals Cleaning Tool
A clean connection is key to obtaining accurate readings. A battery terminals cleaning tool, such as a wire brush, helps remove any corrosion or buildup. You might be tempted to skip this step, but dirty terminals can lead to false readings. A little prep work goes a long way.4. Notebook And Pen
Recording your readings allows you to track the battery’s performance over time. This can be crucial for identifying trends or patterns in battery health. Note down each reading and the date for future reference. It’s surprising how quickly you forget details without writing them down.5. Load Tester (optional)
While not strictly necessary, a load tester can provide additional insights. It simulates the battery’s operation under load, revealing its true capacity. If you’re serious about battery maintenance, this might be a worthwhile investment. It’s not essential, but it can be a game-changer if you frequently work with batteries. Do you have all these tools ready? Each one plays a role in ensuring your testing process is smooth and informative. By organizing your toolkit in advance, you set yourself up for success.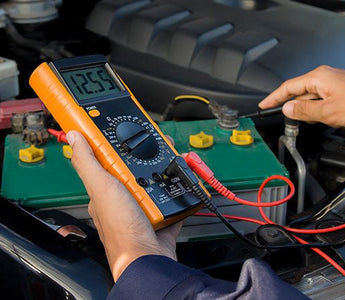
Credit: goldenmateenergy.com
Safety Precautions
Ensure the multimeter is set to the correct mode and range for testing. Wear protective gloves and goggles to prevent accidents. Keep metal objects away to avoid short circuits while connecting the multimeter to the battery terminals.
Testing a deep cycle battery with a multimeter is not just about understanding the technicalities but also ensuring your safety. Batteries carry electrical charges that can be dangerous if mishandled. Taking safety precautions seriously can prevent accidents and ensure accurate readings.Wear Protective Gear
Before you start, put on safety goggles and gloves. This isn’t just a suggestion—it’s a must. Batteries can leak acid, which is harmful to your skin and eyes. Imagine working on a car battery without gloves, only to find your skin itching due to acid exposure. Not fun.Check The Area
Ensure your work environment is dry and clean. Water and electricity are a risky combination. Keep the area free from clutter to avoid any accidental slips or falls. If you have kids or pets, make sure they’re not nearby while you’re testing the battery. This isn’t just for your safety but theirs too.Use The Correct Multimeter Settings
Set your multimeter to the correct voltage setting. Using the wrong setting can not only give incorrect readings but also damage your multimeter. Remember the time you used a multimeter on a wrong setting and heard a loud pop? It’s a lesson learned the hard way.Ensure Battery Is Off
Make sure the battery is disconnected from any power source. Testing a live battery can result in electric shock or short-circuit. You wouldn’t want to startle yourself with a sudden spark, right?Keep Metal Objects Away
Remove any jewelry or metal items from your hands. Metal can conduct electricity and cause a short circuit. It’s easy to overlook this when you’re excited to test your battery, but a small oversight can lead to big problems. Consider this: Are there any safety measures you often overlook when working with electrical equipment? Being mindful of these precautions not only protects you but also enhances your confidence in handling batteries efficiently.Battery Preparation
Preparing your deep cycle battery is crucial before testing it with a multimeter. Proper preparation ensures accurate readings and extends the battery’s life. Follow these steps to get your battery ready for testing.
Cleaning Terminals
Start by cleaning the battery terminals. Dirt and corrosion can affect the connection. Use a wire brush to scrub the terminals gently. Ensure all residue is removed. A clean terminal ensures a good electrical connection. This step is vital for accurate voltage readings.
Checking Voltage
After cleaning, it’s time to check the voltage. Set the multimeter to the correct voltage setting. Connect the red probe to the positive terminal. Attach the black probe to the negative terminal. The multimeter will display the battery’s voltage. Note the reading for future reference. This helps in assessing the battery’s condition.
Multimeter Setup
Setting up your multimeter is crucial for accurate testing of a deep cycle battery. Proper setup ensures correct readings and helps maintain battery health. Understanding the device’s functions and settings can make this task easier. Let’s explore how to set up your multimeter effectively.
Selecting The Correct Mode
First, ensure your multimeter is in the right mode. Use the DC voltage setting for battery testing. Look for the “V” symbol with a straight line above it. This indicates DC voltage. Double-check the dial or button settings to avoid errors. Incorrect settings can lead to inaccurate results.
Calibrating The Device
Calibration ensures your multimeter gives precise readings. Start by turning the multimeter on and setting it to zero. This is the baseline for accurate measurements. Most multimeters have a calibration knob or button. Follow the manufacturer’s instructions for specific calibration steps. Regular calibration keeps your device reliable over time.
Testing Battery Voltage
Testing the voltage of a deep cycle battery is crucial for maintaining its performance. Voltage testing helps you understand the battery’s charge status. A multimeter is the right tool for this task. It allows precise measurement of voltage levels. This section will guide you through the steps.
Connecting The Multimeter
First, ensure your multimeter is set to measure DC voltage. Connect the red probe to the battery’s positive terminal. Attach the black probe to the negative terminal. Make sure the connections are secure. Proper contact ensures accurate readings.
Interpreting Voltage Readings
Read the voltage displayed on the multimeter screen. A fully charged battery usually shows 12.6 volts or more. If the reading is below 12 volts, the battery might need charging. Consistently low readings indicate a possible battery issue. Regular voltage checks help maintain battery health.
Conducting Load Test
Testing a deep cycle battery with a multimeter ensures it functions properly. Begin by setting the multimeter to DC volts. Attach the probes to the battery terminals to measure voltage. A reading between 12. 4 to 12. 7 volts indicates a fully charged battery.
Regular testing helps maintain battery health and performance.
Testing a deep cycle battery is crucial to ensure it operates efficiently. One of the most effective ways to assess its health is by conducting a load test. This involves simulating real-world conditions to see how well the battery performs under pressure. It’s like taking your car for a spin to check if it can handle a road trip. You might be wondering, how exactly do you do this with a multimeter? Let’s dive into the process.Simulating Battery Load
To simulate a battery load, you need to apply a resistance that mimics the typical load the battery would face during regular use. Start by fully charging the battery. This ensures that you are testing under optimal conditions. Next, connect a load tester to the battery terminals. This can be something as simple as a high-wattage bulb or a dedicated battery load tester. Ensure that all connections are secure. You don’t want any loose wires disrupting your test. Once connected, observe the voltage reading on your multimeter. The voltage will drop when the load is applied, but it should remain within the specified range for your battery type. If it drops too low, the battery may not be holding a charge well.Analyzing Performance
Now that you’ve simulated the load, it’s time to analyze the performance. Record the voltage reading from the multimeter. A healthy deep cycle battery typically maintains at least 12 volts under load. Check how long the battery can sustain the load. A significant drop in voltage over a short period indicates a weak battery. This could mean it’s time for a replacement. Consider how the battery’s performance aligns with your needs. If you rely on your deep cycle battery for essential applications, consistent performance is crucial. A quick personal insight: I once thought my battery was fine until a load test revealed it couldn’t sustain a camping trip. That revelation saved me from a potential power outage in the wilderness. Have you found any surprises in your battery tests? Testing regularly can prevent unexpected failures. By understanding your battery’s true condition, you can plan maintenance or replacements proactively.Checking Internal Resistance
Testing a deep cycle battery with a multimeter involves measuring its internal resistance. This helps to assess the battery’s health and efficiency. By checking resistance, you can determine if the battery needs replacing or servicing.
Testing the internal resistance of a deep cycle battery is crucial. It helps determine the battery’s health and efficiency. Lower resistance indicates a healthier battery, while higher resistance may suggest issues. Testing internal resistance can prevent future battery problems.Using The Multimeter
First, ensure the multimeter is set to measure resistance. Connect the multimeter’s probes to the battery terminals. The red probe connects to the positive terminal, and the black probe to the negative. Ensure a firm connection for accurate readings. Keep the multimeter steady to avoid fluctuating results.Understanding Resistance Levels
Normal resistance levels vary between battery types. Typically, a good deep cycle battery should have low resistance. Higher resistance indicates aging or potential faults. Always compare readings with manufacturer specifications. Regular monitoring helps maintain optimal battery performance.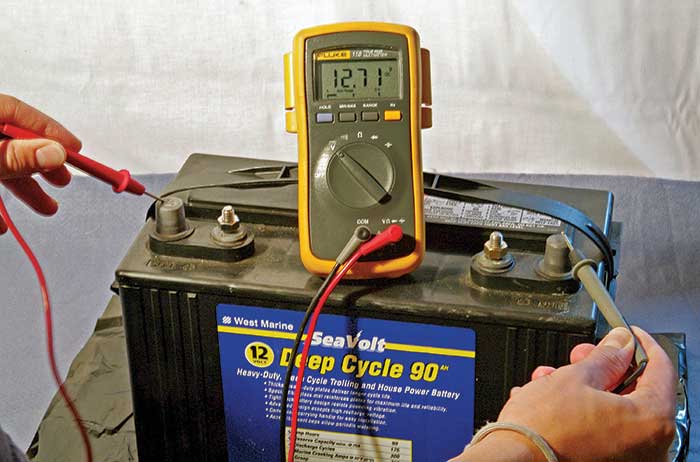
Credit: www.boatus.com
Troubleshooting Common Issues
Testing a deep cycle battery with a multimeter can reveal many issues. Understanding the results helps in maintaining battery efficiency. Troubleshooting common issues is crucial to prevent unexpected failures. This section provides insights into identifying faults and solutions for low voltage.
Identifying Faults
Identifying faults in a deep cycle battery is essential for performance. Start by checking the battery’s physical appearance. Look for signs like corrosion or leaks. These may indicate internal damage. Use a multimeter to measure voltage and resistance. Compare readings with manufacturer specifications. If values differ, there might be a problem. Inspect battery terminals and connections. Loose or corroded terminals can affect performance. Ensure they are clean and tight. A multimeter can help detect short circuits. Short circuits can quickly drain battery power.
Solutions For Low Voltage
Low voltage is a common issue in deep cycle batteries. First, measure the battery voltage with a multimeter. If the voltage is below 12 volts, the battery might be undercharged. Charge the battery fully using a reliable charger. Test the voltage again after charging. If it remains low, the battery may have sulfation. Sulfation occurs when lead sulfate crystals build up. This can reduce the battery’s capacity. Use a desulfation charger to fix this issue. Ensure regular maintenance to prevent sulfation. Check electrolyte levels in flooded batteries. Low electrolyte can cause low voltage. Refill with distilled water if levels are low.
Maintaining Battery Health
Maintaining battery health ensures the longevity and efficiency of deep cycle batteries. Regular checks and proper charging techniques can keep your battery in top shape. A multimeter is a handy tool for this purpose. It helps you monitor the battery’s condition. This guide will help you understand how to test a deep cycle battery with a multimeter. Let’s dive into some essential practices for maintaining battery health.
Regular Testing
Regular testing of your deep cycle battery can prevent unexpected failures. Use a multimeter to measure the voltage. A healthy battery should show a specific voltage range. Deviations might indicate issues. Always test the battery when it’s fully charged. This gives the most accurate reading. Regular checks help catch problems early. This can save you from costly repairs.
Optimal Charging Practices
Charging the battery properly is crucial for its health. Overcharging can harm the battery life. Use a smart charger to avoid this. It adjusts the charge based on the battery’s needs. Undercharging is also harmful. It can lead to sulfation. Ensure the battery gets a full charge after use. This keeps it in good condition. Always follow the manufacturer’s charging instructions. This helps maintain the battery’s health over time.
Frequently Asked Questions
How To Tell If A Deep Cycle Battery Is Bad With A Multimeter?
Check the battery voltage with a multimeter. A reading below 12. 4 volts indicates the battery may be bad. Perform a load test by applying a known load and measuring voltage drop. Significant voltage drop signifies a faulty battery. Ensure connections are clean and secure for accurate results.
How Do I Know If My Deep Cycle Marine Battery Is Bad?
Check for slow charging, low voltage, or inability to hold a charge. These signs indicate a bad battery. Inspect for physical damage or corrosion. Test with a multimeter for accurate voltage readings. Regularly monitor battery performance to prevent unexpected failures.
What Voltage Is 50% Of A Deep Cycle Battery?
A deep cycle battery is at 50% charge when it reads approximately 12. 2 volts. Regularly check voltage to maintain battery health.
Can You Test A Marine Battery With A Multimeter?
Yes, you can test a marine battery using a multimeter. Set the multimeter to measure DC voltage. Connect the positive lead to the battery’s positive terminal and the negative lead to the negative terminal. A healthy marine battery typically shows 12.
4 to 12. 7 volts when fully charged.
Conclusion
Testing a deep cycle battery with a multimeter is simple. Follow the steps carefully for accurate results. Always ensure safety by wearing protective gear. A good battery supports your power needs efficiently. Regular testing helps maintain battery performance. It also prolongs battery life.
Use your multimeter regularly to check voltage and health. If the battery shows issues, consider professional advice. This simple maintenance task can save money and energy. Keep your equipment in top shape. Happy testing!


