
Harnessing the power of the sun can be incredibly rewarding, both for your wallet and the environment. But before you can fully capitalize on this renewable energy source, it’s crucial to ensure your solar panels are functioning optimally.
Imagine the frustration of investing in solar technology only to find out later that your panels aren’t performing as they should. That’s where a multimeter comes into play. This handy tool can help you test and troubleshoot your solar panels with precision.
By understanding how to use a multimeter, you can quickly assess the efficiency and health of your solar setup. So, how exactly can you test your solar panels using a multimeter? Stay with us, and you’ll learn the step-by-step process to empower your solar journey, ensuring every ray of sunlight is working in your favor.

Credit: footprinthero.com
Tools Needed
Testing solar panels with a multimeter requires specific tools for accuracy and safety. Ensuring you have the right equipment is crucial for a successful test. This section covers the essential tools needed for the task.
Choosing The Right Multimeter
Choosing a suitable multimeter is essential for testing solar panels. Ensure your multimeter can measure voltage, current, and resistance. A digital multimeter often provides more accuracy than an analog one. Look for a multimeter with a clear display for easy reading. It should also have a high voltage rating to handle solar panel outputs.
Additional Safety Equipment
Safety is critical when working with electrical equipment like solar panels. Wear insulated gloves to protect against electric shocks. Safety goggles can shield your eyes from potential sparks. A pair of sturdy work boots can prevent grounding issues. Always have a first aid kit nearby for emergencies.
Safety Precautions
Testing solar panels with a multimeter can be risky. Ensuring safety should be your top priority. Solar panels generate high voltage, which can be dangerous. Use the right protective gear and handle with care. Follow these safety precautions to protect yourself and others.
Handling High Voltage
Solar panels can produce high voltage. Always treat them with respect. Avoid touching any exposed wires. Keep your hands dry. Wet hands can increase the risk of electric shock. Never attempt to test panels during wet weather. Ensure all equipment is dry and in good condition.
Protective Gear
Always wear protective gear when testing solar panels. Gloves and goggles are essential. They protect against electric shocks and flying debris. Ensure your gloves are rubber and high-quality. Good gloves provide insulation. Goggles shield your eyes from any sparks or debris. Safety gear is your first line of defense.
Preparing The Solar Panel
Before testing solar panels with a multimeter, preparation is key. Properly preparing the panel ensures accurate readings and prolongs its lifespan. Begin with a clean and well-positioned solar panel to maximize efficiency. This step is crucial for reliable results and optimal energy generation.
Cleaning The Surface
Dust and dirt can hinder a solar panel’s performance. Regular cleaning prevents this issue. Use a soft cloth to wipe the surface gently. Avoid abrasive materials to prevent scratches. For stubborn grime, use mild soapy water. Rinse thoroughly to remove soap residue. A clean panel captures sunlight effectively, boosting energy output.
Positioning For Optimal Sunlight
Correct positioning enhances a solar panel’s efficiency. Place the panel where it receives direct sunlight. Avoid shaded areas as they reduce power generation. Tilt the panel at an angle for maximum sunlight exposure. Adjust the angle seasonally for best results. Proper positioning can significantly improve energy collection.
Credit: www.solar4rvs.com.au
Multimeter Setup
Setting up a multimeter is crucial for testing solar panels. A multimeter helps measure voltage, current, and resistance. Proper setup ensures accurate readings. It involves setting the right mode and adjusting probes. This process is simple with the right guidance.
Setting The Multimeter To Dc Voltage
First, turn on the multimeter. Locate the dial and set it to DC voltage. Solar panels produce direct current. So, it’s essential to measure in this mode. Most multimeters have a “V” symbol. Ensure it’s not set to AC. Double-check the setting. This ensures you read the correct voltage.
Adjusting Probes For Accurate Reading
Probes need correct placement. Connect the red probe to the positive terminal. Attach the black probe to the negative terminal. Ensure firm contact. Loose connections lead to errors. Hold the probes steady while reading. Avoid touching metal parts with your hands. It keeps the reading precise.
Testing Voltage Output
Testing the voltage output of solar panels is crucial. It ensures they operate efficiently. A multimeter helps measure this output accurately. This tool is essential for checking solar panel performance.
Connecting Probes To Panel
First, set the multimeter to DC voltage. Ensure the probes are ready. Connect the red probe to the positive terminal. Attach the black probe to the negative terminal. Make sure connections are secure. Proper connection is vital for accurate readings.
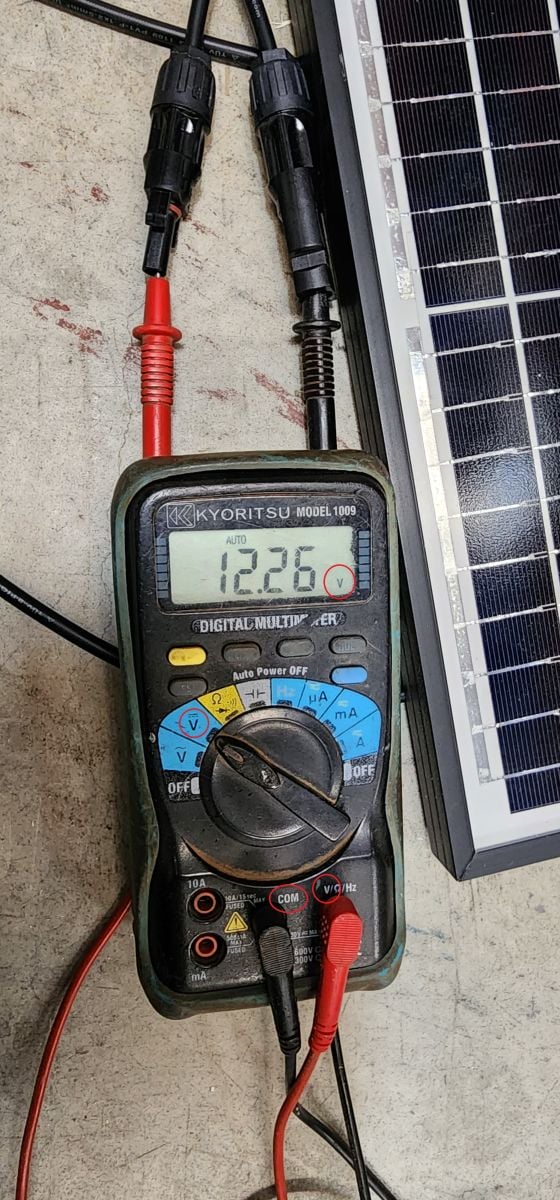
Reading Voltage Measurements
Observe the multimeter display. It shows the voltage output. Compare the reading to the panel’s rated voltage. A lower reading may indicate issues. Check for dirt or shading on panels. Ensure all connections are solid. Regular testing helps maintain efficiency.

Credit: lensunsolar.com
Testing Current Output
Testing solar panels with a multimeter is simple. First, connect the multimeter probes to the panel. Then, measure the current output to ensure efficiency.
Testing the current output of your solar panels can provide you with valuable insights into their performance. While it may seem daunting at first, using a multimeter simplifies the process significantly. This tool helps you ensure your panels are operating efficiently, making it a vital part of solar system maintenance. With a bit of practice, you’ll find it easy to measure the current flowing from your panels. Have you ever wondered if your solar panels are producing the amount of electricity they should? By testing the current output, you can verify their efficiency and catch any issues early.Switching Multimeter To Current Measurement
To begin, set your multimeter to measure current. This usually involves turning the dial to the ‘A’ setting, which stands for amperes. Make sure your multimeter is set to measure DC (Direct Current) as solar panels produce DC electricity. Is your multimeter ready? It’s essential to use the correct settings to avoid damaging the device or getting inaccurate readings. If you’re unsure, consult the multimeter’s manual for guidance.Measuring Current Flow
Once your multimeter is set, it’s time to measure the current flow. Disconnect the solar panel from any connected devices to avoid interference. Then, connect the multimeter in series with the panel by attaching one probe to the panel’s positive terminal and the other to the load’s positive input. If you’re wondering what “in series” means, think of it as inserting the multimeter into the path of the current. This ensures you measure the actual current flowing through the panel. Keep an eye on the reading displayed on the multimeter. This number represents the current output of your solar panel in amperes. What does your reading say about your panel’s performance? If it’s significantly lower than the expected output, it might be time to investigate further. Regularly testing your solar panels this way can help you maintain an efficient solar power system. Are there other aspects of solar panel maintenance you’re curious about? Let us know in the comments!Interpreting Results
Testing solar panels with a multimeter is an essential task. It helps ensure the panels work efficiently. Once you gather data, understanding the results is crucial. Proper interpretation guides maintenance decisions. It also helps in diagnosing potential issues early.
Interpreting results involves reading voltage and current levels. It also includes spotting any irregularities. Let’s dive deeper into what these readings mean.
Understanding Voltage And Current Levels
Voltage indicates the electrical potential of the solar panel. A typical solar panel should show a specific voltage range. For example, a 12V panel often reads around 18V in bright sunlight.
Current measures the flow of electricity. It’s noted in amperes (A). The current level depends on the sunlight’s intensity. A higher current means more power generation.
Compare your readings with the panel’s specifications. Check the manufacturer’s guide for expected values.
Identifying Issues
Low voltage or current might signal a problem. Dirty panels can cause these drops. Shade or obstructions can also affect performance.
Inspect the panel’s surface for dirt or debris. Ensure no objects block sunlight exposure. If readings remain low, connections may be loose or corroded.
Check wiring and connectors. Ensure all connections are secure and free from rust. Regular checks help maintain solar panel efficiency.
Troubleshooting Common Problems
Solar panels sometimes face issues. Testing with a multimeter helps identify problems. This guide focuses on common problems like low voltage and inconsistent current. Understanding these issues ensures efficient panel performance.
Low Voltage Output
Low voltage can occur due to shading or dirt on panels. Check each panel’s voltage using the multimeter. Place the multimeter probes on the panel’s terminals. Compare the readings to expected values. If the voltage is low, clean the panel surface. Ensure no objects block sunlight.
Inconsistent Current Flow
Inconsistent current affects energy production. It may result from faulty wiring or connections. Use the multimeter to measure current at different times. Check the wiring connections for loose or corroded parts. Repair or replace damaged wires. This ensures stable current flow from the panels.
Frequently Asked Questions
How To Check If Solar Panels Are Working With A Multimeter?
Set your multimeter to measure DC voltage. Connect the positive lead to the panel’s positive terminal and the negative lead to the negative terminal. Ensure the panel is in sunlight. Check the voltage reading; it should match the panel’s specified output.
If not, the panel may not be working properly.
How To Test If A Solar Panel Is Bad?
Use a multimeter to check voltage and current output. Compare with the panel’s specifications. Inspect for physical damage or discoloration. Ensure proper connections and no shading. Test during peak sunlight for accuracy.
How To Check If Solar Panels Are Working Properly?
Check the inverter display for error messages. Monitor energy output regularly. Inspect for physical damage. Ensure panels are clean and unobstructed. Use a solar monitoring app for real-time performance data.
What Voltage Should Come Out Of A Solar Panel?
A typical solar panel outputs around 18 to 22 volts in full sunlight. This voltage allows efficient charging of a 12-volt battery. Ensure your solar charge controller matches the panel’s voltage output for optimal performance. Always check the manufacturer’s specifications for exact voltage details.
Conclusion
Testing solar panels with a multimeter is straightforward. Anyone can do it with patience. Follow the steps carefully for accurate results. Regular testing ensures your panels work efficiently. It helps in identifying issues early. This saves money and energy in the long run.
Remember to take safety precautions. Safety comes first. Solar energy is a great investment. Proper maintenance extends the life of your panels. Keep learning and experimenting. Every test makes you more confident. Now, you have the tools to keep your solar panels in top shape.
Enjoy the benefits of clean energy.


