Are you ready to master the art of brake repair? Imagine the confidence you’ll feel knowing you can tackle brake line issues yourself.
Using a brake pipe flaring tool might seem daunting at first, but it’s an essential skill for any hands-on car enthusiast or DIY mechanic. Not only does it save you money, but it also gives you the satisfaction of self-reliance when it comes to your vehicle’s safety.
In this guide, we’ll simplify the process of using a brake pipe flaring tool, breaking it down into easy steps that anyone can follow. By the end, you’ll be equipped with the knowledge to ensure your vehicle’s braking system is in top-notch condition. Let’s dive in and uncover the secrets to flawless brake pipe flaring!
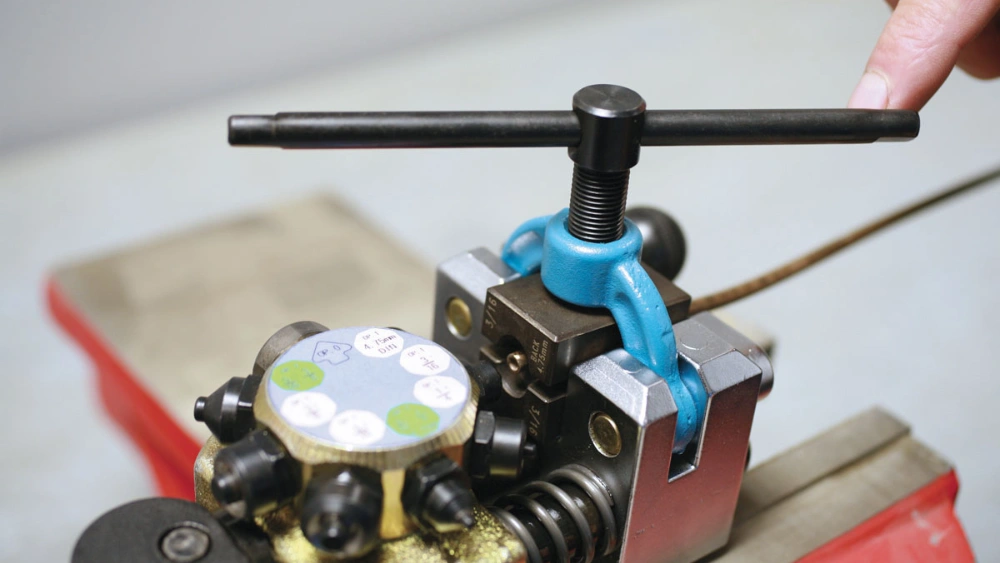
Credit: www.mig-welding.co.uk
Choosing The Right Flaring Tool
Choosing the right brake pipe flaring tool is crucial for safety. Not all flaring tools are created equal. Selecting the correct tool ensures a proper fit and prevents leaks. It also saves time and effort in the long run. Here’s how to choose the right flaring tool for your needs.
Understanding Different Types Of Flares
Brake systems use different types of flares. The most common are the single, double, and bubble flares. Each type serves a specific purpose. Single flares are less common in modern cars. Double flares provide a better seal and are used in most vehicles. Bubble flares are typically found in European cars. Knowing the type of flare you need is the first step in choosing the right tool.
Material Compatibility
Flaring tools must be compatible with the material of the brake lines. Most brake lines are made of steel, copper, or stainless steel. Some tools work better with specific materials. Check the tool’s specifications before purchasing. Using the wrong tool can damage the brake line.
Manual Vs. Hydraulic Flaring Tools
Manual flaring tools require more physical effort. They are suitable for small jobs and occasional use. Hydraulic tools are more efficient for larger projects. They require less effort and produce consistent results. Consider your project size and frequency of use when deciding.
Quality And Durability
A high-quality tool lasts longer and performs better. Look for tools made from durable materials. Stainless steel or hardened steel tools are more reliable. They withstand wear and tear better than cheaper options. Investing in a quality tool saves money over time.
Ease Of Use
Some flaring tools are easier to use than others. Consider the tool’s design and features. Ergonomic handles and clear instructions improve usability. A tool that’s easy to use reduces frustration. It also increases the likelihood of a successful flare.

Credit: www.youtube.com
Step-by-step Flaring Process
Using a brake pipe flaring tool may seem intimidating initially. Understanding the flaring process makes it manageable and straightforward. A step-by-step guide helps ensure precision and safety. Below is a breakdown of the process, focusing on crucial steps and tips.
Step 1: Prepare The Brake Pipe
Start by cutting the brake pipe to the needed length. Ensure the cut is clean and straight. Use a pipe cutter for accurate results. This ensures a proper fit in the flaring tool. A clean cut prevents leaks and ensures a secure connection.
Step 2: Deburr The Pipe
Remove any burrs or sharp edges from the cut end. Use a deburring tool for this task. Smooth edges help in creating a perfect flare. Rough edges may cause improper sealing.
Step 3: Insert The Pipe Into The Flaring Tool
Place the brake pipe into the flaring tool. Ensure it aligns correctly with the tool’s clamp. Tighten the clamp firmly. This holds the pipe steady during the flaring process. Correct alignment is crucial for a successful flare.
Step 4: Select The Appropriate Flaring Head
Choose the correct flaring head for the pipe size. Attach the flaring head to the tool. The right head ensures the flare matches the pipe specifications. Incorrect size may lead to fitting issues.
Step 5: Create The Flare
Turn the tool handle to apply pressure to the pipe. Gradually increase pressure until the flare forms. Check the flare for uniformity. A well-formed flare is essential for a tight seal.
Step 6: Inspect The Flare
Examine the flare for any defects or irregularities. Ensure it is even and symmetric. A faulty flare may cause leaks. Inspect closely to avoid future issues.
Common Mistakes To Avoid
Using a brake pipe flaring tool can seem daunting. But avoiding common mistakes can make the process easier. Many errors stem from lack of preparation or rushing the job. Paying attention to details can prevent these issues. This guide highlights frequent mistakes to avoid.
1. Misjudging Pipe Length
Always measure the pipe length accurately. An incorrect length can lead to improper fittings. Double-check measurements before cutting. Ensure you have extra length for adjustments.
2. Neglecting Cleanliness
Cleanliness is crucial. Dirt on the pipe can affect the flare quality. Clean both the pipe and the tool before use. This ensures a smooth, even flare.
3. Using Wrong Tools
Each pipe type requires specific tools. Use the correct size and type for your pipe. Using the wrong tool can damage the pipe or create a weak flare. Ensure your tool matches the pipe specifications.
4. Rushing The Process
Take your time. Hurrying can lead to mistakes. Go through each step carefully. Ensure each action is deliberate and precise. Rushing can compromise the flare’s integrity.
5. Ignoring Manufacturer Instructions
Read the manufacturer’s instructions carefully. Each tool has unique guidelines. Following these ensures proper usage and safety. Don’t skip this crucial step.
6. Over-tightening The Clamp
Over-tightening can damage the pipe. Tighten just enough to secure. Too much pressure can deform the pipe. Be gentle and mindful of the clamp’s tension.

Credit: www.youtube.com
Frequently Asked Questions
How To Use A Pipe Flaring Tool?
To use a pipe flaring tool, cut the pipe to the desired length. Deburr the cut end. Insert the pipe into the flaring tool’s clamp. Tighten the tool to secure the pipe. Use the cone-shaped anvil to flare the pipe end by turning the handle.
Do Brake Lines Need To Be Double Flared?
Yes, brake lines need to be double flared. This ensures a secure connection and prevents fluid leaks. Double flaring enhances safety by providing durability and reliability. Always prioritize double flares for optimal brake performance and safety.
What Is A Brake Line Flaring Tool Used For?
A brake line flaring tool is used to create flares on brake lines. It ensures secure connections and prevents leaks. This tool is essential for brake system maintenance and repair. Properly flared brake lines enhance vehicle safety by maintaining hydraulic pressure.
How Hard Is It To Flare Brake Lines?
Flaring brake lines requires moderate skill and specific tools. Beginners might find it challenging initially. Practice and patience help in mastering the technique. Ensure you use quality flaring tools for best results and safety. Properly flared brake lines ensure efficient braking and vehicle safety.
Conclusion
A brake pipe flaring tool is essential for safe vehicle maintenance. Using it correctly ensures secure and leak-free connections. Practice makes perfect, so take your time. Follow each step carefully. Double-check your work for accuracy. Safety comes first, so always wear protective gear.
Proper maintenance of your tools extends their lifespan. Keep learning and improving your skills. With patience, you’ll master this task. Your vehicle’s performance depends on it. Happy flaring!


