
Are you tired of struggling with belt installation in your car? You’ve probably spent countless hours trying to stretch belts into place, only to end up with scraped knuckles and a lot of frustration.
But what if there was an easier way? The stretch belt tool is your secret weapon for hassle-free belt installation. This simple yet effective tool can save you time, energy, and a whole lot of stress. Imagine the satisfaction of completing the task with ease and precision.
In this guide, you’ll learn exactly how to use the stretch belt tool, transforming a tricky job into a straightforward process. Stay with us, and you’ll be equipped with the knowledge to tackle your next belt installation like a pro!
Choosing The Right Stretch Belt Tool
Choosing the right stretch belt tool is crucial for ensuring your project runs smoothly and efficiently. With a variety of tools available, making the right choice can feel overwhelming. But don’t worry—this guide will help you navigate the options and find the perfect tool for your needs.
Types Of Stretch Belt Tools
Stretch belt tools come in several types, each designed for specific tasks. The most common ones include manual stretch belt tools, which are great for small projects. They require a bit of elbow grease but are reliable and easy to use.
Power stretch belt tools are ideal for larger jobs. They save time and reduce effort, making them perfect for professionals. These tools often come with various settings to adjust the tension, offering greater precision.
Finally, adjustable stretch belt tools offer versatility. You can use them for different belt sizes and types, making them a go-to choice for those who frequently switch between projects.
Factors To Consider
When choosing a stretch belt tool, consider the size of the belt you’ll be working with. A tool that’s too small or too large can cause frustration and inefficiency.
Think about the frequency of use. If you’re using the tool regularly, investing in a high-quality, durable model will pay off in the long run.
Budget is another important factor. While it might be tempting to go for the cheapest option, investing a bit more can lead to better performance and a longer lifespan.
Have you ever struggled with a tool that just wasn’t right for the job? Choosing the right stretch belt tool can prevent headaches and make your work more enjoyable.
Remember, the right tool not only saves time but also enhances the quality of your work. So take the time to evaluate your needs and pick a tool that matches them perfectly.

Credit: www.lislecorp.com
Preparing For The Repair
Before using a stretch belt tool, preparation is essential. Proper preparation ensures efficiency and safety during the repair. This guide will walk you through the necessary steps.
Gathering Necessary Equipment
First, assemble all required tools. You need a stretch belt tool, a new belt, and protective gloves. Having all items ready saves time and hassle. Check the new belt’s compatibility with your vehicle.
Consult the vehicle manual for specific tool recommendations. Knowing what you need prevents interruptions. Proper equipment makes the task smoother and safer.
Ensuring Safety Precautions
Safety should be your priority. Wear protective gloves to prevent injuries. Ensure the vehicle is on a stable surface. Use wheel chocks to prevent movement.
Disconnect the vehicle’s battery to avoid electrical hazards. Double-check your work area for any potential risks. A clean workspace minimizes accidents.
Removing The Old Belt
Using a stretch belt tool simplifies the process of removing old belts from vehicles. Place the tool on the belt, and rotate it to release tension. This method prevents damage, ensuring a smooth and easy belt removal.
Removing the old belt from your machinery can feel like a daunting task, especially if you’ve never done it before. But with the right approach and tools, you can ensure this process is smooth and hassle-free. The stretch belt tool is your ally here, providing a simple solution to what might seem a complex problem. Let’s explore the practical steps to remove the old belt effectively, ensuring your next installation goes without a hitch.Locating The Belt
First, identify where the belt is situated within your machine. Consult your user manual or check online resources for diagrams if you’re unsure. Understanding the belt’s location is crucial before you begin any removal. Inspect your machine thoroughly. Look for any panels or covers that might need removing to access the belt. These could be held in place by screws or clips, so have your screwdriver ready. Once you’ve located the belt, make a mental note of how it’s positioned. Take a picture if necessary. This will help you immensely when it comes time to install the new belt.Safely Removing The Belt
Before you start removing the belt, ensure the machine is turned off and unplugged. Safety should always be your top priority. Use the stretch belt tool to gently loosen the tension on the belt. This tool is designed to make this part of the process easier and safer. Follow the tool’s instructions to avoid damaging the belt or the machine. Gradually work the belt off the pulleys. Move slowly to avoid any sudden movements that could dislodge other components. If it feels stuck, double-check that all tension has been released. Have you ever struggled with getting an old belt off and wondered if there’s a better way? The stretch belt tool might just be your new best friend. Remember, patience and the right tools are key to a successful removal.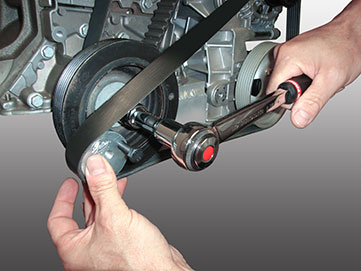
Credit: www.gatestechzone.com
Installing The New Belt
Installing the new belt can seem daunting at first. With the right tools and techniques, it becomes manageable. The stretch belt tool is designed to make this task easier. Proper use ensures the belt is secure and functions well. Let’s dive into the steps to install a new belt effectively.
Positioning The Belt
Start by checking the belt’s path on the pulleys. Ensure no twists or misalignments. A twisted belt may cause damage or wear. Carefully position the belt over the pulleys. Hold it firmly to prevent slipping. Ensure it’s centered and aligned correctly.
Using The Stretch Belt Tool Effectively
The stretch belt tool aids in fitting the belt. Insert the tool between the pulley and belt. Rotate the pulley slowly with the tool in place. This action stretches the belt for a snug fit. Be gentle to avoid damaging the belt. Ensure the belt sits tightly on the pulleys.
Check the tension and alignment after installation. A well-fitted belt runs smoothly and lasts longer. Proper use of the tool ensures efficiency and safety.
Testing The Installation
Stretch belt tools simplify testing the installation process. They effortlessly position belts onto pulleys without causing damage. Ensuring the belt fits properly guarantees optimal performance and extends the life of the equipment.
Testing the installation of a stretch belt tool is crucial to ensure your vehicle runs smoothly and efficiently. After you’ve installed the belt, it’s essential to verify that everything is functioning correctly. Without proper testing, you might miss out on any potential issues that could lead to bigger problems down the road. Let’s dive into how you can confirm your installation is spot-on.Checking For Proper Tension
First, assess the tension of the belt. A properly tensioned belt is vital for optimal performance. Gently press down on the belt with your thumb. It should give slightly but not too much. If the belt feels too loose, it could slip off or wear out quickly. On the other hand, if it’s too tight, it might put undue stress on the engine components. Consider using a tension gauge if you’re unsure. This tool provides an accurate measurement of the belt tension, ensuring you’re not relying solely on feel. Have you ever had a belt snap unexpectedly while driving? It’s often due to incorrect tension. Catching this early can save you time and money.Running The Engine
Once you’re confident in the tension, it’s time to start the engine. Running the engine helps you identify any abnormal noises or vibrations. Listen carefully for any unusual sounds. A properly installed belt should not make any squealing or grinding noises. Observe the belt while the engine is running. It should move smoothly without jumping or wobbling. If you notice anything amiss, it’s worth double-checking the installation. Sometimes a minor adjustment can make all the difference. Have you ever wondered why some car belts last longer than others? Correct installation and regular checks play a significant role. Testing the installation isn’t just about ticking off a checklist. It’s about ensuring your vehicle’s reliability and your peace of mind. Taking these steps seriously can prevent unexpected breakdowns and keep your ride running smoothly.Troubleshooting Common Issues
Using a stretch belt tool can solve many installation problems. This handy tool helps position belts without damage. It’s perfect for cars and appliances.
When using a stretch belt tool, you might encounter some common issues that can interrupt your workflow. Understanding these challenges can help you quickly resolve them and get back to your task. Whether it’s the belt slipping off or unexpected noises, knowing how to tackle these problems can make your experience smoother. Let’s dive into some of these common issues and their solutions.Slippage Problems
One of the most common issues with a stretch belt tool is slippage. You might find the belt slipping off the pulleys during operation. This usually happens when the belt is not aligned properly. To fix this, check the alignment of the belt and adjust it accordingly. Another reason could be a worn-out belt. If your belt has visible wear and tear, consider replacing it. Keeping an eye on the condition of your belt can prevent slippage and ensure a seamless operation.Noise Concerns
Noise can be another issue when using a stretch belt tool. Unusual sounds might indicate misalignment or a loose belt. If you hear a squeaking noise, inspect the tension of the belt. It might need to be tightened to stop the noise. Sometimes, foreign objects can get caught in the tool, leading to grinding noises. Make it a habit to clean your tool regularly. Removing debris can not only solve noise issues but also extend the life of your tool. Have you encountered other issues while using a stretch belt tool? Understanding these problems can make you more adept at handling your equipment. What steps will you take next time you face a problem? Addressing these challenges head-on can save you time and effort in the long run.Maintenance Tips For Longevity
A stretch belt tool makes belt installation easier. Slide the belt onto the pulley without damage. Ensure the tool is aligned properly to prevent slipping.
Maintaining your stretch belt tool is crucial for ensuring its longevity and optimal performance. Proper care can save you money and time in the long run, preventing the need for frequent replacements. Let’s dive into some practical maintenance tips that will help you keep your stretch belt tool in excellent condition for years to come.Regular Inspections
Make it a habit to inspect your stretch belt tool before and after each use. Look for signs of wear and tear, such as frayed edges or weakened areas. Catching these early can prevent bigger issues down the line. Don’t hesitate to replace parts if necessary. A small investment in spare parts can extend the life of your tool significantly. Think of it as giving your tool a little TLC to keep it functioning smoothly. Ask yourself: Have you checked your stretch belt tool lately? Regular inspections can be a game-changer in maintaining its longevity.Cleaning And Storage
After using your stretch belt tool, wipe it down to remove any dirt or debris. This simple step can prevent buildup that might affect its performance. A clean tool is a happy tool! Store your tool in a dry and cool place. Exposure to moisture or extreme temperatures can degrade its materials over time. Consider using a dedicated storage box or bag to keep it safe. Make sure your tool is fully dry before putting it away. This prevents rust and extends its lifespan, ensuring it’s ready for the next job. By taking these small steps, you can ensure your stretch belt tool remains in peak condition. What other maintenance tips do you find useful? Share your thoughts below!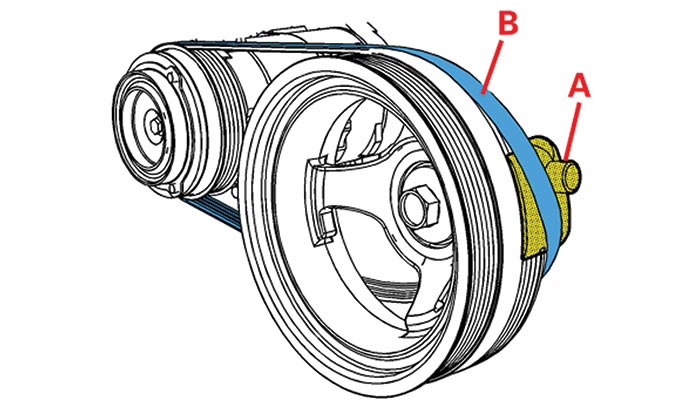
Credit: www.underhoodservice.com
Frequently Asked Questions
How To Use A Stretchable Belt?
To use a stretchable belt, wrap it around your waist and fasten the buckle securely. Adjust the belt for comfort. Ensure it fits snugly but allows movement. Ideal for casual wear, fitness activities, or travel. The elastic material offers flexibility and comfort throughout the day.
How Do Stretch Fit Belts Work?
Stretch fit belts use elastic materials to provide flexibility and comfort. They adjust to your waist size, ensuring a snug fit without pinching. This flexibility makes them ideal for various activities and body movements, offering both support and ease of wear.
How To Use A Belt Tensioning Tool?
Use the belt tensioning tool by placing it on the belt. Adjust until the correct tension is achieved. Ensure the belt is aligned properly to avoid wear. Follow manufacturer’s guidelines for precise tension settings. Regularly check for wear or damage to maintain optimal performance.
How Many Times Can You Reuse A Stretch Belt?
You can reuse a stretch belt until it loses elasticity or shows signs of wear. It’s best to replace it for optimal performance. Regular inspection ensures safety and efficiency.
Conclusion
Using a stretch belt tool simplifies your belt replacement tasks. Easy to handle, this tool saves time and effort. Perfect for beginners and seasoned mechanics alike. With practice, your skills improve, making belt changes smoother. No need for special training or tools.
Just follow the steps, and you’re set. Always prioritize safety and accuracy. So, next time your car needs a new belt, grab your stretch belt tool. You’ll be ready. Keep your vehicle running smoothly. Stay efficient with this handy tool.


