
Are you staring at that beautiful ceramic piece, wondering how to drill a hole without shattering it into a million pieces? You’re not alone.
Many DIY enthusiasts and home decorators face this challenge. Drilling into ceramic might seem intimidating, but with the right approach, you can achieve it with ease and precision. Imagine the satisfaction of completing your project without a single crack. You’ll discover the step-by-step process and the essential tools needed to drill a hole in ceramic, ensuring your project turns out perfectly.
Read on to learn the secrets that will make this task a breeze and boost your confidence in tackling ceramic like a pro.
Choosing The Right Tools
Selecting proper tools is essential for drilling a hole in ceramic. A carbide-tipped drill bit works best, preventing cracks. Secure the ceramic piece, and use a low speed to avoid damage.
Choosing the right tools is crucial when drilling into ceramic. Without the proper equipment, you might end up with shattered pieces instead of a clean hole. Understanding what tools to use can make the process smooth and efficient.Types Of Drill Bits
Ceramic requires special drill bits. Regular bits for wood or metal won’t work here. Carbide-tipped drill bits are excellent for ceramic because they are incredibly hard and can endure the material’s density. Another option is diamond-tipped drill bits. They cost a bit more but are worth the investment for their precision and durability. Have you ever tried drilling with the wrong bit and ended up with a cracked tile? That’s exactly why choosing the right one is essential.Drill Types Suitable For Ceramic
Not all drills are created equal. For ceramic, a standard electric drill works fine. However, ensure it has variable speed settings. Low speed is key to avoid overheating and cracking the ceramic. If you’re into DIY projects, you might already have a cordless drill. They offer flexibility and are less cumbersome, making them a great choice for smaller projects. Have you ever thought about the weight of a drill and how it affects your control? A lighter drill can give you better precision, especially for delicate tasks. When you’re ready to start your project, remember these tips. The right tools can make all the difference in achieving professional-looking results. What’s your go-to drill for ceramic?
Credit: www.youtube.com
Preparing The Ceramic Surface
Drilling holes in ceramic requires careful surface preparation. Clean the ceramic thoroughly to remove any dust or debris. Mark the drilling spot with a pencil for precision, ensuring the surface is smooth and ready for the task.
Preparing the ceramic surface is crucial for successful drilling. A well-prepared surface ensures the drill bit penetrates smoothly. It also helps avoid cracks or damage to the ceramic. Take the time to prepare the surface properly. This ensures a clean and precise hole.Cleaning The Surface
Start by cleaning the ceramic surface. Dust and grime can interfere with drilling. Use a damp cloth to wipe the area. Ensure it’s free from dirt and residue. A clean surface helps the drill bit grip better. It reduces the risk of slipping. Dry the area thoroughly before proceeding.Marking The Drill Spot
Once the surface is clean, mark the drill spot. Use a pencil for precise markings. Measure the exact spot where you want to drill. Double-check the measurements for accuracy. Marking the spot helps guide the drill. It ensures you drill exactly where needed.Setting Up Your Workspace
Preparing to drill a hole in ceramic requires a stable workspace. Gather necessary tools like a ceramic drill bit and protective eyewear. Ensure the ceramic piece is securely clamped to prevent movement during drilling.
Setting up your workspace is crucial for drilling a hole in ceramic. A well-organized area ensures accuracy and safety. It also helps in maintaining focus. Let’s explore how to prepare your workspace effectively.Safety Precautions
Always prioritize safety. Wear safety goggles to protect your eyes from debris. Use gloves to safeguard your hands from sharp edges. Ensure the workspace is well-lit. Good lighting helps in precise drilling. Keep a first aid kit nearby. It should be within easy reach. Make sure your tools are in good condition. Damaged tools can cause accidents. Inspect the drill for any issues before starting.Stabilizing The Ceramic Piece
Stability is key to prevent cracks. Place the ceramic piece on a flat surface. Use a non-slip mat to hold it steady. Clamps can provide extra support. Adjust clamps gently to avoid pressure cracks. Check that the ceramic does not move. Movement can lead to uneven drilling. Use a marker to outline the drilling spot. This helps in maintaining precision. Secure all tools within arm’s reach for convenience.Drilling Techniques
Drilling a hole in ceramic requires careful preparation and the right tools. Use a carbide-tipped drill bit and apply consistent pressure. Keep the surface wet to reduce heat and prevent cracks.
Drilling into ceramic might seem intimidating at first, especially if you’re worried about cracking or damaging the material. Yet, with the right techniques, anyone can achieve a clean, precise hole without breaking a sweat. Whether you’re crafting custom tiles or installing wall hooks, mastering these methods will enhance your DIY skills. Let’s dive into the essential drilling techniques that will make your ceramic projects a success.Adjusting Drill Speed
Setting the correct drill speed is crucial. Ceramic is a delicate material, and high-speed drilling can cause it to shatter. Always start at a low speed and gradually increase as needed. Imagine adjusting the speed like tuning a radio dial, finding just the right frequency where the drill penetrates smoothly without causing damage. This is key to maintaining control and preventing cracks. Take a moment to test the speed on a spare piece of ceramic if available. This practice run ensures that you’re confident in your speed settings before tackling the real piece.Applying Consistent Pressure
Pressure is your best friend when drilling into ceramic. But remember, it’s all about balance. Too much force can break the ceramic, while too little will make the drill skip around, scratching the surface. Think back to a time when you applied too much pressure on a fragile object and it broke. The same principle applies here. Apply steady, even pressure, allowing the drill bit to do the work. If you notice any resistance, pause and reassess your technique. This attention to detail ensures a smooth hole and keeps your ceramic intact. By mastering these techniques, you set yourself up for success in any ceramic drilling project you undertake. What could you achieve if you approached every task with this level of precision and care?Cooling Methods
Drilling a hole in ceramic requires precision and patience. Use a carbide-tipped drill bit and maintain a steady hand. Keep the surface cool with water to prevent cracks.
Drilling into ceramic requires precision and care, especially when dealing with heat generation. Cooling methods are essential to prevent cracks and ensure a smooth finish. Have you ever wondered why your drill bit suddenly becomes red-hot? It’s all about friction. Cooling techniques not only protect your tools but also your ceramic masterpiece. Let’s dive into the methods that can help keep things cool during the drilling process.Using Water As A Coolant
Water is the most common coolant for ceramic drilling. It’s simple, effective, and readily available. You can use a spray bottle to gently mist water on the drilling spot. This helps in reducing heat and lubricating the drill bit. Another approach is to have a sponge soaked in water and press it against the ceramic surface as you drill. This constant supply of moisture can be a game-changer. While drilling a ceramic tile in my kitchen, I found that keeping a small stream of water flowing significantly reduced the risk of breakage. Have you tried this method? It could make all the difference.Alternative Cooling Techniques
Not everyone wants to deal with water messes, especially indoors. An alternative is using cooling gels or lubricants designed for drilling. These products can effectively lower temperatures and offer protection. Some people opt for air cooling. A simple fan directed at the drilling site can help disperse heat. It’s not as effective as water but can be handy in tight spots. Let’s think outside the box. Ever considered using ice packs around the ceramic? It’s unconventional but surprisingly effective in maintaining a cooler surface. What other creative cooling methods can you think of? Embracing these techniques can make your drilling experience smoother and more efficient. What’s your preferred method?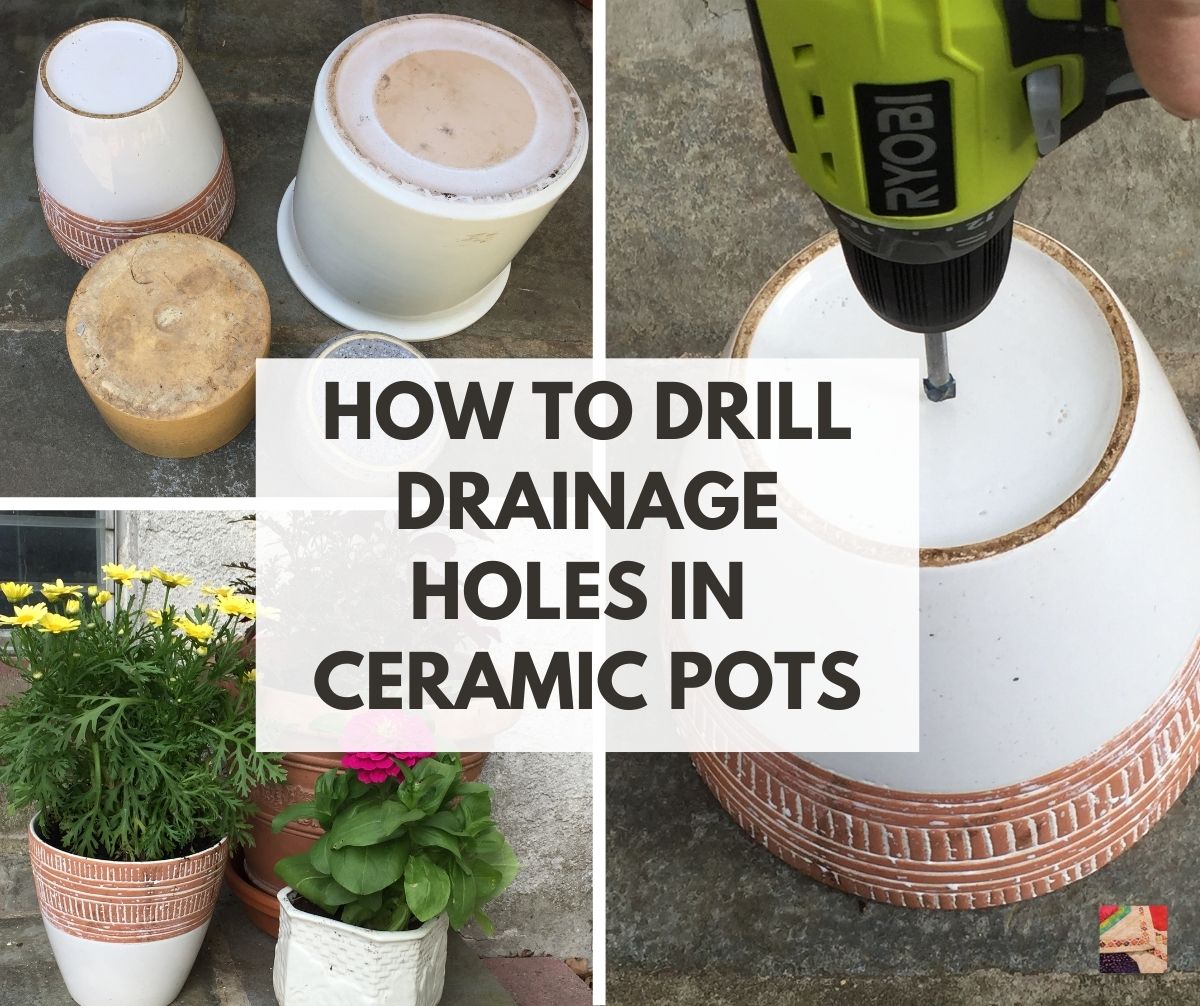
Credit: www.needlepointers.com
Avoiding Common Mistakes
Drilling holes in ceramic requires careful preparation to avoid cracks. Use a carbide-tipped drill bit for smooth results. Keep the drill speed low and maintain steady pressure to prevent damage.
Drilling a hole in ceramic can be a tricky task, and avoiding common mistakes is essential to achieve a clean result. Many DIY enthusiasts have experienced the frustration of cracked tiles or slipping drills. With the right techniques and a bit of patience, you can avoid these pitfalls and get the job done right.Preventing Cracks
Cracks often occur when there’s too much pressure on the drill. To prevent this, use a gentle hand. Consider starting with a small pilot hole before moving to a larger drill bit. Keep the drill speed low. High speeds generate heat, which can weaken the ceramic. Use a spray bottle with water to keep the area cool. A support piece, like a wooden board underneath the tile, can help distribute the pressure evenly. This simple step can make all the difference.Dealing With Slippage
Slippage is another common issue that can ruin your project. A wandering drill bit can scratch the surface or cause uneven holes. To combat this, use a piece of masking tape where you plan to drill. The rough surface of the tape gives the drill bit something to grip. Another method is to use a center punch to create a small indentation in the ceramic. This acts as a guide for the drill bit. If you’ve ever found yourself frustrated by a slipping drill, this trick can save your nerves. Have you ever thought of using a guide or template? This can keep your drill steady, ensuring precision. By focusing on these practical tips, you can avoid common mistakes and successfully drill a hole in ceramic. With preparation and patience, you’ll achieve a professional finish every time.Post-drilling Care
After drilling a hole in ceramic, ensure the surface is clean and free of debris. Use a soft cloth to remove any dust, then gently inspect the edges for smoothness. Proper cleaning helps maintain the integrity of the ceramic.
After successfully drilling a hole in ceramic, proper care is essential. This ensures the material remains intact and functional. Post-drilling care helps maintain the integrity of your ceramic piece. It also prevents damage and prolongs its lifespan. Below are key steps to consider for post-drilling care.Cleaning The Drilled Hole
Remove dust and debris from the drilled hole. Use a soft brush or compressed air. This prevents any leftover particles from causing damage. A clean hole also ensures a smooth surface. Avoid using harsh chemicals that can harm the ceramic. A damp cloth can help wipe away fine dust particles. Pat the area dry with a clean cloth after cleaning.Inspecting For Damage
Check the drilled hole and surrounding area for any cracks. Small cracks can expand if not addressed. Use a magnifying glass for a closer look. Ensure the edges of the hole are smooth. Rough edges can lead to chipping over time. If you find any damage, consider using a ceramic repair kit. These kits can help fix minor issues and prevent further damage.:max_bytes(150000):strip_icc()/SPR-how-to-drill-a-hole-in-a-ceramic-pot-8584910-hero-9d1f095f09f541e0ad63aa0947bc26cf.jpg)
Credit: www.thespruce.com
Expert Recommendations
Drilling ceramic requires patience and the right tools. Start with a diamond-tipped drill bit. Keep the drill speed low to avoid cracks.
Drilling a hole in ceramic can seem daunting. Expert recommendations can make the process smoother and safer. Whether you’re an avid DIYer or just tackling a one-time project, the right guidance can make all the difference. Let’s dive into some key strategies you should consider.Choosing Quality Materials
The quality of materials you use directly impacts the outcome. Always opt for diamond-tipped drill bits; they’re specifically designed for hard surfaces like ceramic. They reduce the risk of cracking. Invest in a reliable drill. It might cost more initially, but it ensures precision and safety. Think about the last time you worked with cheap tools. They might save money upfront, but often lead to frustration and even damage. Consider using a guide or template to keep your drill steady. This prevents slipping and ensures a clean hole. Does your drill bit seem to wander off course? A simple guide can eliminate this issue entirely.Consulting With Professionals
Seek advice from professionals when you’re uncertain. Their experience can offer insights you might not find in manuals. Have you ever thought you could handle a project alone, only to realize midway that expert help was needed? Some hardware stores offer free consultations. Take advantage of these services. They can guide you on the best tools and techniques tailored to your specific ceramic type. You might think you understand the basics, but professionals can provide nuanced advice. They might recommend using water to cool the drill bit, reducing friction and preventing damage. Have you considered how a simple trick like this can extend the life of your tools? Drilling into ceramic requires precision and care. With these expert recommendations, you can approach your project with confidence. Are you ready to make that perfect hole?Frequently Asked Questions
How Do You Drill A Hole In Ceramic Without Breaking It?
Use a diamond-tipped drill bit. Mark the spot with tape to prevent slipping. Start slowly with minimal pressure. Keep the drill cool using water. Gradually increase speed once the hole is started.
What Kind Of Drill Bit Do You Use For Ceramic?
Use a diamond-tipped or carbide-tipped drill bit for ceramic. They offer precision and reduce chipping. Always drill slowly and use water for cooling to prevent cracks. These bits ensure clean, efficient drilling through ceramic surfaces.
Can You Drill Ceramic With A Regular Drill Bit?
Drilling ceramic with a regular drill bit is not recommended. Use a carbide-tipped or diamond drill bit instead. These are specifically designed for hard surfaces like ceramic, ensuring clean holes without damage. Regular drill bits can cause cracks or chips.
Always drill slowly and use water for cooling.
Why Is Ceramic So Hard To Drill Through?
Ceramic is hard to drill due to its dense, brittle nature. It resists penetration and can easily crack. Using specialized drill bits and techniques helps. Proper tools and precautions ensure successful drilling without damage.
Conclusion
Drilling holes in ceramic requires care and precision. Start with the right tools. Use a diamond-tipped drill bit for best results. Ensure the ceramic is stable before drilling. Apply gentle pressure to avoid cracks. Keep the drill speed slow and steady.
This prevents overheating and damage. Use water to cool the drill bit. It also reduces dust and debris. Patience is key. Rushing can cause mistakes. Practice on spare tiles if possible. With these tips, you can drill holes safely and effectively.
Happy drilling!


