
Have you ever found the perfect ceramic pot, but it just doesn’t have the drainage hole you need? You might be wondering if you can simply drill a hole into it without shattering your beautiful find.
You’re not alone. This common dilemma can turn a simple gardening project into a nerve-wracking challenge. But don’t worry—this article is your guide to confidently drilling a hole into a ceramic pot without breaking it. We’ll walk you through the tools you need, the techniques to use, and the precautions to take.
By the end, you’ll be ready to transform any ceramic pot into a functional and stylish addition to your home or garden. Curious how? Keep reading to find out!

Credit: www.youtube.com
Understanding Ceramic Pots
Drilling a hole into a ceramic pot is possible with careful technique and the right tools. Use a carbide-tipped drill bit for best results. Steady hands and low pressure help prevent cracking.
Ceramic pots bring beauty to any space. They are loved for their unique texture. Yet, understanding their nature is crucial. Before drilling, know what you’re dealing with. Each ceramic pot is unique in its make and properties.Types Of Ceramic Pots
Ceramic pots vary in types. They include earthenware, stoneware, and porcelain. Earthenware is porous and less dense. Stoneware is denser, offering more strength. Porcelain is smooth and highly durable. Each type has distinct features. These features affect drilling success.Properties Of Ceramic Material
Ceramic is a hard material. It is formed from clay at high heat. This process makes it strong yet brittle. Ceramics resist stains and scratches. But they can crack under pressure. Understanding these properties helps in handling them right. Drilling requires care and precision. `
Credit: www.youtube.com
Reasons For Drilling Holes
Ceramic pots are popular choices for plant enthusiasts due to their aesthetic appeal and durability. However, you might often wonder if drilling a hole in a ceramic pot is necessary. Understanding the reasons for drilling holes can help you decide whether it’s the right move for your gardening needs.
Improving Drainage
Without proper drainage, the roots of your plants can suffocate. Waterlogged soil leads to root rot, which can kill your plants faster than you think. Drilling holes at the bottom of your ceramic pot allows excess water to escape, preventing this issue.
Consider your own experience with overwatering. You might have noticed yellow leaves or stunted growth. Improving drainage is a simple fix that can save your beloved plants. What’s more, you’ll find your plant care routine becomes easier.
Enhancing Plant Growth
Healthy plants start with healthy roots. Adequate drainage not only prevents rot but also promotes better air circulation within the soil. This contributes to the overall health of the plant, boosting growth.
Imagine your plant thriving with vibrant leaves and strong stems. By ensuring your ceramic pot has proper drainage, you’re giving your plant the best chance to flourish. Think of it as setting the stage for success.
Have you ever considered how much happier your plants would be with optimal conditions? Drilling that hole might be the small change needed to see big results in your garden. Plus, it’s a straightforward task you can easily accomplish with the right tools.
Tools Needed For Drilling
Drilling a hole into a ceramic pot requires special tools. The correct tools make the job easier and prevent damage. Understanding what you need is crucial. Let’s explore the essential tools for this task.
Drill Selection
Choose a drill with adjustable speed settings. Low speed prevents the ceramic from cracking. Cordless drills offer flexibility and ease of use. They allow better control during the drilling process. Ensure the drill is lightweight for comfortable handling.
Appropriate Drill Bits
Use carbide-tipped drill bits for ceramic pots. These bits are durable and designed for hard surfaces. Diamond-tipped bits are also effective and reduce the risk of chipping. Avoid using standard metal or wood drill bits. They can damage the ceramic and create unwanted cracks.
Safety Precautions
Drilling a hole into a ceramic pot requires careful preparation. Safety precautions are crucial to prevent accidents. By following safety measures, you protect yourself and your surroundings.
Protective Gear
Wear safety goggles to shield your eyes from shards. Use gloves to protect your hands from sharp edges. Ear protection helps reduce noise from drilling. Protective gear ensures your safety during the process.
Safe Work Environment
Work in a well-lit area to see clearly. Ensure your workspace is clean and organized. Avoid clutter that can cause accidents. Secure the pot to prevent slipping. A stable surface is essential for safe drilling.
Step-by-step Drilling Process
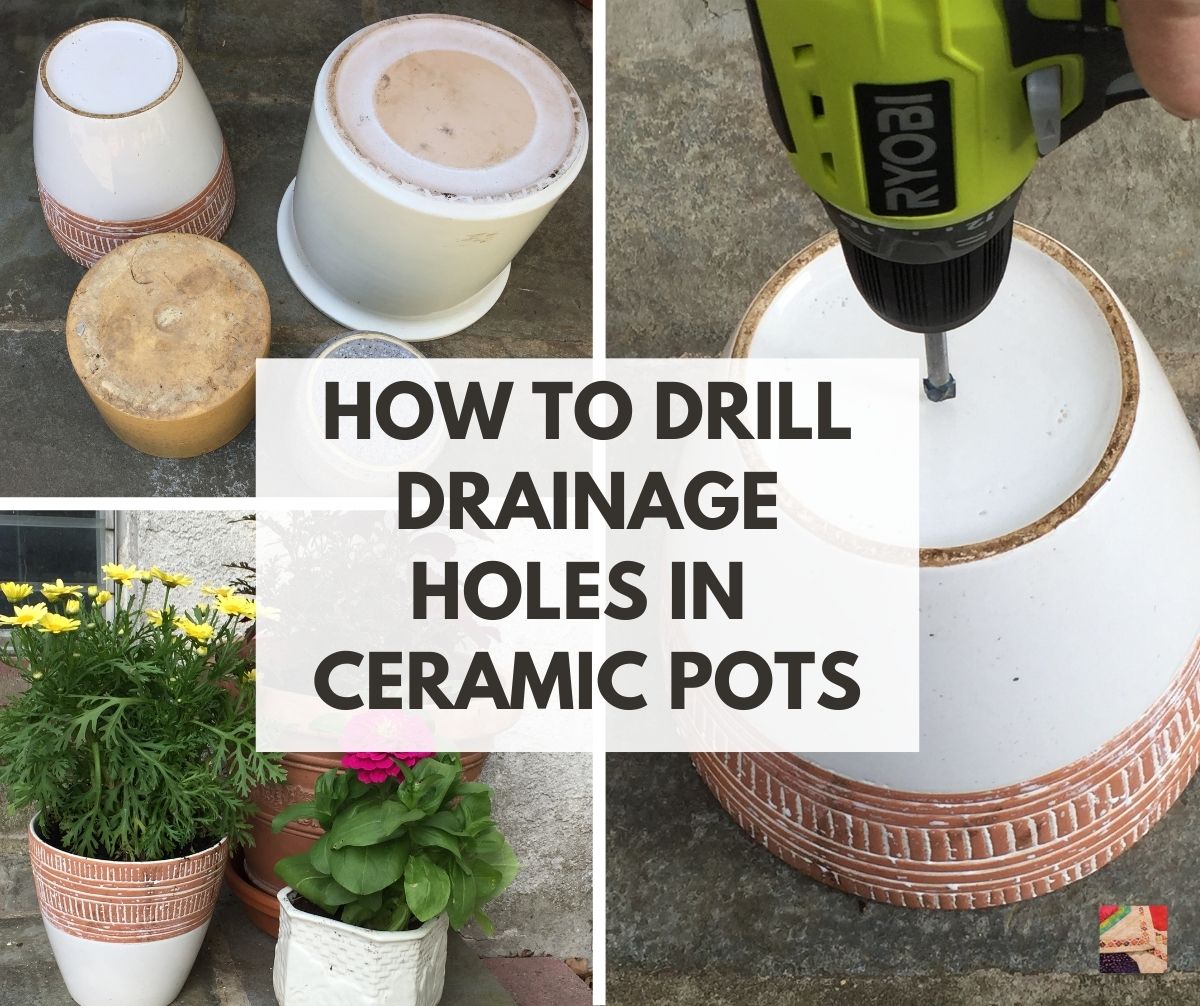
Drilling a hole into a ceramic pot requires patience and precision. First, ensure you have the right drill bit designed for ceramics. Apply steady pressure to avoid cracking the pot, maintaining a slow speed for a cleaner hole.
If you’ve ever wondered whether you can drill a hole into a ceramic pot, you’re not alone. Perhaps you want to repurpose a charming ceramic piece as a planter or create a unique water feature. Drilling into ceramic can be daunting, but with the right tools and steps, it’s quite manageable. Let’s walk through the step-by-step process to ensure your project is a success.Preparing The Pot
Before you start drilling, take a moment to prep your ceramic pot. Clean the surface to remove any dirt or residues that might affect the drilling process. A simple wipe with a damp cloth can do wonders. Select a suitable drill bit for ceramic. A carbide-tipped or diamond drill bit is ideal for this task. These are specifically designed to handle the hard surface of ceramic without causing cracks. Place the pot on a stable surface. If you have a workbench, that’s perfect. If not, a sturdy table will do. Consider cushioning the pot with a towel to prevent it from slipping or getting scratched.Drilling Technique
Now comes the exciting part! Start drilling at a low speed. High speeds can cause the ceramic to crack. Keep the drill bit perpendicular to the pot to ensure a clean, even hole. Apply gentle pressure. Let the drill bit do the work—forcing it can lead to breaks. Have you ever tried to rush through a project only to end up with more problems? Patience is key here. Keep the drilling area cool. A little water can help reduce friction and heat. You might want to have a friend pour water over the area while you drill, or use a spray bottle for control.Post-drilling Care
After successfully drilling the hole, take a moment to inspect your work. Check for any rough edges around the hole. You can smooth them out with a piece of sandpaper or a small file. Clean the pot again to remove any ceramic dust. This is especially important if you plan to use it as a planter, as dust can affect the soil quality. Finally, consider sealing the edges of the hole with a bit of clear nail polish or a ceramic sealant. This can help prevent any small cracks from spreading over time. Have you ever thought about how a simple hole can transform an ordinary pot into something functional and beautiful? With these steps, you’re well on your way to creating a masterpiece. Now, what project will you tackle next?Common Mistakes To Avoid
Drilling into ceramic pots requires caution to prevent cracks. Use a sharp drill bit designed for ceramics and apply gentle pressure. Ensure the pot is firmly supported to avoid damage during drilling.
Drilling a hole into a ceramic pot can be a simple task if done correctly. However, many people make common mistakes that can lead to cracked pots or wasted effort. Understanding these mistakes can save you time and frustration. Let’s take a closer look at what you should avoid.Applying Excessive Pressure
One common mistake is applying too much pressure while drilling. You might think that more pressure will speed up the process, but it can actually cause the ceramic to crack. I once ruined a beautiful pot by pressing too hard, thinking it would be a quick job. Instead, use a gentle, steady hand. Let the drill do the work. Have you ever noticed how the best chefs handle their knives with care? The same principle applies here.Using Incorrect Tools
Using the wrong tools can also lead to mishaps. A regular drill bit might seem like a good choice, but it isn’t designed for ceramic. This can result in uneven holes or chipped edges. I learned this the hard way when I tried using a wood bit, and the bit slipped, scratching the pot. You need a special ceramic or glass drill bit. These are designed to cut through hard surfaces smoothly. Have you checked your toolbox recently? Ensuring you have the right tools can make all the difference. Pay attention to these details. Avoiding these mistakes can help you achieve a perfect hole every time. What other tips have you found useful in your DIY projects? Share your thoughts in the comments!Alternative Solutions
Drilling a hole in a ceramic pot can be tricky. It risks breaking the pot. Fortunately, there are alternative solutions. These methods avoid drilling entirely. They keep your pots safe and intact. Let’s explore some of these options.
Using Pot Inserts
Pot inserts offer a simple solution. They fit inside your ceramic pot. These inserts have drainage holes. They allow excess water to escape. This prevents root rot. You can find pot inserts in many sizes. Choose one that fits snugly inside your pot. This method ensures healthy plant growth.
Choosing Pots With Pre-drilled Holes
Pots with pre-drilled holes are another great option. They come ready for planting. These pots have drainage holes at the bottom. This feature prevents waterlogging. Many stores sell these pots. They are available in various styles and colors. You can easily find one that matches your decor. This option saves time and effort.
Credit: www.needlepointers.com
Expert Tips For Success
Drilling a hole in a ceramic pot requires careful preparation and the right tools. Ensure you use a diamond drill bit for best results. Steady hands and patience will prevent cracks and damage.
Drilling a hole into a ceramic pot seems daunting. With expert guidance, it becomes manageable. Knowing the right techniques ensures success. This section provides tips to make the process smooth and efficient.Choosing The Right Spot
Select a spot on the pot’s flat area. Avoid edges or intricate designs. The flat spot reduces breakage risk. Mark the spot with a pencil or tape. This provides a clear guide for drilling. The marked area ensures precision and control.Maintaining Drill Speed
Start drilling at a slow speed. This prevents cracks and chips. Gradually increase speed as needed. Consistent speed ensures a clean hole. Use a steady hand for even pressure. Steady pressure reduces the chance of accidents. Adjust speed based on pot thickness. Thicker pots need slower speeds.Frequently Asked Questions
How Do You Drill A Hole In A Ceramic Pot Without Cracking It?
Use a carbide-tipped drill bit for ceramic. Secure the pot and mark the spot. Start drilling slowly, applying light pressure. Keep the drill bit cool by dipping in water. Increase speed gradually to avoid cracks.
Do You Need A Special Drill Bit For Ceramic Pots?
Yes, use a carbide-tipped masonry drill bit for ceramic pots. These drill bits easily penetrate ceramic surfaces. Ensure proper lubrication and cooling during drilling. Always start with a smaller bit and gradually increase size for best results. Secure the pot to prevent movement and use gentle pressure.
What Kind Of Drill Bit Do You Use For Ceramic?
Use a carbide-tipped or diamond-tipped drill bit for ceramic. These provide precision and minimize cracking. Always drill slowly and apply minimal pressure to prevent damage. Use water for cooling and lubrication while drilling.
How To Make A Hole In A Ceramic Pot At Home?
Use a drill with a ceramic drill bit. Secure the pot to prevent movement. Start drilling slowly with steady pressure. Keep the drill and pot cool with water to avoid cracking. Wear safety goggles for protection.
Conclusion
Drilling a hole in a ceramic pot is possible. With the right tools, it becomes a simple task. Always use a carbide or diamond drill bit for best results. These bits prevent the pot from cracking. Work slowly and keep the area moist.
This reduces heat and protects the ceramic. Safety goggles are a must to shield your eyes. A face mask helps avoid dust inhalation. With patience and care, your ceramic pot will look great. Perfect for drainage or artistic designs. Enjoy crafting with confidence!


