
Are you tired of standing in ankle-deep water every time you take a shower? A clogged shower tub drain can turn your relaxing bath into a frustrating experience.
But you don’t have to call a plumber just yet. You can fix it yourself with a simple tool: a drain snake. Understanding how to snake a shower tub drain can save you money and hassle. Plus, it gives you the satisfaction of solving a problem on your own.
In this guide, you’ll discover the step-by-step process to clear that stubborn clog and get your water flowing freely again. Keep reading to reclaim your shower and enjoy a smooth, uninterrupted bathing experience.
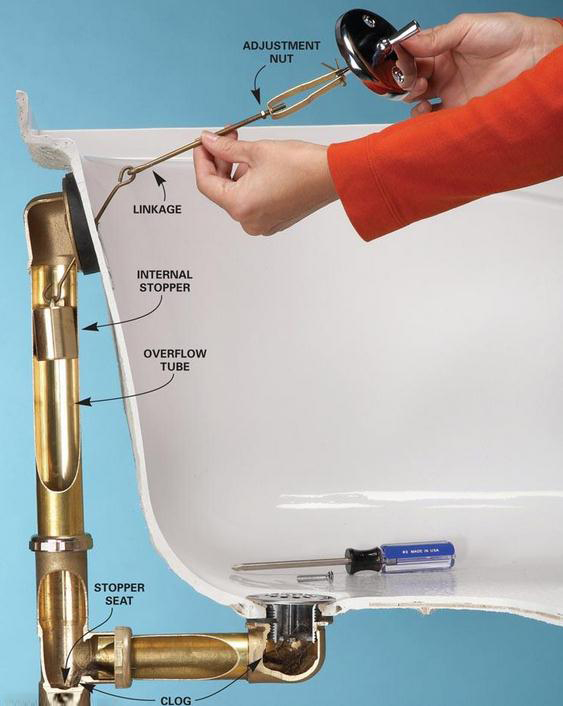
:max_bytes(150000):strip_icc()/bathtub-drain-2718981-02-97fbda4b92074b43ae9758d1121752e8.jpg)
Credit: www.thespruce.com
Tools And Materials
Essential tools for snaking a shower tub drain include a plumber’s snake and a screwdriver. Gather materials like gloves and a bucket to catch debris. These items help efficiently clear clogs, ensuring smooth water flow.
Tackling a clogged shower tub drain might seem daunting, but with the right tools and materials, you can clear it yourself without calling a plumber. Imagine avoiding the hassle and cost of professional services by mastering this simple household task. It’s empowering and surprisingly straightforward when you have the essentials at your disposal.Essential Tools For Snaking A Shower Tub Drain
Start with a drain snake, also known as a plumber’s snake or auger. This flexible tool is crucial for reaching clogs deep within the pipes. A 25-foot manual snake is usually sufficient for most bathroom jobs. A bucket is another necessary item. It will catch any debris or water that might spill when you remove the drain cover or pull out the clog. Keep it nearby to prevent unnecessary mess. Don’t forget rubber gloves. Clogs can be dirty and sometimes smelly. Gloves protect your hands from grime and any unpleasant surprises lurking in your drain.Materials You’ll Need
A screwdriver is essential for removing the drain cover. Most covers are secured with screws, and having a flathead or Phillips screwdriver will make this task easier. Check your cover type beforehand to ensure you have the right tool. Another handy item is baking soda and vinegar. While not necessary for the snaking process, these common household items can help clean your drain naturally after the clog is removed. They break down any remaining residue, leaving your pipes fresh. Consider having a flashlight or headlamp. Good lighting helps you see into the dark recesses of your drain, ensuring you don’t miss any blockages that might be deeper than anticipated.Why These Tools And Materials Matter
You might wonder why these specific tools and materials are recommended. The answer lies in efficiency and effectiveness. Each tool serves a purpose, from maneuvering through twists and turns of the pipe to ensuring your clean-up process is as smooth as possible. Have you ever attempted a DIY task only to realize halfway through that you’re missing a crucial item? Avoid that frustration by preparing ahead. With these tools and materials on hand, you can tackle your clogged drain confidently and efficiently. Feel empowered to give it a try. What could be more satisfying than solving a household problem with your own two hands?Safety Precautions
Ensure safety by wearing rubber gloves and goggles before snaking a shower tub drain. Use a flashlight for better visibility in the drain area. Keep the work area dry to prevent slips and falls.
Snaking a shower tub drain is an effective way to clear clogs and restore proper drainage. However, safety should be a top priority during this process. Understanding and following essential safety precautions can prevent accidents and ensure a smooth experience. Let’s dive into the key safety measures you should take before and during the snaking process.Wear Protective Gear
Always wear gloves to protect your hands from sharp objects and chemicals in the drain. Choose gloves made from durable material that won’t tear easily. Safety goggles are also advisable to shield your eyes from splashes or debris.Ensure Proper Ventilation
Good ventilation is crucial when working with cleaning agents or chemicals. Open a window or turn on an exhaust fan to ensure fresh air circulates in the bathroom. This reduces the risk of inhaling harmful fumes that can cause dizziness or respiratory issues.Use The Right Tools
Select a snake that’s suitable for your drain type to avoid damaging the plumbing. Check the manufacturer’s instructions for guidance on proper usage. If unsure, consult a professional to avoid costly mistakes.Disconnect Electrical Devices
Water and electricity don’t mix. Unplug any electrical devices nearby to eliminate the risk of electric shock. Double-check that any outlets or switches are sealed or covered to prevent accidental exposure to moisture.Handle Chemicals Carefully
If using chemical drain cleaners, read the labels thoroughly for safety warnings and instructions. Mix only as directed and avoid combining different chemicals. Have you ever mixed cleaning agents without thinking? Remember, this can create dangerous reactions.Keep A First Aid Kit Handy
Accidents can happen even with precautions. Keep a first aid kit nearby for minor injuries or irritations. Having it within reach can make a difference in how quickly you can respond to a mishap.Work In A Well-lit Area
Good lighting helps you see what you’re doing, preventing unnecessary mistakes. Ensure your work area is well-lit to spot any potential hazards. You might even discover a tool you forgot you had, making the job easier.Know When To Call A Professional
Sometimes a clog is too stubborn or complicated. Recognizing when it’s time to call a professional can save you time and frustration. Have you ever tried fixing something beyond your skill set? It’s okay to seek expert help. Taking these precautions ensures a safer and more effective experience when snaking your shower tub drain. What safety tips do you find most valuable when tackling home repairs?Initial Drain Check
Blocked shower tub drains can disrupt your routine. An initial drain check is crucial before snaking. This first step helps assess the problem’s severity. Simple methods can reveal if a minor clog is the issue. Understanding what lies ahead makes the snaking process smoother.
Inspect The Drain Cover
Remove the drain cover carefully. This gives a clear view of the drain entrance. Check for visible blockages like hair or soap scum. Use a flashlight for better visibility. Clearing these visible clogs might solve the issue.
Test Drain Flow
Run water briefly to observe drain flow. Slow draining signals a blockage deeper in the pipes. Water backing up indicates a stubborn clog. This test helps gauge how much snaking the drain might need.
Listen For Unusual Sounds
Listen closely while the water runs. Strange gurgling sounds often mean trapped air from a blockage. These noises suggest the clog might be deeper. Snaking becomes necessary if sounds persist.
Check For Foul Odors
Smell around the drain area. Unpleasant odors can indicate trapped debris. They often signal organic matter decomposing in the pipes. If odors are strong, snaking becomes essential.
Consider Recent Changes
Think about recent changes in your bathroom habits. New products might contribute to clogging. Oils and heavy soaps can accumulate easily. Identifying changes helps prevent future clogs.
Accessing The Drain
Accessing the drain is the first step to clearing blockages. It allows you to directly tackle any clogs, ensuring smooth water flow. The drain is often hidden by a cover, which needs careful removal. Once exposed, you can start clearing visible debris. Let’s dive into the process of accessing your shower tub drain.
Removing The Drain Cover
The drain cover protects the drain from large objects. To remove it, you may need a screwdriver. Begin by unscrewing any visible screws on the cover. If there are no screws, gently pry the cover using a flat tool. Be cautious not to damage the cover or surrounding area. Once removed, place the cover aside safely. This gives you full access to the drain opening.
Clearing Visible Debris
Look for any hair or soap scum blocking the drain. Use your fingers or tweezers to pull out debris. A flashlight can help you see deeper into the drain. Clearing visible debris helps prevent further clogs. Check the drain sides and opening thoroughly. Removing debris ensures the snake tool works effectively.
Using A Drain Snake
Using a drain snake is an effective way to clear stubborn clogs in your shower tub drain. This tool can reach deep into pipes, dislodging blockages that regular plungers can’t. Whether you’re dealing with hair, soap, or other debris, a drain snake can be your best friend in maintaining a clean and functional bathroom.
Choosing The Right Snake
Picking the right drain snake is crucial for success. Home improvement stores offer various types, ranging from manual to automatic. For shower tub drains, a manual snakeis often sufficient. It’s affordable and easy to handle.
Before purchasing, consider the length and flexibility. A snake that’s too short won’t reach deep clogs, while one that’s too rigid might struggle with bends. Opt for a snake around 25 feet long with good flexibility to tackle most household drains.
Inserting The Snake
Once you’ve chosen your snake, it’s time to use it. Begin by removing the drain cover. This might require a screwdriver, depending on your setup.
Slowly insert the snake into the drain, keeping a firm grip on the handle. Feel the snake as it moves; you’ll know when it hits a blockage. Avoid forcing it, as this can damage your pipes.
Navigating Pipe Bends
One challenge with using a drain snake is maneuvering through pipe bends. These curves can be tricky but not impossible. When the snake hits a bend, twist the handle gently to guide it through.
Patience is key here. You might need to pull back slightly and try different angles. Imagine the snake as a flexible tool rather than a rigid rod; this mindset will help you navigate those bends effectively.
Once you clear the blockage, retract the snake carefully. This ensures any loosened debris is pulled out entirely. Repeat the process if needed, but remember to clean the snake afterward to maintain its effectiveness.
Have you ever wondered why your shower drain clogs so often? Regular maintenance can prevent future issues. Consider using a hair catcher or regularly flushing with hot water to keep your pipes clear.
Credit: superbrothers.com
Clearing The Clog
Dealing with a clogged shower tub drain can be frustrating. Slow draining water or standing water is often the first sign. The solution? Snaking the drain. It is a straightforward process that can solve the problem effectively. This method removes hair, soap scum, and debris causing the blockage.
Rotating The Snake
Begin by inserting the snake into the drain slowly. Turn the handle clockwise. This helps the snake move through the pipe. Continue rotating as you push further. It breaks through the clog with its corkscrew tip. If you feel resistance, rotate more. It helps the snake grab onto the clog better.
Retrieving The Snake
Once you feel the clog loosen, start pulling the snake out. Rotate counterclockwise to dislodge debris. Pull the snake out slowly. This prevents the clog from breaking apart inside the drain. Wipe the snake clean as you remove it. This keeps your bathroom tidy.
Testing Drain Flow
After removing the snake, test the drain flow. Run hot water through the drain. Check for any remaining blockages. Water should drain quickly without pooling. If the problem persists, repeat the process. A clear drain ensures a clean shower experience.
Reassembling The Drain
Clearing a clogged shower tub drain can be simple with a snake tool. Insert the snake gently into the drain, twisting to break up blockages. Pull back slowly to remove debris, ensuring smooth water flow.
Reassembling the drain is the final step in snaking your shower tub. This process ensures that everything is back in place and working well. Taking care during reassembly prevents future issues. Follow these simple steps to complete the job.Replacing The Drain Cover
Begin with the drain cover. Ensure it’s clean and free from debris. Align the cover with the screw holes in the drain opening. Insert and tighten the screws using a screwdriver. Make sure the cover sits firmly in place. This prevents hair and debris from entering the drain.Final Cleanup
After reassembling, it’s time for cleanup. Remove any leftover debris around the drain area. Wipe down the tub with a clean cloth. Ensure no tools or materials are left behind. Check the water flow to confirm smooth drainage. Your shower tub should now be clean and clog-free.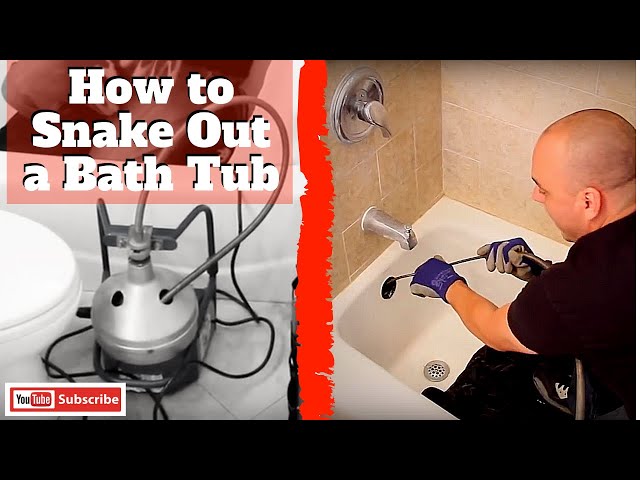
Credit: m.youtube.com
Preventive Maintenance Tips
Preventive maintenance is key to avoiding clogged shower tub drains. Regular care can save you time and frustration. Use simple strategies to keep your drains clear and efficient. These tips help ensure your plumbing stays in top shape.
Regular Cleaning Of Drain Covers
Remove and clean the drain cover weekly. Hair and soap scum accumulate quickly. A clean cover prevents large debris from entering the drain.
Use A Drain Catcher
A drain catcher traps hair and particles before they reach the pipes. Choose one that fits snugly over your drain. It’s an easy, effective solution.
Hot Water Flushes
Pour hot water down the drain monthly. This helps dissolve soap and grease buildup. It’s a simple way to keep your pipes clear.
Baking Soda And Vinegar Treatment
Use baking soda and vinegar to clean drains naturally. Sprinkle baking soda in the drain. Add vinegar and let it sit for 15 minutes. Rinse with hot water.
Avoid Chemical Drain Cleaners
Chemical cleaners can damage pipes with frequent use. Opt for natural solutions. They are safer for your plumbing and the environment.
Mind What You Rinse
Be cautious of what goes down the drain. Avoid rinsing large debris or sticky substances. They can cause stubborn clogs.
Frequently Asked Questions
Can You Snake Out A Shower Drain?
Yes, you can snake out a shower drain. Use a drain snake or plumber’s auger to remove clogs. Insert the snake into the drain, twist and push gently. This helps clear hair, soap scum, and debris efficiently. Regular maintenance prevents future blockages and ensures smooth water flow.
How Do You Unclog A Shower Tub Drain?
Use a plunger to create suction over the drain. Pour boiling water to loosen debris. Mix baking soda and vinegar, pour it in, and wait 15 minutes. Rinse with hot water. Use a drain snake if needed.
Can I Run A Snake Down My Bathtub Drain?
Yes, you can use a snake to clear bathtub clogs. Ensure it’s the correct size for your drain. Insert slowly to avoid damaging pipes. Regular cleaning prevents future blockages. Contact a professional for persistent issues. Avoid chemical cleaners as they can damage pipes and harm the environment.
Why Won’t My Snake Go Down The Shower Drain?
Snakes can’t fit through shower drains due to their size. Drains are too small for them to pass through. Ensure your snake’s enclosure is secure to prevent escapes. If your snake is missing, check nearby hiding spots.
Conclusion
Snaking a shower tub drain can seem daunting. But it’s manageable with patience. Follow the steps carefully. First, gather your tools. Then, remove the drain cover. Insert the snake gently. Turn the handle slowly. Feel for blockages. Pull out the debris slowly.
Rinse the drain with hot water. This helps remove remaining clogs. Regular maintenance prevents future blockages. Keep your tools handy. Practice makes perfect. Soon, you’ll clear drains with ease. Remember, clean drains mean fewer problems. Enjoy your fresh, unclogged shower tub.
Your bathroom will thank you.


