Are you facing issues with a flickering light or a fixture that just won’t turn on? Before calling in an electrician, you might want to try diagnosing the problem yourself.
The multimeter, a handy tool for any DIY enthusiast, can help you get to the root of the problem quickly. You might be surprised how easy it is to use this device to test your light fixtures at home. Imagine the satisfaction of solving the issue all on your own, saving both time and money.
In this guide, you’ll discover step-by-step instructions on how to safely and effectively test a light fixture with a multimeter, ensuring your home stays bright and welcoming. Ready to become the hero of your household lighting woes? Let’s dive in!
Types Of Light Fixtures
Understanding the types of light fixtures in your home or workspace is essential for testing them effectively with a multimeter. Each type operates differently and requires specific attention. Knowing these differences can save time and ensure accurate results when measuring voltage, continuity, and resistance.
Incandescent Fixtures
Incandescent fixtures are the traditional bulbs that many of us grew up with. They produce light by heating a filament inside the bulb until it glows.
These fixtures are simple to test. You can check for continuity by ensuring the filament isn’t broken. If your multimeter reads infinite resistance, the bulb is probably burnt out.
Have you ever noticed how warm incandescent bulbs get? This heat is a byproduct of their inefficiency. Testing these bulbs reminds us why many people have switched to more energy-efficient options.
Led And Cfl Fixtures
LED and CFL fixtures are popular due to their energy efficiency. They use advanced technology to emit light without generating much heat.
Testing these fixtures involves checking for proper voltage. Use your multimeter to ensure they are receiving the right amount of power. If the reading is off, it could be a wiring issue.
Have you ever marveled at how cool these bulbs stay even after hours of use? Their efficiency can be verified with your multimeter, helping you understand why your electricity bill might be lower.
Halogen Fixtures
Halogen fixtures are a step up from incandescent bulbs. They use a halogen gas to increase the lifespan and efficiency of the filament.
When testing, measure both the voltage and continuity. These bulbs can have higher operating temperatures, so ensure everything is within safe ranges.
Have you ever wondered why halogen bulbs are often used in workspaces or outdoor settings? Their intense brightness and durability make them perfect for such environments. Testing them with a multimeter highlights their robustness.
Are you ready to put your multimeter skills to the test? Understanding the type of light fixture you’re working with is your first step toward becoming a DIY lighting expert!
Credit: www.homedepot.com
Multimeter Basics
Understanding how to use a multimeter is crucial for testing light fixtures. A multimeter is an essential tool for measuring voltage, current, and resistance. It’s versatile, making it ideal for electrical diagnostics. Before diving into testing, grasping the basics of a multimeter is key.
Understanding Multimeter Functions
A multimeter can measure different electrical properties. The main functions are voltage, current, and resistance measurements. Voltage checks if a circuit has power. Current measures the flow of electricity. Resistance identifies any barriers in the circuit. Each function has specific settings on the multimeter. Knowing these helps in effective testing.
Selecting The Right Multimeter
Choosing the correct multimeter is essential for accurate testing. Look for a multimeter that is easy to use. Digital multimeters are user-friendly and provide clear readings. Ensure it has the required measurement functions. Check for additional features like auto-ranging. This feature adjusts settings automatically for accurate readings.
Safety Precautions
Testing a light fixture with a multimeter demands caution. Ensure the power is off before starting. Handle the multimeter carefully, avoiding contact with live wires.
Safety precautions are crucial when testing light fixtures with a multimeter. Handling electrical components requires care and attention. Protective gear minimizes risks and ensures a safe experience.Handling Electrical Components
Handle electrical components with care to prevent accidents. Always ensure the power is off before starting. Verify with a multimeter that no current flows. Be aware of your surroundings. Keep tools and wires organized. Avoid touching metal parts directly. Use insulated tools to reduce shock risks.Protective Gear
Wearing protective gear is essential for safety. Gloves protect your hands from electric shock. Use rubber gloves designed for electrical work. Goggles shield your eyes from potential sparks. Wear a long-sleeved shirt to protect your arms. Proper footwear reduces slipping and falling risks. Ensure all gear fits well for optimal protection.
Credit: www.reddit.com
Preparing For Testing
Testing a light fixture with a multimeter involves checking for electrical continuity and verifying voltage levels. Start by ensuring the fixture is disconnected from power. Use the multimeter to measure voltage at the fixture’s terminals, confirming proper electrical flow and identifying any issues.
Testing a light fixture with a multimeter might seem daunting at first, but with the right preparation, you can handle it like a pro. Before you begin, ensuring you’re fully prepared will save time and avoid potential safety issues. This section will guide you through the essentials you need to get ready for testing. You’ll gather your tools and check the fixture connections—simple steps that can make all the difference in your testing journey.Gathering Necessary Tools
Start by collecting all the tools you need. A digital multimeter is essential, but don’t overlook other items like a screwdriver and a pair of safety gloves. Safety gloves protect your hands from unexpected electrical shocks. A screwdriver helps you access various parts of the light fixture. Ensure your multimeter is in good working condition. Check the battery level and ensure the probes are not damaged.Checking Fixture Connection
Before testing, check the fixture’s connection. Ensure the light fixture is turned off and disconnected from any power source. Examine the wires for any visible damage. Frayed wires can cause inaccurate readings and pose a safety risk. Consider whether your fixture is mounted or portable. Each type might have different connection points to inspect. Think about the last time you checked these connections. Has it been a while? Regular inspections can save you from sudden malfunctions. Are you confident in identifying loose connections? If not, take a moment to familiarize yourself with common connection issues. Remember, preparation is key. Are you ready to test your light fixture? With the right tools and a thorough connection check, you’re set for a successful testing experience.Testing Voltage
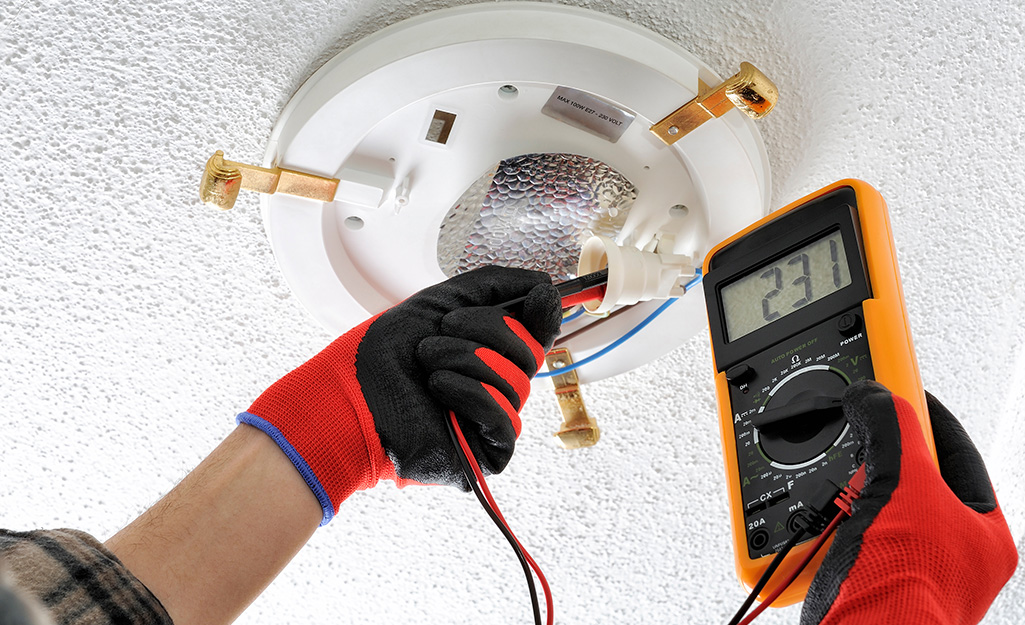
Testing voltage in a light fixture ensures it functions correctly. A multimeter helps measure voltage and diagnose problems. Understanding how to test voltage safely is essential for everyone.
Setting Up The Multimeter
First, locate the multimeter’s voltage setting. It’s often marked with a “V” symbol. Turn the dial to the appropriate AC or DC setting. Light fixtures usually use AC voltage.
Check the multimeter leads. Ensure they are firmly connected. The red lead goes into the “VΩ” port. The black lead goes into the “COM” port. Confirm the multimeter display shows zero. This indicates it’s ready to measure.
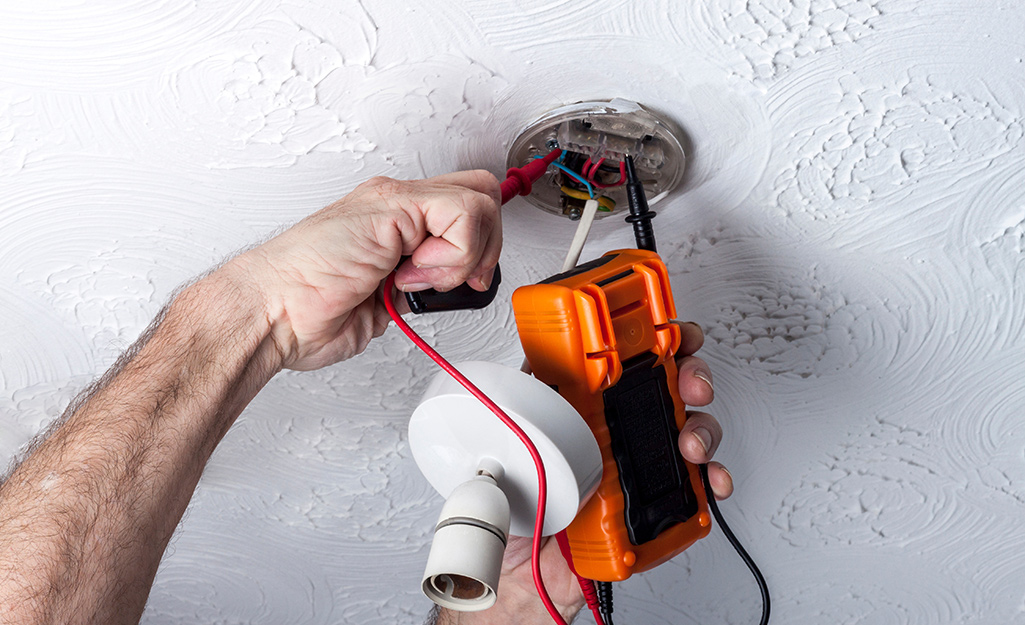
Measuring Voltage In Fixture
Switch off the light fixture before testing. This prevents any electrical shock. Carefully remove the fixture cover to access wires. Identify the live wire connected to the power source.
Place the red lead on the live wire. Place the black lead on the neutral wire. Observe the multimeter reading. It should display the fixture’s voltage level. If the reading matches the expected voltage, the fixture is functioning well.
If the voltage is lower, check connections. Ensure wires are secure. This may resolve any issues. Testing voltage is a straightforward process with the right tools.

Credit: www.youtube.com
Testing Continuity
Testing continuity in light fixtures ensures safety and functionality. A multimeter helps find broken circuits. It checks if electricity flows correctly. This process can prevent hazards and save money. Let’s explore how to test continuity effectively.
Identifying Circuit Pathways
Start by turning off the power to the light fixture. Safety first. Identify the circuit pathways. Check the wires connecting the light fixture. Look for visible damage or wear. A clear path allows electricity to flow smoothly. Ensure all wires are properly connected. This step helps locate the problem area.
Using Multimeter For Continuity
Set the multimeter to continuity mode. This setting often has a diode symbol. Touch the multimeter probes to the wire ends. A beeping sound indicates a complete circuit. Silence means a break in the circuit. Test each wire individually. Confirm all connections are intact. This simple test reveals potential issues. Fixing them restores proper function.
Troubleshooting Common Issues
Testing a light fixture with a multimeter helps identify electrical issues. Start by setting the multimeter to measure voltage. Carefully check the fixture’s wiring connections to ensure they are secure and functioning correctly.
Troubleshooting common issues with light fixtures using a multimeter can save time and money. When a light fixture isn’t working as expected, it’s often due to common problems like flickering lights or non-responsive fixtures. Understanding how to diagnose these issues can make your home feel brighter and more welcoming.Flickering Lights
Flickering lights can be quite frustrating. They can distract you while reading or working, and they might even give you a headache. To address this, check the bulb first; it might just need tightening. If tightening doesn’t fix it, use your multimeter to check the voltage. Set your multimeter to AC voltage mode and measure the voltage at the light fixture’s terminals. A reading too high or too low from the standard (typically around 110-120V in the U.S.) can indicate wiring issues. Have you ever noticed flickering only when certain appliances are on? This could mean that your circuit is overloaded. Consider redistributing your power load or consulting a professional electrician.Non-responsive Fixtures
When a light fixture doesn’t respond at all, it’s easy to assume the bulb is dead. But what if a new bulb doesn’t work either? This is where your multimeter becomes invaluable. Begin by checking the fixture’s power supply. Set the multimeter to AC voltage and test the fixture’s wiring. If there’s no voltage, the wiring might be faulty or the circuit breaker might have tripped. Do you have a switch that feels loose or wobbly? It might be the cause. Test the switch with your multimeter by setting it to continuity mode. If the multimeter beeps when you touch both terminals, the switch is working. No beep means it’s time for a replacement. Having the right tools and knowledge can turn what seems like a daunting task into a manageable one. Don’t let flickering lights or non-responsive fixtures disrupt your space. Take control with a multimeter and illuminate your home with confidence.Maintenance Tips
Regular maintenance of light fixtures ensures their longevity and safety. Testing with a multimeter is a key part of this process. Multimeters help detect issues early, preventing bigger problems. Follow these maintenance tips for optimal performance.
Regular Fixture Checks
Inspect light fixtures monthly for signs of wear. Check for loose screws or rust. Look at the wiring for fraying or damage. Early detection of problems saves money. Replace damaged bulbs and clean dusty surfaces. Ensure all parts are secure. Proper checks improve efficiency and safety.
Multimeter Care
Keep your multimeter clean and dry. Store it in a safe place. Check its battery regularly; a fresh battery ensures accurate readings. Handle the probes gently to avoid damage. Inspect the leads for wear. Replace them if damaged. A well-maintained multimeter lasts longer and works better.
Frequently Asked Questions
What Setting Do I Put My Multimeter On To Test A Light Switch?
Set your multimeter to the continuity setting to test a light switch. Ensure the switch is off before testing. Place probes on terminals, and check for a continuity beep when the switch is toggled. If no beep, the switch may be faulty.
How To Check A Light Circuit With A Multimeter?
Set the multimeter to AC voltage. Touch the probes to the circuit’s wires. A reading indicates power flow. For continuity, turn off power and set the multimeter to continuity mode. Test between connections; a beep indicates continuity.
How To Find A Short In A Light Fixture?
Turn off the power at the breaker box. Remove the light fixture. Inspect wires for damage or exposed sections. Use a multimeter to check for continuity issues. Replace damaged wires or connections. Reinstall the fixture and restore power to test.
Always prioritize safety and consult a professional if needed.
How Much Voltage Should A Light Fixture Have?
Light fixtures typically require 120 volts for standard residential use. Some fixtures may use 240 volts, especially in commercial settings. Always check the manufacturer’s specifications for accurate voltage requirements. Ensuring the correct voltage is crucial for safety and optimal performance.
Incorrect voltage can lead to poor lighting and potential hazards.
Conclusion
Testing light fixtures with a multimeter is simple and effective. These steps ensure accurate results. Always prioritize safety when handling electrical components. Make sure your multimeter works properly before use. Follow the instructions for your specific light fixture. This helps avoid mistakes and potential hazards.
A multimeter identifies issues quickly, saving time and effort. Understanding basic multimeter functions can be very helpful. Proper testing ensures your light fixtures function correctly. This leads to a well-lit and safe home environment. Always keep your tools in good condition for reliable results.
Remember, practice makes the process easier over time.


