
Are you tired of your car audio system not delivering the punch you crave? The secret to unlocking its true potential lies in setting your amp gain just right.
But here’s the kicker—using a multimeter can make this process more precise and efficient than ever before. Imagine cruising down the road with crisp, clear sound that feels like a live concert. You don’t need to be a tech wizard to make this happen.
In this guide, you’ll discover how to set amp gain with a multimeter, ensuring you get the best sound quality while protecting your equipment from damage. Get ready to transform your listening experience with a few simple steps that anyone can follow.
Understanding Amplifier Gain
Understanding amplifier gain is crucial for achieving the best audio performance. Gain refers to the amplification level of an audio signal. It ensures your sound system delivers clear and powerful audio. Setting the gain correctly prevents distortion and maximizes the efficiency of your amplifier.
What Is Amplifier Gain?
Amplifier gain is the ratio of output to input signal strength. It determines how much the amplifier boosts the audio signal. An optimal gain setting ensures a clean and precise sound output.
Importance Of Proper Gain Setting
Proper gain setting avoids audio distortion and protects your speakers. It ensures your audio system performs efficiently and reliably. Incorrect gain levels can lead to poor sound quality and potential equipment damage.
Common Mistakes In Gain Adjustment
One mistake is setting the gain too high. This causes distortion and speaker damage. Another error is setting the gain too low. This results in weak and low-quality sound output.
Tools Needed For Gain Setting
A multimeter is essential for accurate gain setting. It measures voltage levels and ensures precise adjustments. Other tools include a test tone CD or a digital file for consistent audio signal testing.
Tools Required
Setting the amp gain with a multimeter requires specific tools. These tools help measure and adjust the amplifier accurately. Using the right tools ensures your audio system performs optimally. Let’s explore the essential tools needed for this task.
Choosing The Right Multimeter
The multimeter is the key tool in this process. Choose one that offers accurate readings. Digital multimeters are preferred for their precision. Look for a model with an easy-to-read display. Ensure it can measure AC and DC voltage. The multimeter should have strong build quality. This ensures it lasts through regular use. A reliable multimeter makes the setup process smoother.
Other Essential Equipment
Alongside a multimeter, you need other items. A screwdriver is necessary for opening amp casings. You might also need a wiring diagram of your amplifier. This helps identify the right wires to test. Speaker wires are essential for connecting the amp to the speakers. Use quality wires to maintain sound quality. Lastly, a clean workspace helps avoid mistakes. Organize your tools for easy access. This makes the process efficient and safe.
Preparing For The Adjustment
Setting the amp gain with a multimeter requires careful preparation. This ensures accurate readings and prevents damage. Begin by gathering necessary tools. You will need a multimeter and a screwdriver. A clean workspace is also important. This helps avoid distractions during the process.
Ensuring Safety Measures
Safety should be your top priority. Start by turning off the amplifier. This prevents electrical shocks. Wear safety gloves for added protection. Check the multimeter’s battery. A low battery can give false readings. Ensure proper ventilation in your workspace. This helps in case of overheating.
Disconnecting The Speakers
Disconnecting the speakers is crucial. This prevents damage during adjustment. Use a screwdriver to detach speaker wires. Label the wires for easy reconnection later. Ensure all wires are clear and untangled. This makes reconnecting smoother. Double-check your connections before proceeding.
Setting Up The Multimeter
Setting amp gain with a multimeter involves connecting the device to measure voltage and current. Adjust the amplifier settings based on the readings for optimal sound quality. Ensure safe handling to prevent damage and achieve precise results.
Setting up your multimeter properly is crucial when you’re on the quest to set your amp gain accurately. It might seem like a daunting task at first, but with the right steps, you’ll find it straightforward and rewarding. Having a well-calibrated multimeter is like having a reliable co-pilot—it ensures your audio system delivers the performance you expect without any distortion.
Selecting The Correct Voltage Setting
First, you’ll need to select the correct voltage setting on your multimeter. This is a simple yet essential step. Set your multimeter to measure AC voltage, as this is the type of current your amplifier uses. Typically, you’ll find the AC voltage symbol as a “V” with a tilde (~) next to it. Now, think about the voltage range. Your amplifier’s output voltage will vary based on its power rating and the impedance of your speakers. If your multimeter has different voltage ranges, choose the one that best fits your expected output. This ensures precision in your readings.
Calibrating The Multimeter
Calibrating your multimeter is like tuning your guitar before a big gig. It sets the stage for accurate measurements. Start by checking the battery of your multimeter. A weak battery can lead to faulty readings, which could mislead your entire setup process. Next, test your multimeter’s accuracy with a known voltage source. If you have a test socket or a simple battery, use it to check if your multimeter reads the voltage correctly. If it’s off, consult the manual for calibration instructions or consider professional recalibration. Have you ever skipped calibrating because you were in a hurry? It’s a common mistake that can lead to frustration later. Taking the extra time to calibrate ensures you’re getting the most accurate data possible. Setting up your multimeter correctly is a game-changer in amp gain adjustment. It not only saves time but also ensures your audio system performs at its peak. Are you ready to get started with your multimeter setup?
Calculating Desired Output Voltage
Calculating the desired output voltage is crucial for setting your amp gain with a multimeter. It ensures your amplifier delivers sound at optimal levels without distortion. Understanding the basic principles behind this process will help you achieve the best audio experience. Start by getting familiar with key concepts like Ohm’s Law and amplifier specifications.
Understanding Ohm’s Law
Ohm’s Law is fundamental in electronics. It relates voltage, current, and resistance in a circuit. The formula is simple: Voltage (V) = Current (I) x Resistance (R). This equation helps you understand the relationship between these elements. Knowing this will guide you in calculating the desired output voltage.
For setting amp gain, you need to know the resistance of your speakers. This is usually measured in ohms. Using Ohm’s Law, you can determine how much voltage your amplifier should produce. This ensures the sound is clear and free from distortion.
Determining Amplifier Specifications
Understanding your amplifier specifications is vital. It tells you what your amp can handle and its limits. Look at the power rating and impedance. These are usually found in the user manual.
Power rating indicates how much power the amp can output safely. Impedance is the resistance your speakers provide. These details help you calculate the voltage needed for optimal performance. Use these specifications to set your amp gain correctly.
Ensure your amplifier matches your speakers’ impedance. This prevents damage and ensures smooth audio delivery. Once you have this information, you can proceed to calculate the desired output voltage. This ensures your audio system functions at its best.

Credit: learn.sonicelectronix.com
Adjusting The Gain
Setting amp gain with a multimeter ensures accurate audio levels. First, disconnect speakers to prevent damage. Then, connect the multimeter to the amplifier’s output terminals and adjust the gain until you reach the desired voltage. This method helps achieve optimal sound quality without distortion.
Adjusting the gain on your amplifier can enhance sound quality. It allows your audio system to perform at its best. Setting the gain correctly prevents distortion and ensures clarity. Using a multimeter makes this task precise and straightforward. Follow these steps to adjust the gain effectively.
Connecting The Multimeter To The Amplifier
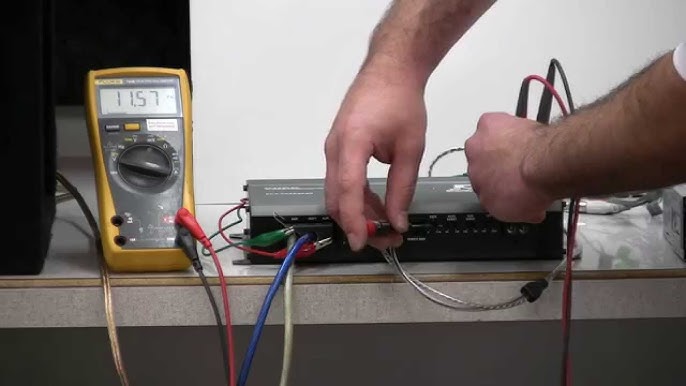
Begin by turning off your amplifier. Safety is crucial during this process. Connect the multimeter probes to the amplifier’s output terminals. Use the red probe for the positive terminal. Use the black probe for the negative terminal. Set the multimeter to AC voltage measurement. This setting helps in reading the voltage accurately. Ensure your multimeter is functioning correctly before proceeding.
Fine-tuning The Gain Control
Turn on your audio system at a low volume. Play a test tone through your system. A 1 kHz tone works well for this purpose. Gradually increase the gain on your amplifier. Watch the multimeter reading closely. Aim for a voltage that matches your system’s specifications. Adjust the gain until the desired voltage is achieved. Listen carefully for any distortion in the audio. If distortion occurs, lower the gain slightly. Gain adjustment ensures your audio system sounds clear and crisp. It prevents any potential damage from incorrect settings. With patience, you can achieve perfect sound quality.
Testing The Setup
Testing your amp gain setup ensures your audio system sounds optimal. After setting the gain with a multimeter, it’s crucial to verify the results. This step helps confirm that everything works correctly. It also ensures that sound quality meets expectations. Start by reconnecting the speakers and performing sound quality checks.
Reconnecting The Speakers
Begin by securely reconnecting the speakers to the amplifier. Double-check all connections to avoid loose ends. Ensure that each wire is connected to the right terminal. This prevents any distortion or imbalance in sound output. Secure connections are key for optimal performance.
Performing Sound Quality Checks
With speakers connected, play audio to test sound quality. Listen carefully for any distortions or issues. Adjustments might be necessary if the sound seems off. Ensure all frequencies are clear and balanced. This process confirms the gain setting is accurate.
Check both low and high volumes for consistency. This ensures the amplifier functions well at all levels. A balanced sound indicates a successful setup.
Credit: www.tiktok.com
Troubleshooting Common Issues
Setting amp gain with a multimeter can be tricky. Many face challenges during this process. Understanding common issues helps. You can ensure your amp delivers the best sound. Troubleshooting is key.
Addressing Distortion Problems
Distortion affects sound quality. It can ruin your audio experience. Check the gain level first. High gain often causes distortion. Lower the gain gradually. Listen for clarity. Use the multimeter to measure voltage. It should be consistent. Adjust until distortion clears.
Handling Inconsistent Readings
Inconsistent readings can confuse. Check the multimeter settings. Ensure it is on the correct mode. The probes should connect properly. Re-calibrate if needed. Sometimes, batteries cause issues. Replace them if readings fluctuate. Double-check all connections. They must be secure. Consistent readings mean accurate settings.
Maintenance Tips
Setting amp gain with a multimeter ensures optimal audio performance. Start by disconnecting speakers and setting your multimeter to AC voltage. Adjust the gain until it matches the desired voltage level for clear sound.
Maintaining your audio equipment is crucial for ensuring it performs at its best. When setting amp gain with a multimeter, regular maintenance can prevent sound distortion and prolong the life of your equipment. You might wonder how often you need to check your equipment or what practices can optimize its use. Let’s dive into some practical maintenance tips that will help you get the most out of your audio setup.
Regular Equipment Checks
Regularly checking your audio equipment can save you a lot of headaches down the road. Imagine the frustration of setting up for a party only to find your sound system isn’t delivering as expected. To avoid this, make it a habit to inspect your connections, wires, and amp settings. A multimeter can be your best friend in this process. It’s a simple tool that can verify if your amp gain is set correctly. Check the voltage and ensure it’s consistent with the manufacturer’s specifications. This simple step can make a huge difference in sound quality.
Optimal Usage Practices
Using your audio equipment optimally is key to its longevity. Are you aware of how your listening habits might be affecting your gear? Turning up the volume to the maximum frequently can strain your amp and speakers. Instead, try to keep your volume at a comfortable level that doesn’t push your equipment to the limits. Consider the environment where you use your equipment. Dust and moisture are your enemies here. Keeping your setup in a clean, dry space can prevent damage and ensure it performs well. Remember, a little care goes a long way in preserving your gear. Maintenance doesn’t have to be complicated. By incorporating these straightforward checks and practices, you can enjoy high-quality sound without the stress of unexpected equipment failures. How often do you check your audio setup?
Credit: www.youtube.com
Frequently Asked Questions
How To Properly Set Gain On An Amp?
To set the gain on an amp, turn the volume down on your audio source. Increase the amp’s gain until you hear distortion, then slightly reduce it. Ensure all settings are balanced for optimal sound quality.
How To Set Up A Multimeter To Measure Amps?
Turn the multimeter dial to the ampere setting. Connect the black lead to the COM port. Insert the red lead into the amp port. Break the circuit and connect leads in series. Read the display for current measurement. Ensure proper range selection for accuracy.
What Test Tone To Set Amp Gain?
Use a 1 kHz test tone for setting amplifier gain. This frequency helps achieve optimal clarity and performance. Adjust the gain until you reach the desired output without distortion. Proper setting ensures balanced audio quality and protects your equipment.
How To Determine The Gain Of An Amplifier?
To determine amplifier gain, divide the output voltage by the input voltage. Gain = Output Voltage / Input Voltage. Use a multimeter to measure voltages. Gain can also be expressed in decibels (dB): Gain(dB) = 20 * log10(Vout/Vin). Ensure your measurements are accurate for precise results.
Conclusion
Setting amp gain with a multimeter ensures clear sound. It protects speakers from damage too. Start by turning off your equipment. Connect the multimeter to the amplifier’s output. Adjust the gain until readings match your target voltage. This process takes patience.
But it’s worth the effort. Proper gain settings enhance audio quality. It makes listening more enjoyable. Always follow safety guidelines. Double-check connections for accuracy. With practice, the process becomes easier. Now, enjoy better sound from your system.




