Are you experiencing erratic engine idling, poor acceleration, or unexpected stalling? Your throttle position sensor (TPS) might be the culprit.
This small but crucial component ensures your vehicle runs smoothly by monitoring the position of the throttle. But how do you know if it’s working correctly? Testing a TPS sensor with a multimeter might sound technical, but it’s simpler than you think.
In this guide, you’ll discover step-by-step instructions to diagnose your TPS sensor’s health, saving you time and potentially costly repairs. Ready to become your car’s hero and ensure it runs like a dream? Let’s dive into the details and put your troubleshooting skills to the test.

Credit: www.onallcylinders.com
Tools Needed
Testing a TPS sensor with a multimeter requires the right tools. Having the correct tools ensures accurate readings and smooth testing. This section covers the essential tools needed for this task.
Multimeter
A multimeter is essential for measuring voltage and resistance. Choose a digital multimeter for precise results. It should have the capability to measure in the range required for automotive sensors.
Safety Gloves
Safety gloves protect your hands from electrical hazards. Choose gloves that are comfortable and fit well. Ensure they are made of insulating material to reduce risks.
Wire Probes
Wire probes help connect the multimeter to the sensor terminals. Choose probes that fit securely and conduct electricity well. They should be durable and provide reliable contact.
Vehicle Manual
The vehicle manual offers guidance on sensor location and wiring diagrams. It helps identify the correct terminals for testing. Keep it handy for quick reference during the process.
Safety Precautions
Testing a TPS sensor with a multimeter requires careful handling. Safety is crucial. Without proper precautions, you risk injury or damaging your vehicle. Following safety guidelines ensures a smooth testing process. Always prioritize your well-being before starting any electrical task.
1. Wear Protective Gear
Always wear gloves and safety goggles. Protect your eyes and hands from harm. Electrical components can cause shocks or burns. Safety gear is a must for any vehicle work.
2. Disconnect The Battery
Disconnecting the battery prevents accidental electrical shocks. It reduces the risk of short circuits. Always remove the negative terminal first. This step is vital for safety.
3. Use The Right Tools
Ensure your multimeter is suitable for the task. Check if it can handle the required voltage. Incorrect tools can lead to inaccurate readings. They might even damage the sensor.
4. Work In A Well-lit Area
Good lighting helps you see what you’re doing. It reduces mistakes and accidents. Ensure your workspace is clear and bright. This helps you focus on the task.
5. Follow Manufacturer Guidelines
Each vehicle model has specific guidelines. Always refer to the vehicle’s manual. It provides crucial instructions for handling the TPS sensor. Adhering to these ensures safety and accuracy.
6. Keep Water Away
Water and electricity don’t mix. Keep your work area dry. Avoid testing in damp conditions. Moisture can cause short circuits and damage.
Locating The Tps Sensor
Finding the Throttle Position Sensor (TPS) is the first step in testing it. This sensor plays a critical role in your vehicle’s engine management. Properly identifying it ensures accurate testing and performance.
The TPS is usually near the throttle body. It monitors the position of the throttle valve. Knowing its location helps you avoid testing the wrong component.
Understanding The Engine Layout
Start by familiarizing yourself with the engine layout. Look for the air intake system. The throttle body is a part of this system. The TPS is mounted on the throttle body. This is typically near the engine’s air intake manifold.
Identifying The Throttle Body
The throttle body controls air intake into the engine. It connects to the accelerator pedal. Look for a round, metal component with a butterfly valve. The TPS is attached here.
Recognizing The Tps Sensor
The TPS sensor is small and typically rectangular. It has electrical connectors attached. It might have two or three wires. These connectors are crucial for its function. Ensure you identify this sensor before proceeding.
Consulting The Vehicle’s Manual
Your vehicle’s manual is a valuable resource. It provides specific details about your car model. Use it to locate the TPS sensor precisely. Manuals often include diagrams for easy identification.
Credit: www.jakelectronics.com
Multimeter Setup
Setting up a multimeter correctly is essential for testing a TPS sensor. A TPS sensor measures throttle position and helps the vehicle’s computer manage engine performance. Before starting the test, make sure the multimeter is ready. This section will guide you through the setup process for a multimeter.
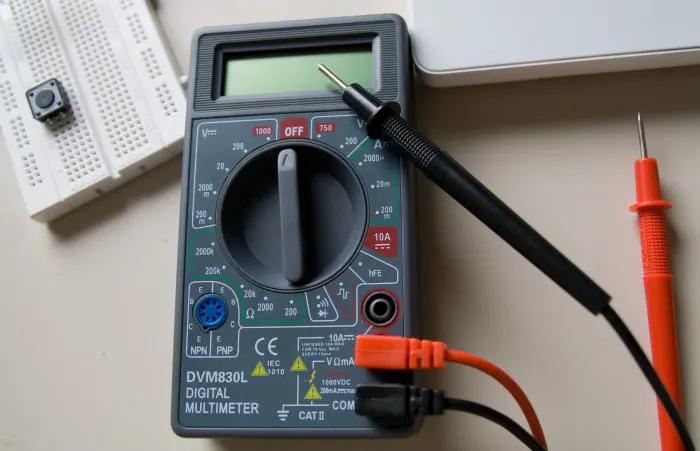
Choosing The Right Multimeter
Ensure you have a digital multimeter. Digital models offer precise readings. They are easier to read than analog ones. Check if your multimeter is in good condition. The display should be clear. The leads should be intact.
Selecting The Correct Settings
Set your multimeter to measure voltage. This is crucial for testing a TPS sensor. Most multimeters have a dial. Turn it to the voltage setting. Choose DC voltage since vehicles use DC current. Make sure the multimeter range is suitable. For a TPS sensor, the range should be between 0-5 volts.
Connecting The Multimeter Leads
Connect the multimeter leads correctly to ensure accurate results. Insert the black lead into the COM port. It is the common ground connection. Insert the red lead into the VΩmA port. It measures voltage, resistance, and current. Position the leads carefully to avoid errors.
Preparing The Tps Sensor
Locate the TPS sensor on your vehicle. It is usually near the throttle body. Ensure the engine is off for safety. Identify the wires connected to the TPS sensor. The wires usually have three colors: ground, signal, and reference voltage. You need to test the signal wire.
Testing The Sensor
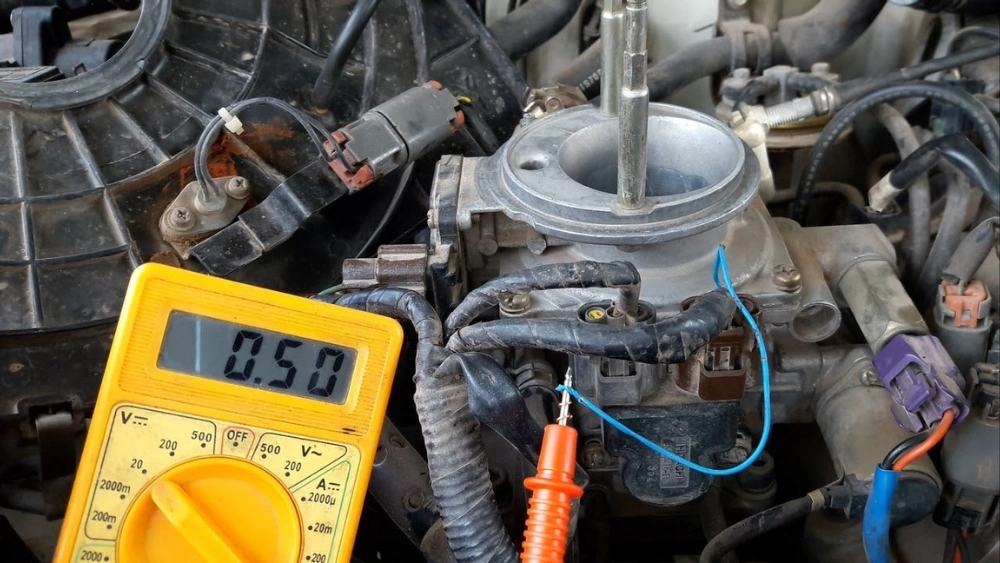
Turn the ignition to the on position without starting the engine. This provides power to the TPS sensor. Place the black lead on the ground wire. Position the red lead on the signal wire. Note the voltage reading on the multimeter. It should increase smoothly as you move the throttle.
Testing Voltage
Testing the voltage of a TPS sensor with a multimeter involves checking the sensor’s electrical output. Connect the multimeter’s probes to the sensor’s terminals and measure the voltage. Ensure readings match the manufacturer’s specifications for accurate sensor performance.
Testing the voltage of a TPS (Throttle Position Sensor) is a crucial step in ensuring your vehicle’s engine runs smoothly. A malfunctioning TPS can lead to poor performance, rough idling, and even stalling. Luckily, using a multimeter to test the sensor’s voltage is straightforward. By understanding how to prepare, connect, and read voltage correctly, you can diagnose issues with precision. Let’s dive into the specifics of testing voltage with a multimeter.Preparing The Sensor
Before you begin testing, make sure the vehicle is off. Locate the TPS on the throttle body. It’s usually held in place by a couple of screws and has a three-wire connector. You might need to consult your vehicle’s manual to find its exact location. Always ensure that the sensor is clean and free from debris. This prevents false readings.Connecting The Multimeter
Once the TPS is prepared, it’s time to connect the multimeter. Set your multimeter to measure voltage, usually indicated by a “V” symbol. Attach the multimeter’s black probe to the ground wire in the TPS connector. Connect the red probe to the sensor wire. This wire typically feeds back to the ECU (Engine Control Unit). Having a stable connection is key to getting accurate readings.Reading The Voltage
Turn the vehicle’s ignition to the “on” position, but don’t start the engine. Observe the voltage reading on the multimeter. A healthy TPS should show a voltage between 0.2 and 0.9 volts at idle. As you manually move the throttle, the voltage should smoothly rise up to approximately 4.5 volts at full throttle. If the voltage jumps erratically or doesn’t change, you may have a faulty TPS. Testing voltage doesn’t have to be daunting. Each step helps ensure accurate measurements and diagnoses. Have you ever faced a confusing car issue that a simple multimeter test solved? Share your stories or questions in the comments below!Testing Resistance
Testing resistance in a TPS sensor with a multimeter involves checking for consistent voltage output. Connect the multimeter to the sensor, adjusting the throttle to ensure smooth reading changes. This process helps determine if the sensor functions correctly, aiding in vehicle performance.
Testing the resistance of a Throttle Position Sensor (TPS) with a multimeter is a crucial step in diagnosing issues with your vehicle’s throttle system. It’s a simple process that even a beginner can master with a bit of patience and attention. Understanding how to measure resistance accurately can save you from costly repairs and ensure your vehicle runs smoothly.Setting The Multimeter
Before you begin, ensure your multimeter is set to the resistance (ohms) setting. This is often represented by the Greek letter omega (Ω). Choose a range that can measure up to 10k ohms, which is typically suitable for most TPS sensors. If your multimeter has an auto-range feature, it will automatically select the correct range for you. Check the battery of your multimeter to avoid incorrect readings. A fresh battery ensures accurate results.Measuring Resistance
With the multimeter set, locate the TPS sensor in your vehicle. It’s usually connected to the throttle body. Carefully disconnect the sensor’s electrical connector to access its terminals. Avoid touching the terminals directly with your hands to prevent static damage. Connect the multimeter probes to the sensor’s terminals. The order usually doesn’t matter when measuring resistance. Observe the reading on your multimeter’s display. It should show a steady resistance value, which you will use in the next step.Interpreting Results
Compare the reading from your multimeter with the manufacturer’s specifications for the TPS sensor. These specifications are often found in the vehicle’s service manual. A significant deviation from the specified resistance indicates a faulty sensor. A good sensor should have a resistance that falls within the specified range. Consider how a faulty TPS sensor could affect your driving experience. Erratic idle, poor fuel economy, or engine stalling might be due to incorrect TPS readings. Have you ever faced unexpected car issues due to a faulty sensor? Share your experience to help others learn from it. Testing the resistance of a TPS sensor is straightforward but requires careful attention. Taking the time to test it properly can prevent future headaches and keep your vehicle in top condition.Troubleshooting Tips
Testing a TPS sensor with a multimeter involves checking voltage signals. First, locate the sensor on the throttle body. Then, connect the multimeter to the sensor’s terminals to measure voltage changes while moving the throttle. This helps ensure proper sensor function and smooth engine performance.
Troubleshooting a TPS (Throttle Position Sensor) can be daunting, especially if you’re not familiar with using a multimeter. However, with a bit of guidance and a few handy tips, you can confidently diagnose potential issues. Understanding the nuances of testing a TPS sensor can save you time and money, and keep your vehicle running smoothly.Check For Faulty Connections
Start by inspecting the connections. Loose or corroded wires might be the culprit. Ensure that all connections are tight and free from rust or dirt. A faulty connection might mimic a failing TPS sensor, leading to incorrect diagnosis. Use your multimeter to test the continuity of the wires to ensure they are conducting electricity properly.Verify The Sensor Voltage
With your multimeter set to the voltage setting, test the sensor’s output. The TPS sensor typically outputs between 0.5 to 4.5 volts. Is the reading outside this range? This could indicate a problem. Adjust the throttle manually and observe if the voltage changes smoothly as the throttle moves. A sudden jump or drop may suggest an issue with the sensor.Inspect The Sensor’s Resistance
Set your multimeter to measure resistance. Disconnect the TPS sensor from the vehicle’s harness. Measure the resistance across the terminals. A significant deviation from the expected resistance indicates a fault. Refer to your vehicle’s service manual for the correct resistance values.Test The Sensor’s Response To Throttle Movement
Reconnect the TPS sensor and monitor its response as you move the throttle. The voltage should increase steadily with throttle movement. Did you notice any erratic readings? This can pinpoint a worn-out sensor. Smooth and consistent readings indicate a healthy sensor.Consider Environmental Factors
Temperature changes can affect the TPS sensor’s performance. Observe any changes in readings under different temperature conditions. Have you ever noticed a problem only during cold mornings or hot afternoons? This might be a clue. Sometimes, environmental factors can help you identify intermittent issues that aren’t immediately apparent. Testing a TPS sensor with a multimeter doesn’t have to be a complex task. By following these troubleshooting tips, you can effectively diagnose and address sensor issues. Have you ever had a mysterious engine problem that was solved with just a multimeter and a bit of patience? Share your experiences in the comments below!
Credit: www.youtube.com
Replacing A Faulty Tps Sensor
Testing a faulty TPS sensor with a multimeter can help diagnose vehicle performance issues. Measure voltage at idle and full throttle to ensure proper function. Consistent readings indicate a healthy sensor, while irregular results suggest replacement is necessary.
Replacing a faulty TPS (Throttle Position Sensor) might seem daunting, but it’s often necessary to ensure your vehicle runs smoothly. After testing with a multimeter, you might discover that your TPS sensor is not working correctly. This part plays a crucial role in controlling your engine’s air intake, which directly affects performance. If the sensor is faulty, it can lead to poor fuel economy and sluggish acceleration. Let’s dive into how you can replace it effectively.Preparing For Replacement
Before you start, gather all necessary tools, including a new TPS sensor, a socket set, and a screwdriver. Check your vehicle’s manual for sensor specifications and location. This information is crucial for ensuring you have the correct replacement part. Wear safety gloves and ensure your car is on a flat surface. Disconnect the battery to avoid any electrical mishaps while working. Are you ready to get hands-on with your car?Removing The Faulty Sensor
Locate the TPS sensor, usually on the throttle body. Carefully unplug the sensor’s connector, ensuring you do not damage the wires. Use a socket or screwdriver to unscrew the sensor from its position. Once removed, inspect the area for any debris or corrosion. Clean it thoroughly before installing the new sensor. This step is vital to ensure a secure fit and optimal performance.Installing The New Sensor
Align the new TPS sensor with the mounting holes and securely screw it in place. Make sure it’s snug but don’t over-tighten it. Reconnect the sensor’s wiring carefully, ensuring each connection is firm. Double-check the fitment and connections to avoid future issues. Have you ever considered how a simple sensor can impact your vehicle’s efficiency?Testing The New Sensor
Reconnect the battery and start the engine. Observe the throttle response and check for any error codes on your dashboard. A smoothly running engine is a good indication that your replacement was successful. If you notice any issues, retrace your steps to ensure everything was installed correctly. The peace of mind from knowing your car is running efficiently is worth the effort. Replacing a TPS sensor might seem like a small task, but it can significantly impact your driving experience. Are you ready to take control of your vehicle’s performance?Frequently Asked Questions
How To Test Tps With A Multimeter?
To test a TPS with a multimeter, first, disconnect the sensor. Set the multimeter to voltage. Connect the probes to the TPS terminals. Turn the ignition on without starting the engine. Check for a gradual increase in voltage as the throttle opens.
Compare readings with manufacturer specifications.
How To Check If A Tps Sensor Is Bad?
Check the TPS sensor by using a multimeter. Measure voltage at idle and wide open throttle. Compare readings with manufacturer specifications. Look for erratic voltage or lack of smooth transition between positions. Inspect for physical damage or wiring issues. If unsure, consult a professional mechanic.
How Do I Test A Sensor With A Multimeter?
To test a sensor, set the multimeter to measure resistance or voltage. Connect the multimeter leads to the sensor terminals. Read the multimeter display to check for expected values. Compare these values with the sensor’s specifications to determine functionality.
How Many Volts Should A Tps Sensor Have?
A TPS sensor typically reads between 0. 2 to 1. 5 volts at idle and up to 5 volts at full throttle. Always refer to your vehicle’s manual for specific voltage ranges. Proper voltage ensures accurate throttle position readings, enhancing engine performance.
Conclusion
Testing a TPS sensor with a multimeter is straightforward. Follow the steps carefully. Ensure the multimeter is working correctly. Safety is essential—disconnect the battery before starting. Check the sensor’s voltage and resistance accurately. Use the multimeter’s probes carefully on the sensor terminals.
Compare your readings with the manufacturer’s specifications. A faulty sensor affects vehicle performance. Regular checks prevent unexpected issues. You can save money by diagnosing problems early. Enjoy smoother rides with a well-maintained sensor. Remember, practice makes perfect. Keep learning and improving your skills.
Your vehicle’s health depends on it.


