
Are you staring at that sleek ceramic tile wall, wondering if it’s possible to drill a hole without making a mess or cracking the tile? You’re not alone.
Many people find themselves in this situation, whether they’re looking to hang a towel rack, install a shelf, or simply add a decorative touch. The idea can seem daunting, but it doesn’t have to be. Imagine the satisfaction of having everything in place just where you want it—no chips, no cracks, and no stress.
In this guide, you’ll discover the simple, step-by-step process to safely and effectively drill a hole in ceramic tile, using tools and techniques that ensure precision and protect your investment. Ready to transform your space with confidence? Let’s dive in.
Tools For Drilling Ceramic Tile
Drilling into ceramic tile requires the right tools for a clean job. The tile surface is hard and brittle, posing a challenge for standard drills. With proper equipment, you can make precise holes without cracking the tile. Below are the essential tools for this task.
Drill Bits For Ceramic Tile
Ceramic tile needs special drill bits to prevent chipping. Carbide-tipped bits work well for ceramic surfaces. Diamond-tipped bits are great for tougher tiles like porcelain. Both types ensure smooth drilling through the hard surface.
Drill Machine
The right drill machine is crucial for success. A variable speed drill offers better control. Lower speeds reduce the risk of cracking tiles. Cordless drills provide flexibility and ease of use.
Masking Tape
Masking tape prevents drill bits from slipping on smooth tiles. Place a small piece on the drilling spot for better grip. It also helps mark the exact point for drilling.
Coolant
Drilling generates heat that can damage tiles. Use water as a coolant to keep the drill bit cool. Spray water on the tile while drilling for best results.
Safety Gear
Safety gear protects you during the drilling process. Wear safety goggles to shield your eyes from debris. Gloves provide a better grip and protect your hands.

Credit: danslelakehouse.com
Choosing The Right Drill Bit
Drilling holes in ceramic tile requires precision and care. Choosing the right drill bit is crucial for success. Ceramic tiles are hard and brittle. Using the wrong bit can cause cracks or damage. Selecting a suitable drill bit ensures clean cuts and prevents costly mistakes.
Diamond-tipped Bits
Diamond-tipped bits are ideal for ceramic tiles. They offer superior cutting ability. Diamonds are the hardest known material. They slice through ceramic effortlessly. Diamond bits are durable and long-lasting. These bits maintain their sharpness over multiple uses. They provide clean, accurate holes without chipping.
Carbide-tipped Bits
Carbide-tipped bits are another great option. They are designed for hard surfaces. Carbide is tougher than steel. It withstands heat and friction well. These bits work effectively on glazed tiles. Carbide-tipped bits are more affordable than diamond bits. They are a reliable choice for occasional drilling tasks.
Preparing The Tile Surface
Drilling a hole in ceramic tile might seem daunting, but with proper preparation, it becomes manageable. The tile surface must be prepared carefully to avoid cracks and damages. This process involves cleaning, marking, and the strategic use of masking tape.
Cleaning And Marking
Start by cleaning the tile surface thoroughly. Use a mild detergent and warm water. Remove any dirt or grime that may interfere with the drilling process. Dry the tile completely to prevent slipping during marking.
Mark the spot where you want to drill using a felt-tip pen. Make sure the mark is clear and visible. Accurate marking is crucial for precise drilling.
Using Masking Tape
Masking tape plays a vital role in preparing the tile. Place a strip of masking tape over the marked spot. This helps prevent the drill bit from slipping. The tape provides grip and stability during drilling.
Double-check the marked spot through the tape. Ensure that it’s visible and properly aligned. Masking tape also reduces vibrations, minimizing the risk of tile damage.
Drilling Techniques
Drilling a hole in ceramic tile requires precision and the right tools. Use a carbide-tipped drill bit for best results. Start slowly to avoid cracking the tile, and keep the drill steady.
Drilling into ceramic tile can seem daunting at first, but with the right techniques, you can achieve clean and precise results. Whether you’re hanging a towel rack or installing a new fixture, understanding the nuances of drilling into this hard surface is essential. Let’s dive into effective drilling techniques that will help you handle your next DIY project with confidence.Starting The Hole
Before you begin, gather the right tools. A carbide-tipped masonry bit is your best friend here. Make sure to mark the exact spot where you want to drill using a non-permanent marker or masking tape. This prevents slipping and provides a clear target. Place a piece of masking tape over the mark to prevent the drill bit from wandering. It also helps reduce chipping around the hole. Start drilling at a low speed. Applying too much pressure can crack the tile. Patience is key here. Have you ever noticed how a gentle approach often leads to better results? The same goes for drilling tiles. Take your time to start the hole properly.Maintaining Control
Once the hole is started, maintaining control of the drill is crucial. Increase the speed slightly as you proceed. Keep a steady hand. A wobbling drill can cause the hole to become uneven or larger than intended. Remember to cool the drill bit occasionally with water. This prevents overheating and prolongs the life of your bit. Consider pausing to check your progress. This ensures you’re drilling straight and hitting the desired depth. Have you ever been halfway through a task and realized something’s off? Regular checks help you catch mistakes early. By following these steps, you’ll not only protect your tile but also achieve the professional finish you’re aiming for. What other projects have you tackled that seemed intimidating at first? Share your experiences and tips in the comments. Your insights could be the encouragement someone else needs to take on their own DIY challenge.Safety Precautions
Drilling into ceramic tile requires careful handling to avoid cracks. Use a tile drill bit for smooth operation. Secure the tile and wear protective gear to ensure safety.
Drilling a hole in ceramic tile can seem daunting, but with the right safety precautions, you can tackle this task smoothly. Ensuring you take the necessary steps to protect yourself and your tile will make the process easier and safer. Whether you’re hanging a towel rack or installing a new fixture, it’s crucial to understand the safety measures involved.Protective Gear
Wearing protective gear is not just a suggestion; it’s a necessity. Start with safety goggles to shield your eyes from potential ceramic shards. A simple slip can send tiny pieces flying, and goggles can prevent serious eye injuries. Consider wearing gloves to protect your hands. While ceramic tiles are smooth, they can become sharp when broken. Gloves add a layer of protection, keeping your fingers safe from cuts. Think about using a dust mask. Drilling can create dust, which is not just a nuisance but can irritate your lungs. A mask helps you breathe easily while staying focused on your task.Avoiding Tile Cracks
Cracking a tile is every DIYer’s nightmare. To prevent this, use a drill bit designed for ceramic tiles. These bits are less likely to slip, reducing the risk of cracking. Keep your drill speed slow and steady. Fast speeds increase heat, which can lead to cracks. A controlled pace ensures you maintain precision without damaging the tile. Before drilling, consider the tile’s thickness. Thicker tiles may require more patience and care. Ask yourself, “Is my drill bit suitable for the tile’s density?” This question can save you from unexpected mishaps. Remember, drilling a hole in ceramic tile is a skill you can master with practice. Taking these safety precautions not only prevents accidents but also ensures your project is a success. Have you ever faced a challenging DIY task and realized the importance of preparation? It’s all about being ready and staying safe.Post-drilling Tips
Drilling ceramic tile requires careful technique to avoid damage. Use a diamond-tipped bit for precision and maintain steady pressure. After drilling, clean the area to remove dust and debris, ensuring a neat finish.
After successfully drilling a hole in ceramic tile, it’s crucial to follow specific steps. These post-drilling tips ensure your tile remains intact and functional. Proper care after drilling helps maintain the tile’s appearance and durability. Let’s explore essential tips to keep your tile in excellent condition.Cleaning The Tile
Once the drilling is done, cleaning the tile is vital. Dust and debris from drilling can settle on the surface. Use a soft cloth to gently wipe the tile. Avoid harsh chemicals that might damage the tile’s finish. Warm water with mild soap is often sufficient for cleaning. Rinse the area thoroughly to remove any soap residue. This simple cleaning step restores the tile’s shine.Checking For Damage
After cleaning, inspect the tile for any damage. Look closely at the hole and surrounding area. Check for cracks, chips, or any uneven edges. If you find any, consider using a tile repair kit. These kits can help fix minor issues effectively. Ensuring the tile is damage-free helps maintain its longevity. Regular inspections can prevent future problems and keep your tile looking new.Common Mistakes To Avoid
Drilling through ceramic tiles can be tricky. Using excessive force might crack the tile. Not choosing the right drill bit can damage both the tile and the drill.
Drilling holes in ceramic tile can be tricky. Mistakes can crack or damage the tile. Understanding common errors helps ensure a smooth process. Avoid these pitfalls for a successful drilling experience.Using Incorrect Tools
Choosing the wrong tool can cause problems. Some tools may damage the tile. A regular drill bit will not work on ceramic. Use a carbide-tipped drill bit instead. It’s designed for hard surfaces like ceramic. Check the drill type as well. A power drill with variable speed is best. It allows you to control pressure and speed. Remember, the right tool makes a big difference.Rushing The Process
Patience is key when drilling ceramic tiles. Rushing can lead to cracks and mistakes. Start with a low speed. Increase speed gradually. Applying too much pressure can also cause damage. Let the drill do the work. Make sure to keep the drill steady. A steady hand helps prevent slips. Take breaks if needed. This keeps the drill from overheating. Careful steps lead to a perfect hole. `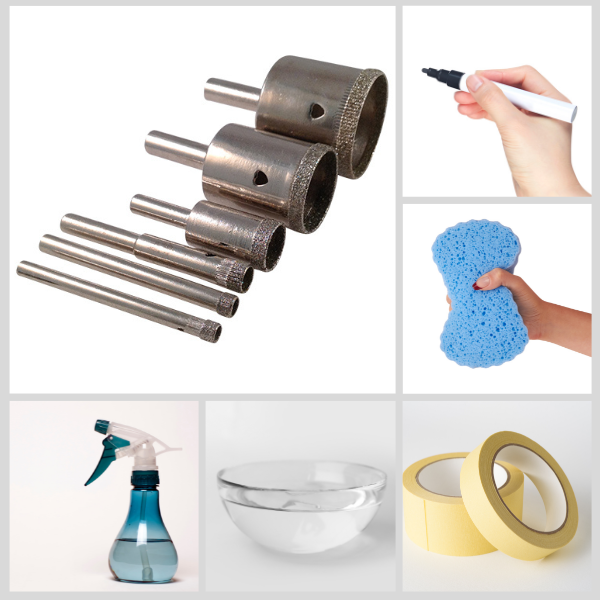
Credit: eternaltools.com

Credit: www.youtube.com
Frequently Asked Questions
How To Drill Into Ceramic Tile Without Cracking It?
Use a carbide-tipped drill bit for ceramic tiles. Apply masking tape over the spot to prevent slipping. Drill slowly with minimal pressure. Keep the drill bit cool by misting water while drilling. Avoid using hammer drills, as they can crack tiles.
How Do You Drill A Hole In Ceramic Without Cracking It?
Use a carbide-tipped drill bit for ceramic. Apply masking tape to the surface for grip. Drill slowly with light pressure. Keep the drill perpendicular to the surface. Frequently cool the bit with water to prevent overheating.
What Is The Best Drill Bit For Ceramic Tile?
Use a diamond-tipped drill bit for ceramic tile. It efficiently cuts through hard surfaces without cracking. Ensure steady pressure and cooling. Avoid carbide-tipped bits as they may damage tiles. Diamond bits offer longevity and precision, making them ideal for tile drilling projects.
How Do I Drill Holes In Ceramic Tiles?
Use a carbide-tipped drill bit for ceramic tiles. Start with a small pilot hole. Apply steady pressure while drilling. Keep the drill at a low speed. Use masking tape on the tile to prevent slipping. Keep the area cool with water to avoid cracks.
Conclusion
Drilling ceramic tile is possible with the right tools and care. Use a diamond or carbide drill bit for best results. Start slowly to avoid cracking the tile. Keep your drill steady and apply light pressure. Use masking tape to mark the spot and prevent slipping.
Remember to cool the drill bit with water. Patience is key. Practice on a spare tile if you’re unsure. Safety goggles and gloves are a must. With these tips, you can successfully drill your ceramic tiles. Happy DIY!


