Imagine the frustration of dealing with a faulty temperature sensor, especially when you rely on it for critical operations. Understanding how to test a temp sensor with a multimeter can save you time, money, and hassle.
You might wonder if it’s complicated or requires expert skills. The truth is, with the right guidance, you can easily perform this task yourself. Picture the satisfaction of solving the problem and getting things back on track without waiting for professional help.
In this guide, you’ll learn straightforward steps to test a temp sensor using a multimeter, empowering you with the knowledge to tackle sensor issues confidently. By the end, you’ll have the know-how to ensure your sensors are functioning correctly, giving you peace of mind and control over your devices. Keep reading to unlock these practical insights.
Tools Needed
A multimeter is essential to test a temperature sensor effectively. Ensure you have probes and safety gloves for accurate readings. A user manual helps understand the multimeter’s functions better.
Testing a temperature sensor with a multimeter may sound daunting, but with the right tools, it becomes straightforward. You’ll need a few essential items to ensure accuracy and safety. Let’s dive into what you need to get started.Multimeter
A multimeter is your primary tool for this task. It measures voltage, resistance, and current, helping you diagnose if your temp sensor is functioning correctly. Choose a digital multimeter for ease of reading. Ensure it’s capable of measuring the specific parameters your sensor operates within. A reliable multimeter can turn a confusing situation into a manageable task, as I learned when my car’s temperature gauge malfunctioned. It turned out to be a faulty sensor, easily identified with my trusty multimeter.Temp Sensor
The temp sensor itself is, of course, essential. Before testing, make sure it’s clean and free from any debris that could affect readings. Whether it’s a thermistor, thermocouple, or RTD, understanding its specifications is crucial. This knowledge helps you set your multimeter correctly. When I first started working with sensors, I underestimated the importance of knowing your sensor type. It was a costly mistake that could have been avoided by simply checking the sensor’s manual.Safety Equipment
Safety should never be an afterthought. Use insulated gloves and goggles to protect yourself from electrical shocks or burns, especially if you’re dealing with high temperatures. A sturdy work surface and proper lighting can also prevent accidents. Consider the safety lessons I learned during my first electrical project, which taught me that a little caution goes a long way. Would you risk a preventable injury when a few safety measures can keep you secure? Gathering these tools not only prepares you for testing but also empowers you with the confidence to handle the task efficiently. What other tools do you think might be handy in testing sensors?Preparing The Sensor
Before you start testing your temperature sensor with a multimeter, preparing the sensor is crucial for accurate results. This step ensures that the sensor is in optimal condition and free from any obstructions that might affect the readings. Think of it as giving your car a quick check before a long drive. You want everything to be in top shape.
Inspecting Physical Condition
Begin by examining the sensor for any visible damage. Look for cracks, dents, or frayed wires. These can be signs that your sensor might not function correctly. Imagine finding a scratch on your phone screen; it might still work, but it’s not ideal. A damaged sensor can lead to inaccurate readings.
Check the connector and pins for corrosion or rust. These elements can disrupt the electrical signals. If you notice any wear and tear, consider replacing the sensor before testing. Just like a rusty hinge needs oiling, a corroded sensor needs attention.
Cleaning The Sensor
Once you’ve inspected the sensor, it’s time to clean it. Dust and grime can accumulate on the sensor, affecting its performance. Use a soft cloth or a small brush to gently remove any dirt. You wouldn’t wear dirty glasses, would you? The same principle applies here.
For stubborn dirt, a small amount of isopropyl alcohol on a cotton swab can work wonders. Be cautious not to soak the sensor, as excessive moisture can damage it. You want the sensor to shine, not swim.
Ask yourself: Is my sensor truly clean and ready for testing? A clean sensor is your first step towards reliable readings. Taking the time to prepare your sensor ensures accuracy and saves you from unnecessary troubleshooting later.
Setting Up The Multimeter
Setting up your multimeter correctly is crucial for testing a temp sensor. A multimeter measures electrical values like voltage and resistance. Proper setup ensures accurate readings. This section guides you through setting up your multimeter for testing temperature sensors.
Choosing The Right Mode
First, select the mode suitable for your task. For temp sensors, choose the resistance mode. This mode checks how much resistance the sensor has. Resistance mode is often marked with the letter “Ω”. Ensure the multimeter is off before switching modes. This prevents damage to the device.
Setting The Range
Next, set the range to match the expected value. Temp sensors usually have a specific resistance range. Check the sensor’s specifications for guidance. Set your multimeter to a range slightly higher than the expected maximum. This prevents overload and inaccurate readings. If unsure, start with the highest range and adjust accordingly.

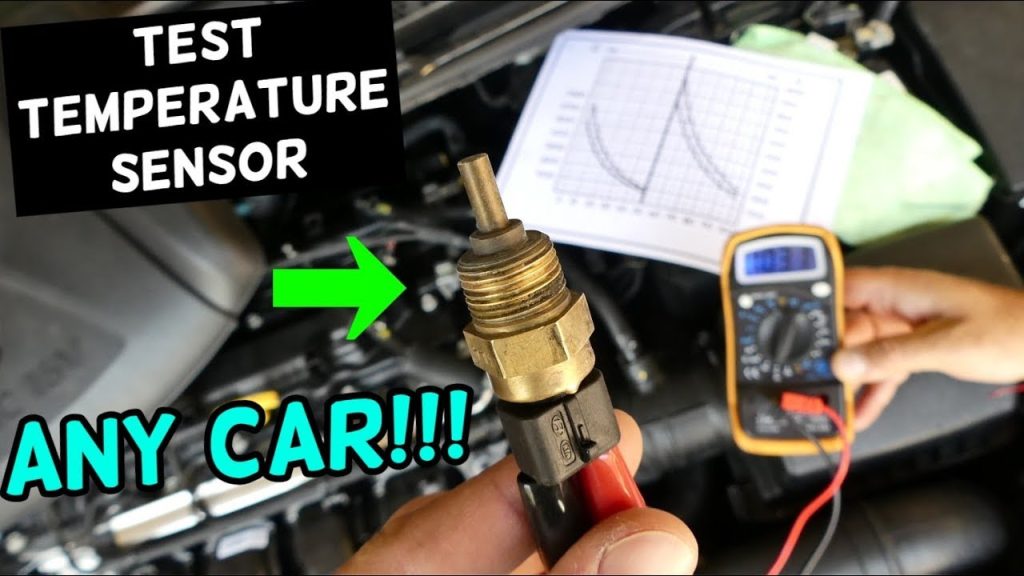
Credit: support.clivecoffee.com
Testing The Sensor
Testing a temperature sensor with a multimeter is crucial. It ensures accurate readings in your devices. This process involves measuring resistance and checking voltage output. Using a multimeter for these tests is straightforward. You’ll find it simple and effective.
Measuring Resistance
Start by setting the multimeter to the resistance mode. Disconnect the sensor from any power source. Place the probes on the sensor terminals. Read the resistance value on the multimeter screen. Compare it to the expected resistance range. This confirms if the sensor is working correctly.
Checking Voltage Output
Switch the multimeter to voltage mode. Reconnect the sensor to its power source. Attach the probes to the sensor terminals. Check the voltage reading on the multimeter. Ensure it matches the expected voltage output. A correct voltage indicates a functional sensor.
Interpreting Results
Testing a temperature sensor with a multimeter involves careful analysis of results. Understanding these results ensures accurate sensor function. The multimeter provides readings that indicate sensor performance. Interpreting these readings is crucial for effective diagnostics.
Understanding Resistance Values
Resistance values show sensor condition. Measure resistance with the multimeter set to ohms. Check the sensor’s datasheet for standard resistance values. Compare readings with standard values. Large deviations suggest sensor issues. Consistent readings indicate a healthy sensor.
Analyzing Voltage Readings
Voltage readings highlight sensor output. Set the multimeter to volts for this test. Check the sensor’s voltage output. Compare readings to expected voltage levels. Low voltage may indicate a faulty sensor. Stable voltage suggests proper function.

Credit: www.wikihow.com
Troubleshooting Common Issues
Troubleshooting common issues with temperature sensors can be tricky. A multimeter helps diagnose problems quickly. Correct diagnosis requires understanding potential issues. Let’s explore how to identify and resolve them.
Identifying Faulty Sensors
First, ensure the sensor is clean and undamaged. Dirt or damage can affect readings. Check the sensor’s wiring for visible wear. Loose connections often cause faulty readings. Tighten any loose connections.
Measure the sensor’s resistance with the multimeter. Compare this to the manufacturer’s specifications. A significant difference indicates a faulty sensor. Replace the sensor if the readings are inconsistent.
Correcting Multimeter Settings
Set your multimeter to measure resistance in ohms. Ensure the settings match the sensor’s specifications. Incorrect settings can lead to inaccurate readings.
Check the multimeter’s battery. A weak battery affects accuracy. Replace it if necessary. Calibrate the multimeter before testing. This ensures reliable results.
Test the multimeter on a known resistor. This confirms it’s working correctly. If results differ, recalibrate or replace the multimeter.
Tips For Accurate Measurements
Testing a temp sensor with a multimeter requires precision for accurate results. First, set the multimeter to resistance mode. Then, connect the probes to the sensor terminals, ensuring solid contact for reliable readings.
Testing a temperature sensor with a multimeter can be a straightforward task if done correctly. Accuracy in measurement is vital to ensure the sensor functions properly. Even a slight error can lead to incorrect readings, affecting your entire project. Here are some essential tips to achieve precise results.Ensuring Stable Temperature
Before you start testing, ensure that the environment where you are measuring is stable. Temperature fluctuations can skew your readings, leading you to incorrect conclusions. For instance, if you are testing in a room with a draft or under direct sunlight, the sensor might not give a true reflection of its calibration. You might want to consider using a controlled environment, like a shaded room or an enclosed space, to maintain a consistent temperature. This stability allows you to test the sensor without external interference. Have you ever noticed how your body temperature feels different in varying weather conditions? The same principle applies here.Avoiding Common Mistakes
One common mistake people make is not checking the multimeter settings. Always ensure it is set to the correct mode, typically ohms (Ω) for resistance measurement, which is crucial for temperature sensors. Missteps in settings can lead to false readings or even damage the sensor. Avoid touching the probe ends with your fingers during testing, as body heat can affect the readings. Use alligator clips if possible to minimize contact and ensure a more stable connection. Remember the time you tried balancing on a wobbly chair? The same applies to loose connections—they just don’t work well. Always double-check your connections. A loose wire or an incorrect hookup can lead to inaccurate results. Take your time to ensure everything is securely connected. It’s like fastening your seatbelt before driving; it’s a small step that makes a big difference. By keeping these tips in mind, you can enhance the accuracy of your measurements and ensure your temperature sensor is working optimally. Do you have any other tips that have worked for you? Share them in the comments below!
Credit: www.youtube.com
Frequently Asked Questions
Can You Check A Temperature Sensor With A Multimeter?
Yes, you can check a temperature sensor with a multimeter. Set the multimeter to measure resistance. Connect the probes to the sensor terminals. Compare the reading with the sensor’s specifications to verify its condition. Adjust or replace the sensor if necessary.
How To Check If A Temperature Sensor Is Faulty?
Test the sensor by comparing its readings with a known accurate thermometer. Check for visible damage or corrosion. Inspect wiring connections for loose or broken wires. Use a multimeter to measure resistance and ensure it matches the manufacturer’s specifications. Replace the sensor if readings remain inconsistent.
How To Test If A Sensor Is Bad With A Multimeter?
Set the multimeter to measure resistance. Disconnect the sensor. Connect multimeter leads to sensor terminals. Check for expected resistance value. A significantly different reading indicates a faulty sensor.
How To Ohm Test A Temperature Sensor?
To ohm test a temperature sensor, first disconnect it from the circuit. Set a multimeter to the ohms setting. Place the probes on the sensor terminals. Compare the resistance reading with the manufacturer’s specifications. Ensure the sensor is at room temperature for accurate results.
Conclusion
Testing a temp sensor with a multimeter is straightforward. Follow the steps carefully. Ensure your multimeter is set to the correct setting. Check the sensor’s connections. A stable reading indicates a working sensor. If readings fluctuate, inspect the sensor for faults.
Regular testing helps maintain accurate temperature readings. This ensures devices work efficiently. Always handle sensors gently to avoid damage. With practice, testing becomes quicker and easier. Keep your multimeter in good condition for reliable results. Happy testing, and keep learning for better understanding!


