
Are you experiencing engine problems and suspect the crank sensor might be the culprit? You’re not alone.
The crank sensor is a crucial component in your vehicle, responsible for monitoring the position and rotational speed of the crankshaft. When it malfunctions, your car might refuse to start or run erratically. But before you rush to the mechanic, there’s something you can do yourself.
In this guide, you’ll learn how to check the crank sensor with a multimeter, a simple tool that can save you time and money. Don’t worry if you’re not a car expert; we’ll walk you through each step in a way that’s easy to understand and follow. By the end, you’ll have the confidence to diagnose the issue on your own. Ready to get started? Let’s dive in and put you back in control of your car’s health.

Credit: m.youtube.com
Tools And Materials Needed
Checking a crank sensor with a multimeter requires specific tools. Having the right materials ensures accuracy and safety during testing. Let’s explore what you need.
1. Multimeter
A digital multimeter is essential. It measures voltage, current, and resistance. Choose one with a clear display. Make sure it has a continuity function.
2. Safety Gloves
Wear safety gloves to protect your hands. They guard against electrical shocks. Ensure they are insulated for extra safety.
3. Screwdriver Set
A screwdriver set helps remove covers. You might need various sizes. Ensure the set includes both flathead and Phillips types.
4. Vehicle Manual
The vehicle manual provides sensor locations. It guides you through the process. Keep it handy for reference.
5. Safety Glasses
Protect your eyes with safety glasses. They shield against debris. Choose glasses that fit comfortably.
6. Flashlight
A flashlight is useful for visibility. It helps in dark spaces. Ensure it’s bright and easy to handle.
7. Tape Or Marker
Use tape or a marker to label wires. This helps avoid confusion. Keep them nearby for quick access.
8. Cleaning Cloth
A cleaning cloth wipes surfaces. It keeps areas dust-free. Use it to clean sensor connectors.
9. Wire Cutters
Wire cutters trim excess wires. They ensure clean cuts. Opt for a sturdy pair.
10. Insulation Tester
An insulation tester checks wire insulation. It prevents shorts. Select one that’s easy to operate.
These tools and materials are crucial. They prepare you for testing a crank sensor. Always prioritize safety and precision.
Credit: www.nevsemi.com
Safety Precautions
Before diving into checking your crank sensor, prioritize safety. Electrical tasks can be risky. Proper precautions protect you from harm. Ensure a safe environment for your work.
1. Wear Protective Gear
Always wear safety goggles to protect your eyes. Gloves are essential too. They guard your hands from electrical shocks. Ensure your clothing is not loose. Loose clothing may get caught in moving parts.
2. Disconnect The Battery
Disconnect the car battery before you start. This prevents accidental electrical shocks. It also safeguards the car’s electronic systems. Avoid working on a live circuit.
3. Work In A Well-ventilated Area
Choose a space with good ventilation. Fumes from the engine can be harmful. Fresh air reduces the risk of inhaling toxic gases. A garage with open doors works well.
4. Use Insulated Tools
Use tools with insulated handles. Insulated tools protect against electrical currents. Avoid using metal tools without insulation. They increase the risk of shock.
5. Avoid Wet Conditions
Ensure your work area is dry. Moisture can increase electrical hazards. Never work in wet or damp conditions. Keep the area clean and dry for safety.
6. Keep A Fire Extinguisher Nearby
Have a fire extinguisher within reach. Electrical work can cause sparks. Be prepared to handle small fires quickly. Ensure it is suitable for electrical fires.
Locating The Crank Sensor
Finding the crank sensor is essential before testing it with a multimeter. Usually, it is located near the engine block or the transmission bell housing. Check your vehicle’s manual for exact placement to ensure accurate testing results.
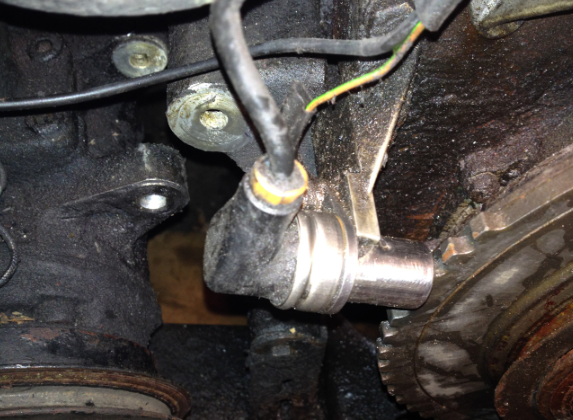
Locating the crank sensor is often the first step when you suspect there might be an issue with your vehicle’s engine performance. The crank sensor is crucial for measuring the position and rotational speed of the crankshaft, which is vital for engine timing. Finding it can seem daunting, but with a bit of guidance, you’ll be able to locate it like a pro. Have you ever wondered where this small yet significant component is hiding in your engine bay?Common Sensor Locations
Crank sensors are usually nestled near the crankshaft, which might be located at the engine’s front, back, or side. Often, they are positioned near the harmonic balancer or crank pulley. In some vehicles, you might find them near the flywheel. A quick tip is to consult your vehicle’s manual, which often provides diagrams or descriptions of the sensor’s location. But what if your manual isn’t handy? Look around the engine block for a small component attached with a wire harness, often near the engine’s bottom. Have you checked there yet?Identifying Your Sensor Type
Once you’ve pinpointed the general area, it’s time to identify the specific type of crank sensor your vehicle uses. There are two main types: inductive and Hall effect sensors. Inductive sensors typically have two wires, while Hall effect sensors usually have three. A closer inspection can help you identify your sensor type. Inductive sensors are often cylindrical, while Hall effect sensors might have a more rectangular shape. Knowing the type is crucial because it affects how you use the multimeter to test it. Do you know which type your vehicle has? If you’re unsure, a quick search online with your vehicle’s make and model can provide the answers. Understanding your sensor type can save you time and help ensure accurate testing results.Preparing The Multimeter
Preparing your multimeter is an essential first step when you’re about to check your crank sensor. Whether you’re a seasoned mechanic or a curious DIY enthusiast, understanding the basics of multimeter setup can make the difference between getting accurate readings and scratching your head in confusion. So, let’s roll up our sleeves and get your multimeter ready for action.
Setting Up The Multimeter
First things first, make sure your multimeter is in working order. Check the battery; a fresh one ensures consistent power. Now, turn the dial to the appropriate setting. For checking the crank sensor, you’ll want to use the resistance setting (often marked with an ohm symbol, Ω). This prepares the multimeter to measure the resistance levels, which are key indicators of sensor health.
Next, connect the probes. The black probe goes into the common port marked ‘COM’, and the red probe fits into the port marked ‘VΩmA’. This configuration is crucial for accurate readings. Imagine trying to decipher a puzzle with missing pieces; having the probes in the wrong ports is just that.
Understanding Multimeter Readings
Once your multimeter is set up, it’s time to take some readings. What do these numbers mean, anyway? When you measure the resistance of the crank sensor, you’re looking for a specific range. Typically, a healthy sensor will show a resistance between 200 and 1,500 ohms.
If your reading falls outside this range, it might be time to replace the sensor. Think of it as a health check-up for your car’s engine. Just like a doctor uses a thermometer to check your temperature, you’re using the multimeter to gauge your sensor’s condition. Does your reading look off? That’s your cue to investigate further.
So, what does your multimeter say about your crank sensor? Are the numbers in line with a well-functioning engine part, or are they waving a red flag? Understanding these readings empowers you to make informed decisions about your vehicle’s maintenance. Consider this your first step in taking control of your car’s health, turning numbers into actionable insights. Are you ready to interpret what your multimeter is telling you?
Testing The Crank Sensor
Testing the crank sensor is essential for vehicle maintenance. This small device plays a big role in engine performance. If it’s faulty, the engine may not start. Sometimes, it causes misfires or stalls. Fortunately, checking it with a multimeter is straightforward. A multimeter helps diagnose issues accurately. You can save time and money by doing this yourself.
Checking Resistance
First, set the multimeter to measure resistance. The crank sensor’s resistance should be within a specific range. Check the vehicle manual for exact values. Connect the multimeter probes to the sensor’s terminals. A reading outside the expected range indicates a problem. This step is crucial in identifying sensor issues early.
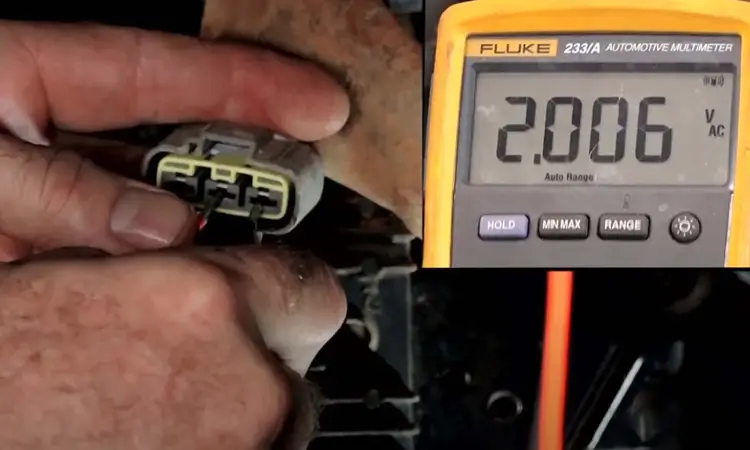
Voltage Testing
Switch the multimeter to voltage measurement mode. Turn on the ignition without starting the engine. Connect the probes to the sensor’s wiring harness. You should see voltage pulses as the engine turns. These pulses indicate the sensor is sending signals correctly. If there are no pulses, the sensor may be faulty.
Interpreting Results
Understanding the multimeter readings is key. Resistance readings should match the vehicle’s specifications. Voltage pulses confirm the sensor’s operation. If either test fails, consider replacing the sensor. Accurate interpretation ensures efficient engine function. Regular checks prevent unexpected engine issues.
Credit: rfidunion.com
Troubleshooting Common Issues
Checking a crank sensor with a multimeter helps diagnose engine problems. First, locate the sensor in your vehicle. Use the multimeter to test voltage and resistance, ensuring readings align with manufacturer specifications.
Troubleshooting common issues with your vehicle can be daunting, especially when it involves complex components like the crank sensor. However, understanding the basics can save you time, money, and stress. With a multimeter at your disposal, you’re already halfway through solving the problem. Have you ever been stuck on the side of the road, wondering why your car won’t start? It might just be a faulty crank sensor.Signs Of A Faulty Sensor
Identifying the signs of a faulty crank sensor is crucial. You might notice that your engine is misfiring or your car is hard to start. Sometimes, the check engine light might flash unexpectedly. A faulty sensor can also lead to poor fuel economy. If your vehicle is guzzling more gas than usual, it’s worth investigating. Do you hear unusual noises from the engine bay? It could be another hint pointing towards the crank sensor.Resolving Inaccurate Readings
Inaccurate readings can complicate diagnostics, but they aren’t insurmountable. Start by ensuring your multimeter is properly calibrated. A miscalibrated tool can lead you astray. Check the connections and ensure they’re clean and secure. Corrosion or loose wires can interfere with readings. Have you inspected the sensor itself? Physical damage or dirt accumulation can distort the data. Lastly, compare your readings with the manufacturer’s specifications. If there’s a significant deviation, it might be time for a replacement. Sometimes, a simple reset of the vehicle’s computer system can clear up discrepancies. Are you ready to take control of your vehicle’s health? With these steps, you’re well on your way.Tips For Sensor Maintenance
Maintaining your crank sensor is crucial for ensuring your vehicle’s engine runs smoothly and efficiently. With regular checks and simple maintenance steps, you can extend the life of your sensor and avoid unexpected breakdowns. Let’s delve into some practical tips for keeping your crank sensor in top-notch condition.
Inspect Regularly
Make it a habit to visually inspect your crank sensor every few months. Look for any signs of wear and tear, such as cracked wiring or corroded connectors. Catching these issues early can save you a lot of hassle down the road.
Keep It Clean
Dirt and grime can easily accumulate around your crank sensor. Use a soft brush or a can of compressed air to gently clean the area. A clean sensor ensures accurate readings and better performance.
Check Connections
Loose or corroded connections can lead to faulty sensor readings. Ensure that all connectors are tightly secured and free from rust. This simple check can prevent false signals that might cause engine misfires.
Test With A Multimeter
Regular testing with a multimeter can help you monitor your sensor’s health. Measure the resistance and compare it with the manufacturer’s specifications. If the readings are off, it might be time to replace the sensor.
Address Issues Promptly
If you notice any irregularities, such as engine stalling or rough idling, don’t ignore them. These could be signs of a failing crank sensor. Prompt action can prevent further damage and costly repairs.
Have you ever ignored a small issue only to have it turn into a bigger problem? Taking these maintenance steps seriously can save you from that headache. Your vehicle’s performance depends on the health of its components, and the crank sensor is no exception.
Frequently Asked Questions
How To Test A Crank Sensor With A Multimeter?
Set the multimeter to the ohms scale. Disconnect the sensor. Connect the multimeter probes to the sensor terminals. Check for resistance within the manufacturer’s specified range. Set multimeter to AC volts. Reconnect sensor, start engine, and measure voltage. Ensure reading matches manufacturer specifications.
Replace the sensor if readings are incorrect.
How Many Ohms Should A Crank Sensor Have?
A crank sensor typically has a resistance range of 200 to 1,000 ohms. Always refer to your vehicle’s manual for the exact specification. Testing the sensor with a multimeter ensures it’s functioning correctly.
How To Test If Your Crankshaft Sensor Is Bad?
Use a multimeter to check the sensor’s resistance and voltage. Look for inconsistent readings or no signal. Inspect for physical damage or loose connections. A diagnostic scanner can identify error codes related to the sensor. A faulty crankshaft sensor often causes engine misfires or stalling.
How To Check A Sensor With A Multimeter?
To check a sensor, set the multimeter to the correct setting. Connect the multimeter probes to the sensor terminals. Read the displayed value to verify if it matches the sensor’s specifications. Ensure proper contact for accurate readings.
Conclusion
Checking a crank sensor with a multimeter is simple. Follow the steps, and you’ll get accurate results. Always ensure your multimeter is set correctly. Safety first—disconnect the battery before starting. A faulty crank sensor can cause engine problems. Regular checks can prevent bigger issues.
Understanding your vehicle’s sensors can save you time and money. Maintain your car’s health by keeping an eye on these small parts. With practice, you’ll gain confidence in handling these tasks. Your car will thank you for the extra care.


