
Have you ever wondered if your thermocouple is working correctly? Maybe you’re dealing with inconsistent temperature readings or need to troubleshoot an appliance.
Testing a thermocouple with a multimeter can seem daunting, but it’s easier than you might think. Imagine the peace of mind you’ll have knowing your thermocouple is functioning properly, ensuring your equipment runs smoothly and safely. In this guide, you’ll discover simple steps to check your thermocouple with a multimeter, empowering you to take control of your maintenance tasks.
Dive in, and unlock the secrets to precise temperature measurements right at your fingertips!

Credit: www.wikihow.com
Thermocouple Basics
Understanding thermocouples is key to testing them effectively. These devices measure temperature using two different metals. They are widely used in various industries.
Thermocouples are reliable and cost-effective. Knowing their types and functions aids in accurate testing.
Function And Importance
Thermocouples detect temperature changes. They convert thermal energy into electrical voltage. This makes them essential in temperature monitoring.
Industries like manufacturing and food rely on thermocouples. They ensure processes run smoothly and safely.
Common Types
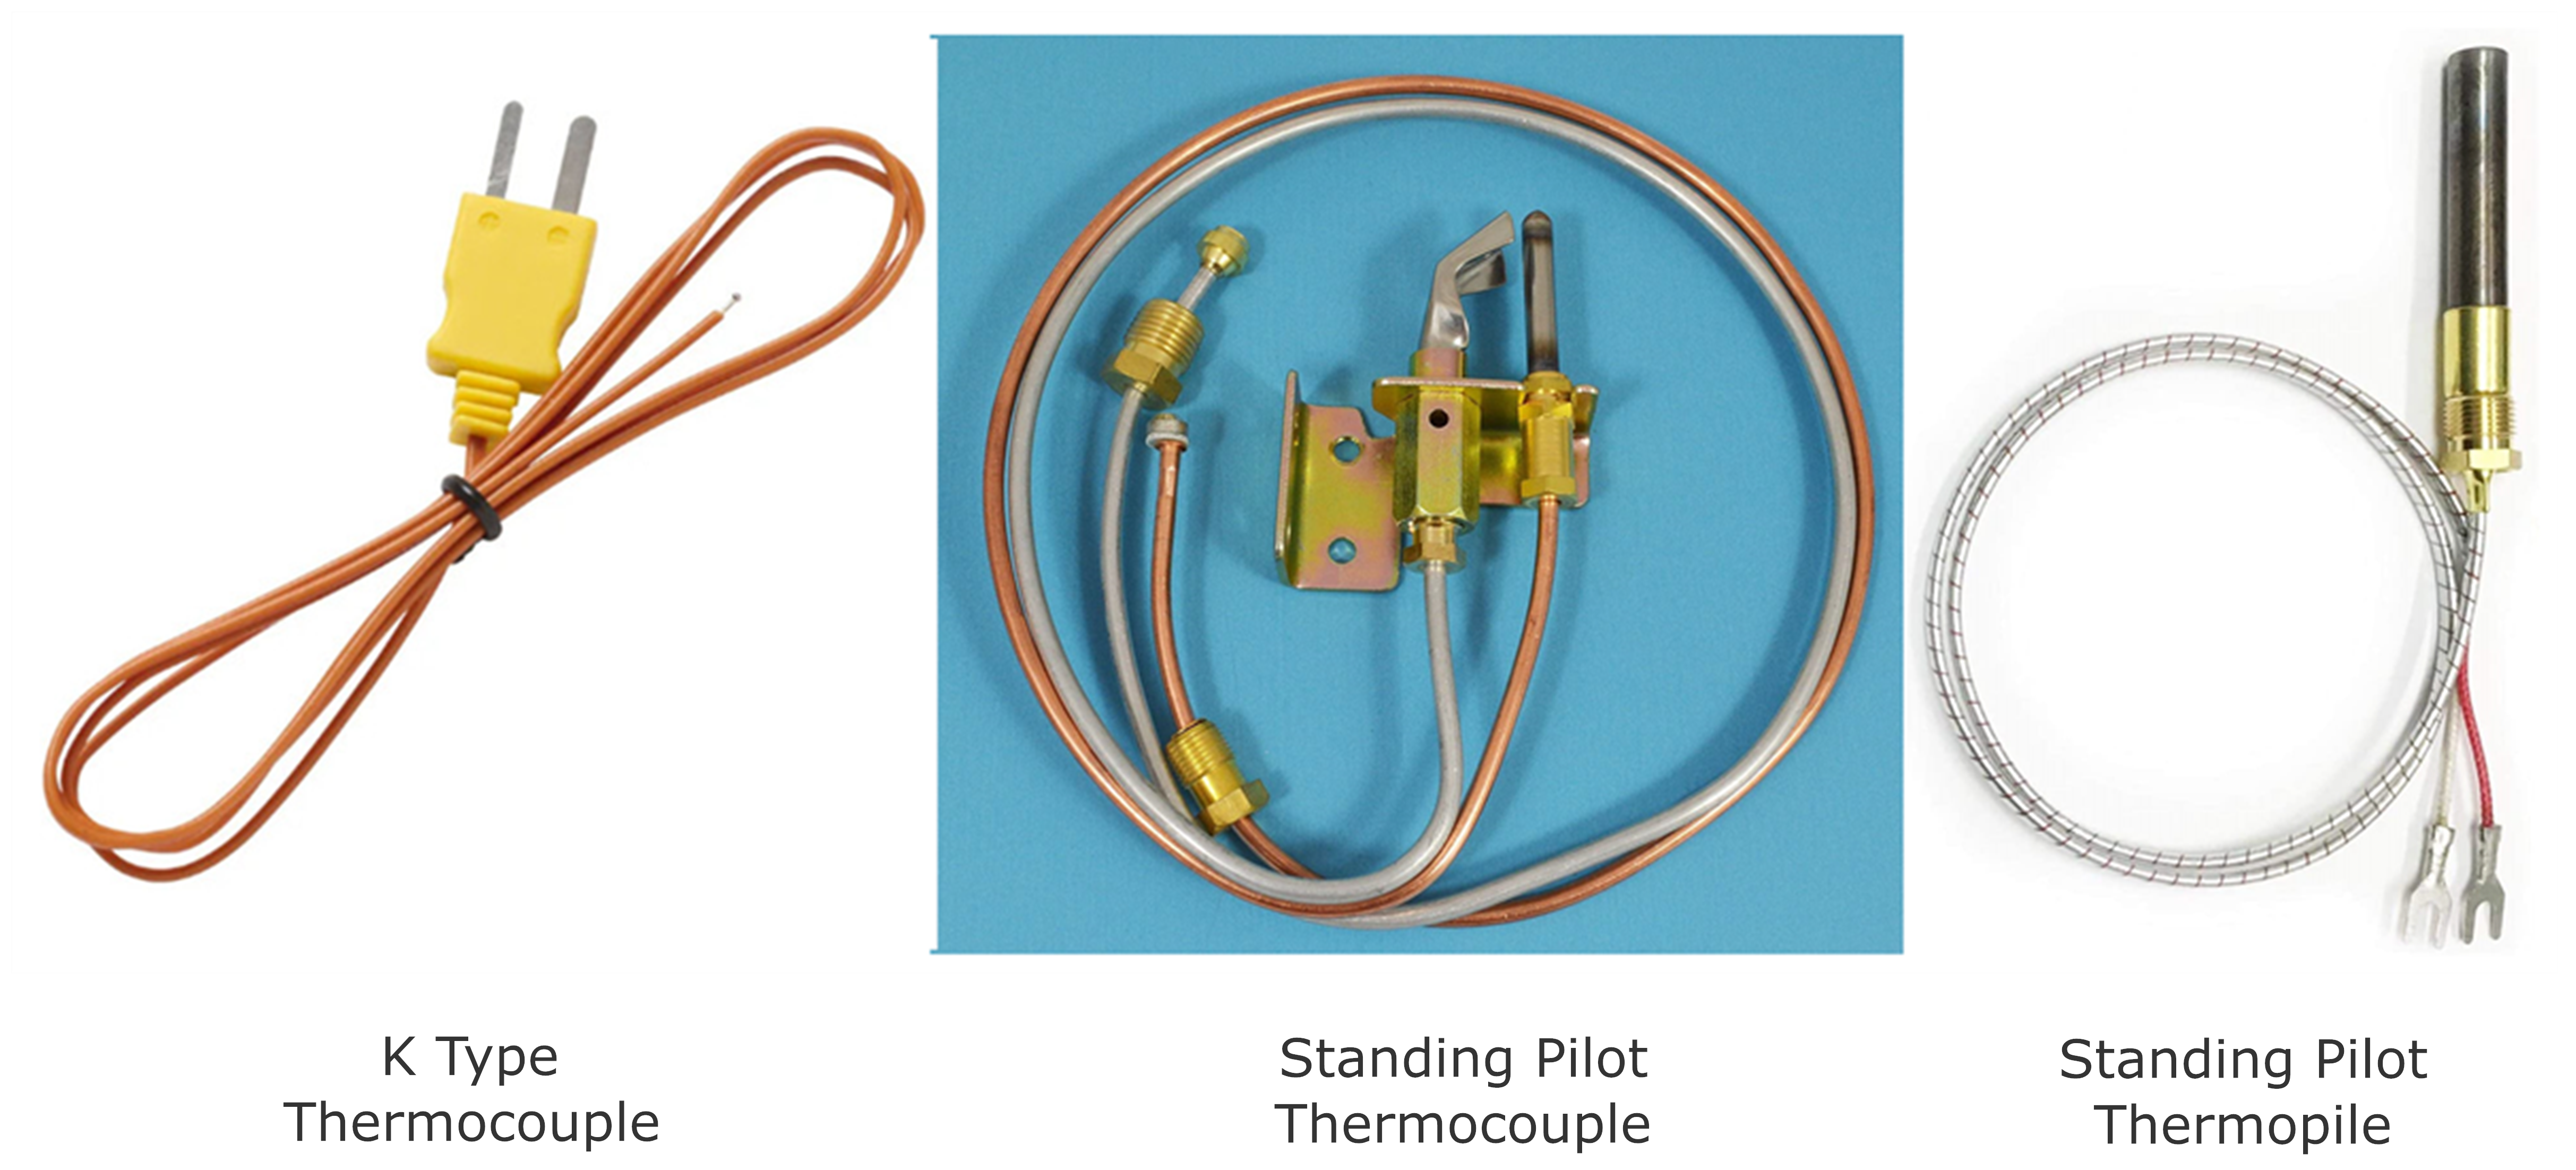
Several types of thermocouples exist. Each has specific uses and temperature ranges. The most common types include Type J, K, T, and E.
Type J works well for general purposes. Type K is suitable for high temperatures. Type T fits low-temperature environments. Type E offers a strong signal output.
Multimeter Essentials
Testing a thermocouple with a multimeter requires understanding the tool. Multimeters are essential devices for measuring electrical parameters. They help in diagnosing and troubleshooting electrical issues. Knowing the basics of multimeters can improve your testing skills.
Features To Consider
When choosing a multimeter, consider its range and accuracy. These features help in getting precise measurements. Look for a multimeter with a clear display. It aids in reading measurements easily. Another important feature is the durability of the device. A sturdy build ensures longevity.
Safety features are also crucial. A multimeter with overload protection can prevent accidents. Autoranging is a helpful feature too. It automatically selects the correct range for measurements. This makes the multimeter user-friendly, especially for beginners.
Types Of Multimeters
There are two main types of multimeters: analog and digital. Analog multimeters have a needle and dial. They are less common today but still useful for certain tasks. Digital multimeters are more popular. They have a digital display, making them easier to read.
Digital multimeters often come with advanced features. They can measure voltage, current, and resistance with high accuracy. Some models even test temperature and frequency. Choose the type that suits your needs and experience level.
Understanding these essentials helps in making informed decisions. It ensures accurate thermocouple testing and reliable results.
Safety Precautions
Testing a thermocouple with a multimeter requires careful handling to ensure safety. Always wear protective gear like gloves. Double-check connections to prevent electric shock or damage.
Testing a thermocouple with a multimeter is a straightforward task, but it demands careful attention to safety precautions. Whether you’re an experienced electrician or a DIY enthusiast, prioritizing safety can prevent accidents and ensure accurate results. Before diving into the technical steps, it’s crucial to understand and implement essential safety measures.Protective Gear
Wearing the right protective gear is the first step in ensuring your safety. Always use insulated gloves to avoid any accidental electrical shocks. Safety goggles are also a must to protect your eyes from any unforeseen sparks or debris. Remember, even if the risk seems minimal, taking these precautions can save you from serious harm.Common Hazards
Working with electricity involves inherent risks that should not be underestimated. One common hazard is the risk of electric shock, especially if the equipment is faulty or if you accidentally touch exposed wires. Another potential danger is short-circuiting, which can occur if metal tools come into contact with live parts. Think about this: Is the peace of mind worth skipping these safety steps? Your well-being should always come first. When I first tested a thermocouple, I underestimated the importance of these precautions and ended up with a minor shock that served as a valuable lesson. It’s easy to think that accidents won’t happen to you, but preparation is key. By taking the time to suit up and understand the hazards, you’re not just protecting yourself, but also ensuring a smooth and successful testing process.Preparing For The Test
Getting ready to test a thermocouple with a multimeter is a straightforward process, but preparation is key to obtaining accurate results. If you’ve ever felt your thermometer readings were off, this is your chance to get to the bottom of it. Before you dive into testing, ensure you have everything you need and check the thermocouple’s condition.
Gathering Tools
First things first—grab your trusty multimeter. If you’re like me, you might have misplaced it a few times, so make sure it’s in working order. You’ll also need a pair of gloves for safety, especially if the thermocouple has been recently used. A pen and paper can be handy to jot down your readings. Do you have all of these within reach?
Inspecting The Thermocouple
Before testing, take a moment to inspect the thermocouple. Look for signs of wear or damage, like frayed wires or corrosion. These could lead to inaccurate readings. A damaged thermocouple might need replacement, not just testing. Have you noticed any unusual wear on yours lately?
Checking the connections is equally important. Loose or disconnected wires can alter results. Ensure the thermocouple is securely attached to its setup. This might sound basic, but a simple oversight can lead to frustration later on. Are the connections tight and intact?
By paying attention to these details, you set the stage for a successful test. The preparation phase is often where mistakes are caught before they become bigger issues. Remember, the devil is in the details—how carefully have you prepared for your test?
Testing Process
Testing a thermocouple with a multimeter is a straightforward task. This process ensures your thermocouple functions correctly. A faulty thermocouple can lead to inaccurate temperature readings. Follow these steps for accurate testing results.
Setting Up The Multimeter
First, set your multimeter to measure voltage. Look for a V symbol on your device. Connect the multimeter probes to the thermocouple wires. The red probe connects to the positive wire. The black probe connects to the negative wire. Ensure tight connections for accurate readings.
Measuring Voltage Output
Next, apply heat to the thermocouple tip. Use a heat source like a lighter. Observe the multimeter screen. It should display a small voltage. This voltage indicates the thermocouple is working. If no voltage appears, check connections. Incorrect readings suggest a faulty thermocouple.
Interpreting Results
Checking a thermocouple with a multimeter involves measuring voltage to ensure accurate temperature readings. Set the multimeter to millivolts. Then connect it to the thermocouple wires. Reading should change with temperature variation. This simple test helps verify if the thermocouple functions properly.
Interpreting the results of your thermocouple test is crucial in determining whether it’s functioning correctly or if there’s a potential issue. Once you’ve taken your readings with a multimeter, understanding what those numbers mean can help you decide your next steps. Let’s break it down so you can confidently assess your thermocouple’s condition.Normal Readings
A healthy thermocouple will produce a voltage that corresponds to the temperature it’s exposed to. You can compare the reading you get to standard thermocouple tables, which list the expected voltage output at various temperatures. If your thermocouple reads as expected, congratulations! It’s likely functioning properly. Standard readings can vary slightly depending on the type of thermocouple and the specific environment. Double-check the specifications for your specific thermocouple type. This ensures you’re comparing apples to apples.Troubleshooting Issues
If the readings are off, it’s time to dig deeper. First, ensure your multimeter is set to the correct measurement type and range. A common mistake is having the multimeter set incorrectly, leading to skewed readings. Check the connections at both ends of the thermocouple. Loose or corroded connections can cause inaccurate readings. Tightening or cleaning these can often solve the problem without needing to replace the thermocouple. In some cases, the thermocouple might be faulty. Before deciding on a replacement, consider if the thermocouple has been exposed to extreme conditions beyond its design limits. This could lead to wear or damage. How do you decide when to replace a thermocouple? If readings remain inconsistent after addressing common issues, replacement might be the best option. Always ensure you’re using a suitable thermocouple type for your specific application to avoid recurring issues. By understanding your readings and acting accordingly, you maintain the efficiency and safety of your equipment. Have you ever been surprised by the results of a simple test? Share your experiences and insights in the comments below!Advanced Testing Techniques
Testing a thermocouple with a multimeter involves checking its resistance and voltage. Start by setting the multimeter to measure resistance. Connect the thermocouple wires to the multimeter probes and read the resistance value. Then, measure the voltage to ensure the thermocouple functions correctly.
Testing a thermocouple with a multimeter is a straightforward process for most, but what if you need more precision? Advanced testing techniques can help you achieve more accurate results. These methods are particularly useful if you’re dealing with high-stakes environments where precision is crucial, such as laboratories or industrial settings. By employing these techniques, you can ensure that your thermocouples deliver the most reliable readings possible.Temperature Calibration
Calibrating your thermocouple is essential for precise temperature measurements. Begin by immersing the thermocouple in a stable temperature environment, like an ice bath or boiling water. Compare the multimeter reading with the known temperature to check for discrepancies. You can then adjust your thermocouple’s settings based on these findings. This method is crucial if you’ve noticed inconsistencies in your temperature readings. Calibration isn’t a one-time task; make it a regular part of your maintenance routine.Using Specialized Equipment
While a multimeter is versatile, specialized equipment can offer even more detailed insights. Devices like a precision temperature calibrator can provide highly accurate benchmarks. These tools allow you to test the thermocouple across various temperature ranges, ensuring it performs well in all conditions. Using such equipment might seem excessive for casual users. However, if you work in a field where accuracy is paramount, the investment can be worthwhile. Have you ever considered how much a small error in temperature reading could cost you in your specific field? Testing your thermocouple with advanced techniques can seem daunting. Yet, the peace of mind that comes with accurate measurements is invaluable. Whether you’re using temperature calibration or specialized equipment, these methods can enhance your testing process.Maintaining Your Thermocouple
Testing a thermocouple with a multimeter ensures accurate temperature readings. Start by setting the multimeter to millivolts. Connect the multimeter probes to the thermocouple wires and observe the reading. If the value is zero or erratic, the thermocouple may be faulty and require replacement.
Maintaining your thermocouple is essential for ensuring accurate temperature readings. Regular upkeep not only extends its lifespan but also prevents any unexpected failures. Think of it as giving your trusty thermometer a little TLC. You wouldn’t want to end up with a cold stove or a malfunctioning kiln due to a neglected thermocouple, would you?Regular Inspection
Regularly inspect your thermocouple to catch any signs of wear and tear early. It’s like checking the tires on your car—simple but necessary. Look for visible damage such as frayed wires or corrosion. If you spot any, it might be time to consider a replacement. A quick tip: set a calendar reminder for a monthly inspection. This way, it becomes a routine task rather than a forgotten chore. You’ll thank yourself later when everything runs smoothly.Cleaning Tips
Cleaning your thermocouple is crucial for maintaining its accuracy. Dust and grime can accumulate, affecting its performance. Use a soft cloth to gently wipe the surface, ensuring there are no residues left behind. Avoid using harsh chemicals as they can damage the thermocouple. A simple mix of water and mild soap works wonders. Dry it thoroughly before reinstallation to prevent moisture from interfering with its function. If you’ve ever had a thermocouple fail due to neglect, you know the frustration. Keeping it clean and inspected is your best defense against such issues. Do you have any personal cleaning tips or tricks that have worked wonders for you? Share them with us in the comments!Common Mistakes
Testing a thermocouple with a multimeter seems easy. Yet, common mistakes can lead to incorrect readings. These errors frustrate many users. Understanding these mistakes helps ensure accurate results. Awareness of these pitfalls is key.
Incorrect Setup
Setting up the multimeter wrong is a frequent error. Ensure the multimeter is on the correct setting. Use the right mode for measuring voltage. This prevents false readings. Check the connections. Loose wires cause inaccurate results. Make sure all connections are secure.
Avoiding Misreadings
Misreadings are common and easily avoided. Keep the multimeter probes clean. Dirt affects readings. Maintain a stable environment. Temperature changes impact accuracy. Avoid drafts or direct sunlight. These conditions skew readings. Use the multimeter correctly. Follow the manual for best practices.

Credit: www.youtube.com
Credit: support.johnstonehvac.biz
Frequently Asked Questions
How To Check If A Thermocouple Is Ok Or Not?
Check a thermocouple by measuring its voltage output using a multimeter. Connect the multimeter to the thermocouple leads, then heat the thermocouple tip. A functioning thermocouple will show a voltage change on the multimeter display. If there’s no change, the thermocouple may be faulty.
What Ohms Should A Thermocouple Read?
A thermocouple typically reads between 1 to 20 ohms. This range indicates a functioning sensor. Higher resistance may suggest issues like poor connections or damaged wires. Regular maintenance ensures accurate readings, helping in efficient temperature monitoring and control. Always verify with a multimeter for precise measurements.
What Multimeter Setting For Thermocouple?
Set the multimeter to millivolts (mV) for thermocouple measurement. Ensure proper connection with the thermocouple leads. Select the appropriate thermocouple type on the multimeter if required. Check for stable readings for accurate temperature measurement. Always verify compatibility with the thermocouple type used.
Should A Thermocouple Have Continuity?
Yes, a thermocouple should have continuity. It indicates the circuit is complete and can measure temperature accurately. If there’s no continuity, the thermocouple might be damaged or broken. Regular checks ensure proper functioning and reliable temperature readings, which are crucial for accurate measurements.
Conclusion
Testing a thermocouple with a multimeter is simple. Follow the steps carefully. First, ensure safety by turning off power. Next, connect the multimeter leads correctly. Measure the resistance to check for faults. A stable reading indicates a functioning thermocouple. If readings fluctuate, replace it.
Regular testing ensures accurate temperature readings. This prevents equipment damage. Always keep your tools in good condition. Practice these steps to maintain efficiency. Remember, correct testing saves time and resources. Keep learning and stay safe.




